X2 Packaging Editor
GENERAL DESCRIPTION
The main components of a model are:
Required
The main variables of a model (e.g. Length (length), Width (width), Depth (depth)) are used in the frontend for scaling. It may also have other important variables (e.g. Margin (edge of the svg), Thickness (thickness of the 3D model), etc.).
Optionals
Other variables that help to create the model. They can contain numbers, formulas or other needed information. These variables can be divided into 2 categories:
normal: used for the creation of the model
internal: used for characteristics of the packaging system.
Most of the normal variables are the same as those defined in the CAD software files. Sometimes new variables can be defined here to support the process of creating the model. (e.g. a value/formula is used x times, so it is stored in a variable).
The current internal variables are:
Show_Overall_Dimensions: shows/hides the values of the main variables of the model (length (length), width (width), depth (depth)).
Show_Order_Number: Shows/hides the order number in the production PDF
Order_Number: The order number in the production PDF
Show_Bleed: Show/hide the bleed of the model
Bleed_Outer_Stroke_Color: The color of the bleed
Bleed_Inner_Stroke_Color: The type of background color of the bleed
Bleed_Offset: The distance between the bleed and the die cut
Bleed_Width: The width of the bleed
Hide3D: Used to hide 2D elements in the 3D model
Show_Icc_Color: Shows/hides CMYK colors
Designer_Measurement_Width: Measurement of the model on the X axis, used for designers
Desinger_Measurement_Height: Measurement of the model on the Y-axis, used for designer
In_Designer: show/hide the measurement lines on Y-axis, used for designer
Show_Trimbox_Dimensions: Shows/hides the trimbox of the model
Reversed_Bleed: Defines the orientation of the bleed
0 - for counterclockwise bleed
1 - for clockwise bleed
Linked_3D_Model: The name used by the 3D soft to link to the 2D model (should be the same name as the model, without .json extension)
Global_Trimbox: Turns on/off the use of the trimbox in the Global Helpers.
The values of the internal variables must not be changed, as this will cause behavior changes of the packaging system in the frontend. They can be changed within the editor as long as they are not saved.
SvgWidth
Here you can enter the formula for the width of the model. If the field is left empty, the editor will automatically calculate the width based on the elements that make up the model.
SvgHeight
Here you can enter the formula for the height of the model. If the field is left empty, the editor will automatically calculate the width based on the elements that make up the model.
FormatWidth
This is the formula that defines the width used in the frontend. It should be the width of the model (like SvgWidth, but without the border of the model). If the field is empty, it will be automatically calculated as follows: SvgWidth - 2 * Margin, where Margin is the variable Margin (symbol M) of the model.
FormatHeight
Same as FormatWidth, but for height.
Unit
Unit of measurement used. (mm or cm);
Limits
Suppose you want to prevent the frontend user from setting the width higher than the length. You can do this by defining a limit. All you need to do is set the formula ($W <= $L) and the warning message "Width must be narrower than length". In the frontend, the user will see the warning message if the result of the formula ($W <= $L) is false (not true).
Pages
A model can have one or more pages. A page contains multiple entities:
Offset: The offset is the "origin" of the page. It means that this point represents (0,0) in coordinates and all points defined on the page refer to it.
Cuts: contains all the cuts of the model. These are the blue lines in the svg. A cut is formed from:
Start: defines a starting point of the cut (X and Y axis) relative to the offset of the page.
Lines: Lines are defined by the endpoint only since the editor assumes that the start point of a line is the end point of the previously created element (or the start point of the cut if the current line is the first element in that cut)
Circles: Circles are defined as Lines. But has more properties that are specific to circles
Ellipses: Ellipses are defined like Lines. But has more properties that are specific to ellipses.
Folds: contains all the folds of the model. They have the same properties as Cuts, but their color is red.
Bleeds: contains the bleeds of the model. They have the same properties as Cuts, but their color is green.
No Print Area: contains the non-printable areas of the model. They have the same properties as Cuts, but their color is green.
Helpers: these are usually for internal use. They implement the functions of the packaging system and some are bound to the internal optional variables.
Global Helpers
These, like the helpers on a page, are for internal use.
Commands
A command is a function of the system that assists the user in creating a package. Its purpose is to automate the calculation of mathematical formulas or to automatically calculate a result that would require a complex series of steps to obtain.
The commands use internal structures to create the desired effect:
INTERNAL STRUCTURES
Point
It is represented by an ordered pair (x, y), as in Euclidean geometry. The x/y values can be filled with constants, variables of the model or formulas.
Line (segment)
It is defined by the start and end points. It can also be interpreted as a segment. In the editor it is displayed as a dotted line between the 2 points.
Construction Line
Corresponds to the Line, but is displayed as an "infinite" dotted line.
Circle
It is defined by the center point and radius.
A command has 2 elements:
Name: A meaningful name for the command, which must be unique among the other command names created in the editor.
Parameters: A list of specific parameters
Each command has a special parameter called "Reference", which is an ID. To use the result of a command, its reference ID must be used, just like any other variable. Therefore, the value of this parameter must be unique among the other declared commands.
USE OF COMMANDS
Commands are not bound to the entities defined in the Pages section. Instead, the Pages entities use the commands to create the wrapper, using their result via the Reference ID.
a command is declared beforehand and cannot use entities created in the Pages section.
a command can use variables declared in the Required and Optionals sections or the result of a command created before it.
The elements constructed by a command (points, lines, arcs, etc.) are not rendered in the final model. To see these elements, the model must be rendered in the editor with the “Additionals mode” option enabled.
The commands use the offset of page-1, so each result is relative to that offset.
The commands usually return a result. This result can be a number or a container with several partial results. For example, the command "reblend" returns 3 points and an angle.
To use the results of the container, you must use the Reference ID of the command and then append a dot (.) and the name of the desired partial result. The general scheme for getting a partial result in a container is:
$[Reference_ID_command].[sub_result_1].[sub_result_1_1].[sub_result_1_1_1]...Suppose you have a command whose Reference ID is set to FooBarCommand. Let's also assume that this command returns a container with several partial results: a point called fooPoint and a line called barLine. To access the X coordinate of the resulting point, we would use: $FooBarCommand.fooPoint.x.
Note: The X and Y axis lines of the Cartesian coordinate system are predefined and you can use them. Their reference ID is $ox for the X axis and $oy for the Y axis.
Some of the commands available in the editor are:
addVariable
Creates a variable similar to those defined in the Optionals section.
Parameters:
value: constants, variables of formulas
point
Defines an instance of the point structure.
Parameters:
X: the value for the X axis: constants, variables of formulas
Y: The value for the Y-axis: constants, variables of formulas
Return value: Instance of the Point
Accessible partial results:
x: the set value for the X field
y: the set value for the Y field
Example: $fooPoint.x
pointDistance
Calculates the Euclidean distance between 2 points.
Parameters:
Point 1: ID of the first point
Point 2: ID of the second point
Return value: An integer/float value
line
Creates an instance of line.
Parameters:
Start Point: ID of the start point (point) (must be an instance of the point structure)
End Point: ID of the end point (point) (must be an instance of the Point structure)
Return value: the instance of the internal structure of Line
Accessible partial results:
point: value of the first point (instance of Point)
point2: value of the second point (instance of Point)
Example: $barLine.point
circleRadius
Creates an instance of the circle.
Parameters:
Center Point: ID of the center point (must be an instance of the Point structure).
Radius: Radius of the created circle (int | float)
Return value: Instance of Circle
Accessible partial results:
center: Value of the center point field (instance of Point)
radius: the value of the radius field (int|float)
Example: $fooCircle.center
linesAngle
Calculates the angle between 2 lines in radians. (if intersection exists)
Parameters:
First Line: ID of the first line
Second Line: ID of the second line
Return value: Angle between the two lines. (radian measure)
linePointAngleDistance
Given a start point, creates the endpoint of the line at a given distance and angle and returns a line defined by these points.
Parameters:
Point: ID of the starting point
Angle: Angle of the resulting line relative to the X axis. (in radians)
Distance: the distance between the start and end point (int | float)
Return value: the instance of Line
bisector
Returns the bisector of the acute angle of 2 lines.
Parameters:
Line: ID of the first line
Line: ID of the second line
Return value: the instance of Line representing the angle bisector
con
Returns a construction line created by offsetting another given line.
Parameters:
Line: ID of the line
Offset: the offset of the resulting line (int | float)
Return value: the instance of Line
rotateLine
Returns a line rotated by a given angle and point.
Parameters:
Line: ID of the line
Point: ID of the pivot point around which the rotation is performed
Angle: the angle in radians
Return value: the instance of the line given as a parameter, but rotated.
INTER
Returns the intersection of 2 lines.
Parameters:
Line: ID of the first line
Line: ID of the second line
Return value: the instance of Line
circleLineInter
Returns the intersection of a given circle and a line.
Parameters:
Circle: ID of the circle (must be an internal circle structure).
Line: ID of the line
Intersection Point: the intersection point to be returned by the command (if the line is tangent to the circle, there is only one intersection point, so any value of the parameter returns this point)
Return value: the instance of Point
REBLEND
Creates a smooth transition at the intersection of two lines. An arc with a given radius is created such that the two lines are tangent to the arc.
Parameters:
Line 1: ID of the first line
Line 2: ID of the second line
Reblend radius: the radius for the arc (float)
Return value: container with further partial results
Reachable partial results:
center: the point that represents the center of the reblend arc (instance of Point)
firstPoint: one of the points at the extremities of the reblend arc (instance of Point)
secondPoint: one of the points at the extremities of the blend arc (instance of Point)
angle: the angle of the blend arc (in radians)
Example: $reblend.center | $reblend.angle
BLEND3
Creates a smooth transition at the intersection of 3 lines by creating an arc such that the 3 lines are tangent to the arc.
Parameters:
Line 1: ID of the first line
Line 2: ID of the second line
Line 3: ID of the third line
Result value: Container with further partial results
Reachable partial results:
center: the point representing the center of the crossfade arc (instance of Point)
firstPoint: one of the points at the extremities of the blend arc (instance of Point)
secondPoint: one of the points at the extremities of the blend arc (instance of Point)
radius: the radius of the blend arc (int | float)
Example: $blend3.firstPoint | $reblend.radius
Helper functions:
A function performs a task for a given input (list of arguments) and returns an output based on the calculations performed with the input.
Several functions are defined in the editor that can be used as utilities when creating a model. These functions can be used to calculate mathematical results or use shortcuts to facilitate the model creation process.
Usage:
A function is called within a formula, which then returns the result to be used further by the system. This means that it can be used within variables, commands, limits, etc.
Example of a call: [name_of_function](arg1, arg2, ..., argN)
where
name of function: the name of the function to use
arg1, arg2, ..., argN: list of parameters/arguments that depend on the called function
In the following section describing functions, we will assume that an expression is a combination/sequence of constants, variables, functions, and operators that are evaluated by the system and returns a result that is considered a value. Therefore, an expression will end up being calculated as a value.
Available functions:
step
input:
expression, value_1, test_value_1, value_2, test_value_2, ... value_n, test_value_n, [else_value].
Where n is an arbitrary number, else_value is an optional argument as an expression.
Description: Used when checking whether a value is part of a given range of values. The function checks from left to right whether the value of the first argument is strictly less than a test_value_i (using the < operator) from a list of pairs given as arguments. If the first test is true, it returns value_i as the result and terminates the execution of the function. Optionally, a final else_value may be specified at the end, which is returned if none of the tests return true.
Output:
value_i, where i is the index of the first test_value_i check true
value_i, where i is the index of the first test_value_i check is true
else_value (if provided), if none of the above is true
Example: step($Thickness, 1, 0.5, 2, 1, 3, 2.5, 5)
Returns: 1, if $Thickness < 0.5, 2, if $Thickness < 1, 3 if $Thickness < 2.5, or 5 otherwise
stepUp
Description:
Like step, but the check is performed with the "<=" operator.
eCase
Input:
value_1, test_1, value_2, test_2, ..., value_n, test_n, else_case,
where n is an arbitrary number and else_case is an expression.
Description:
Implements if-else case returns different results depending on which case is chosen ("true"). The arguments consist of one or more pairs of (value, test) and a final else_case value, used as follows:
value:
any expression
test:
any expression that returns a boolean value (true/false).
The pairs are evaluated from left to right. The first test that returns True terminates the tests and returns the value.
Output:
value_i, where i is the index of the first test_i which is true
else_case if none of the above is true
Example: eCase(10, $Thickness < 1, 15, $Thickness == 1.5, 20, $Thickness <= 3, 50)
Returns: 10 if $Thickness < 1, 15 if $Thickness == 1.5, 20 if $Thickness <= 3 or 50 otherwise
eMinMax:
Input:
value_to_check, min, max
Description:
Checks if the first argument is in the interval/range [min, max] values. If yes, it is returned, otherwise, min or max is returned depending on whether the argument is less than min or greater than max.
Output:
value_to_check if value_to_check is greater than or equal to min and less than or equal to max
min, if value_to_check is less than min
max, if value_to_check is greater than max
Example: eMinMax($L + $W, 0.5, 3)
Returns:
$L + $W, if $L + $W >= 0.5 and $L + $W <= 3
0.5, if $L + $W < 0.5
3, if $L + $W > 3
round
input:
expression, [precision = 0]
Description:
Rounds the specified value (expression) to a precision.
Output:
The rounded value
ceil
Input:
expression
Description:
Round up fractions, rounded to the nearest integer.
output:
rounded expression
floor
Input:
expression
Description:
Round fractions, rounded to the next smallest integer.
output:
Rounded expression
eRound
Input:
expression, nearest
Description:
Rounds value/nearest to 0, then multiplies by nearest.
Output:
Result of the above formula
Example: eRound(10.7, 2)
Returns: 10
eRoundDown
Input:
expression, precision
Description:
Rounds down the value by calculating: floor(espression/precision) * precision and the integer value of its (like applying a lower bound to the result) If precision is 0, floor(expression) is returned
Output: Result from above
eRoundUp
Input:
expression, precision
Description:
Rounds up the value by calculating: ceil(expression/precision) * precision.
if precision is 0, ceil(expression) is returned
Output:
Result from above
eTrunc
Input:
expression, precision
Description:
Truncates the value of the argument to precision
Output:
Truncated ecpression
cos, sin, tan
Input:
Expression in radians
Description:
Calculates the cosine/sine/tangent of the expression.
Output:
Cosine/sine/tangent of the expression
asin, acos, atan
Input:
expression
Description:
Calculates the arc cosine/sine/tangent of the expression.
Output:
Arc cosine/sine/tangent of the expression
deg2rad
Input:
value
Description:
Converts the value (degrees) to radians equivalent.
Output:
Value in radians
rad2deg
Input:
expression
Description:
Converts the radian value to the corresponding value in degrees
Output:
Value in degrees
min, max
Input:
value_1, value_2, ..., value_n
Description:
Calculates the minimum/maximum value of the specified arguments.
Output:
Minimum/maximum value from the argument list.
sqrt
input:
expression
Description:
Calculates the square root of the argument.
Output:
Square root of the expression
abs
Input:
expression
Description:
Calculates the absolute value of the argument
Output:
Absolute value of the expression
pow
input:
expression
Description:
Calculates the exponential expression of expressionm.
Output:
Exponential expression of the expression
intval
Input:
expression
Description:
Calculates the integer value of the expression
Output:
The integer value of the expression
getSign
Input:
expression
Description:
Calculates the sign of the expression
Output:
1: Value is positive (>= 0)
-1: Value is negative (< 0)
getIntersectLineLine
Input:
point_1_x, point_1_y, point_2_x, point_2_y, point_3_x, point_3_y, point_4_x, point_4_y
Description:
Calculates the intersection of the two straight lines (if it exists): (point_1_x, point_1_y, point_2_x, point_2_y) and (point_3_x, point_3_y, point_4_x, point_4_y).
Output:
Container with two values: intersection_point_x, intersection_point_y
Callable by $result[0] and $result[1].
getIntersectLineCircle
Input:
point_1_x, point_1_y, point_2_x, point_2_y, arc_radius, arc_center_x, arc_center_y
Description:
Calculates the intersection point(s) of the line and the circle/arc (if any).
Output:
Container with two values:
0: first point of the intersection:
$result[0][‘x’], $result[0][‘y’]
1: second point of the intersection
$result[1][‘x’], $result[1][‘y’]
getLineAngle
Input:
point_1_x, point_1_y, point_2_x, point_2_y, point_3_x, point_3_y, point_4_x, point_4_y
Description:
Calculates the small angle (<=90) between two straight lines.
Output:
Angle in radians
eUnits
Input:
unit, result_M, result_I
Unit: string value, can be 'M' (for metric system) or 'I' (for imperial system)
Description:
Returns the value result_M or result_I depending on the unit argument.
Output:
the corresponding value for the selected unit
CREATE A MODEL
To better understand how to create the model, we will show you how to implement a basic model - a rectangle that has the length (length) and width (width) as required variables.

1.) By default, when you open the editor, there is already a default model that has all components predefined. Name the new model and press "Save as" to create it.
2.) Set the unit for your model (cm or mm):

3.) Add the required variables: Length and Width.
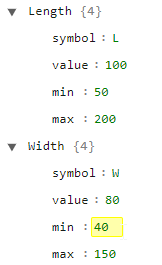
where:
Symbol represents the variable placeholder that will be used later in formulas preceded by $ sign ($L, $W).
Value the default value for this variable
Min - minimum value for this variable, which can be set by the frontend user
Max - maximum value that can be set by the frontend user
4.) Add optional variables as we did above for the required variables.
5.) Set the formulas for svgWidth and svgHeight to define how big the model is:

In our case, svgWidth is 2 * Margin(left and right) + Length; SvgHeigth is defined in the same way.
6.) Open Pages > page-1 > offset and set the desired offset for the model.

In our case the origin of the page is the point ($M,$M), where $M is the margin variable.
7.) Now the moment has come to define the cuts of the page.
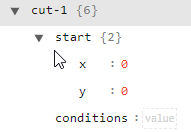
By default, the model has an empty cut called cut-1..
1.) You can rename it as you like, using only letters, numbers, - and _.
2.) Set the starting point of the cut by editing the start tag.
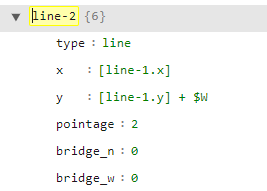
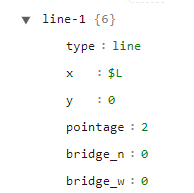
3.) Add new elements (line, circle, ellipse). Name your new elements and enter the formula for their end point:
4.) As you can see, in the formula for line-2 we have [line-1.x] and [line-1.y]. This means that you don't have to repeat the formula, you can use an existing formula. In our case the formula from line-1. This is useful if you have large formulas.
5.) Repeat step #3 until your section is defined.
8.) For folds, bleeds, and no_print_area do the same as for cuts.
9.) Press "Render Model" each time you want to see the changes made to your model.
10.) If you want to save your model, press:
"Save" to save the model to the current file (shown in the model input from the top of the page) ,
"Save As" to save your model to a new file.


CREATING A MODEL WITH COMMANDS (OPTIONAL)
Let's say we want to create a transition at one of the corners of this rectangle. We can use the commands to make it (it would make it faster if the angle between the 2 lines was other than s 90 degrees). We want to use the REBLEND command for this. Here are the steps:
1.) Repeat the first 6 steps from the "Creating a Model" section.
2.) Define the lines:
We need two lines for the REBLEND command. We start by defining each point of each line: PointA, PointB, PointC.
|
|
Now the lines: Line1, Line2
3.) Define the transition with:
If we render the model with “Additionals” mode enabled, we get this:
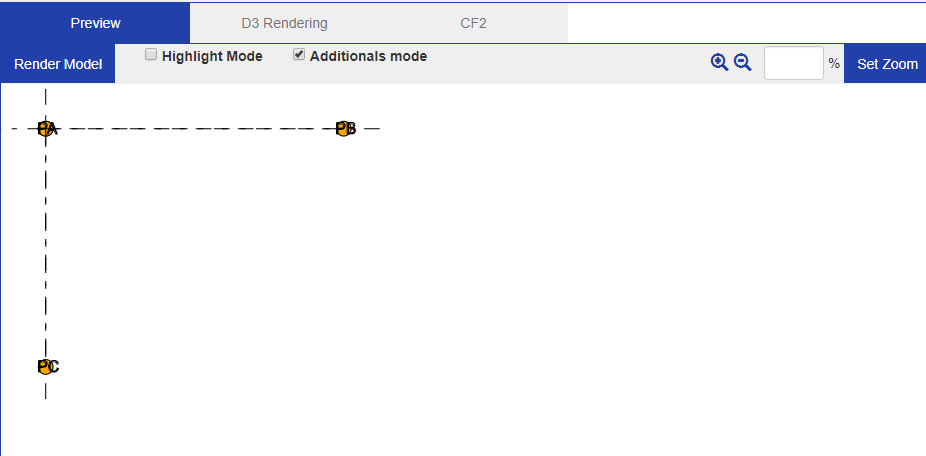
We see only the three defined points, PA, PB, PC. The reblend command does not render any elements, it only saves them. You will have to render them manually when you see the result.
4.) Create the rectangular shape again, but with the blending.
When we add the cuts, we add a circle for the blending. In our case, we want the circle to be inserted in the upper left corner, at the very beginning.
We need to change the start of cut-1 from (0, 0) to one of the points resulting from the reblend command. (because the reblend command returns two points - the start/end points of the blend arc).
I choose the second point of the blend as the starting point since I will be creating the rest of the cuts in a clockwise direction.
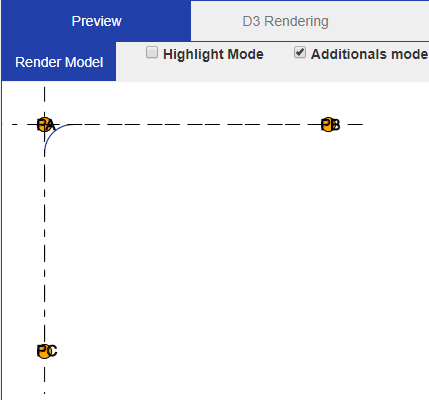
Then we create the circle using the variables stored in reblend for the center of the circle and the angle. The radius should be the same as the one entered in the blend command.
If we render the model up to this point, we can see the circle:
5.) Repeat the remaining steps:
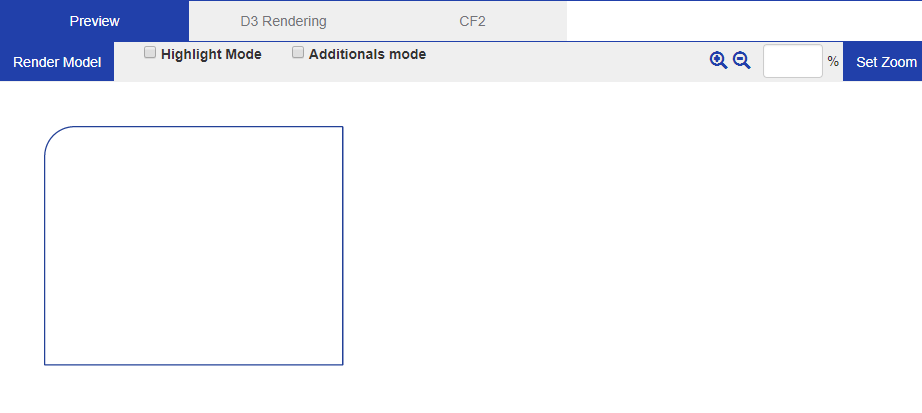
Now we proceed to create the rest of the model in the same way as before. In the end, we get this:
USER-DEFINED LIMITS OF A MODEL
Sometimes the min/max limits of the main variable are not enough for the model, so more complex limits are required. We can validate different requirements of a model (e.g. "Length" must be higher than "Width") and set a custom error message that will be returned to the user if any of the rules are violated. The "Custom Limits" section of the model is located under the name "Limits" within the model.
Structure of a user-defined limit
Name: the unique identifier of the limit, usually used as an informative title.
Error message: the message that will be displayed to the user
3.) Formula: logical/boolean expression, which is evaluated and has the result
0 (false): the validation fails and the error message is returned to the user
1 (true): the validation is successful
The expression is like a normal formula and may contain references to variables of the model (e.g. $L, $W), operators, constants, etc.
EXAMPLE OPERATORS
Logical operators
Example | Name | Result |
$a && $b ($a and $b) | And | True, if both $a and $b are true |
$a || $b ($a or $b) | Or | True, if $a or $b is true |
! $a | Not | True if $a is not true |
$a xor $b | Xor | True if either $a or $b is true, but not both |
Comparison operators
$a == $b | Equal | True if $a is equal to $b after type juggling |
$a === $b | Identical | True if $a is equal to $b, and they are of the same type |
$a != $b | Not equal | True if $a is not equal to $b after type juggling |
$a !== $b | Not identical | True if $a is not equal to $b, or they are not of the same type |
$a < $b | Less than | True if $a is strictly less than $b |
$a > $b | Greater than | True if $a is strictly greater than $b |
$a <= $b | Less than or equal to | True if $a is less than or equal to $b |
$a >= $b | Greater than or equal to | True if $a is greater than or equal to $b |
Limit examples
