X2 HP SiteFlow integration
Overview
The ability to pass Product Configuration Data and Print Ready PDF(s) to HP PrintOS/SiteFlow is now available in the CloudLab Data Center. Below follows the configuration methods and related requirements to enable this feature.
What is HP PrintOS SiteFlow
SiteFlow is an End-to-end workflow & production automation system.
Configuration of SiteFlow for CloudLab’s Data Center
Steps to be completed for the Configuration
These are the Steps to Configure the SiteFlow Integration:
Set up the API Configuration
Set up a Product in Magento and the Data Center
configure the SiteFlow IDs
Set up the Production Center
Testing
1. Set up the API Configuration
The API is used to deliver the Product Configuration and Print Ready PDFs to SiteFlow.
This is a one-time configuration.
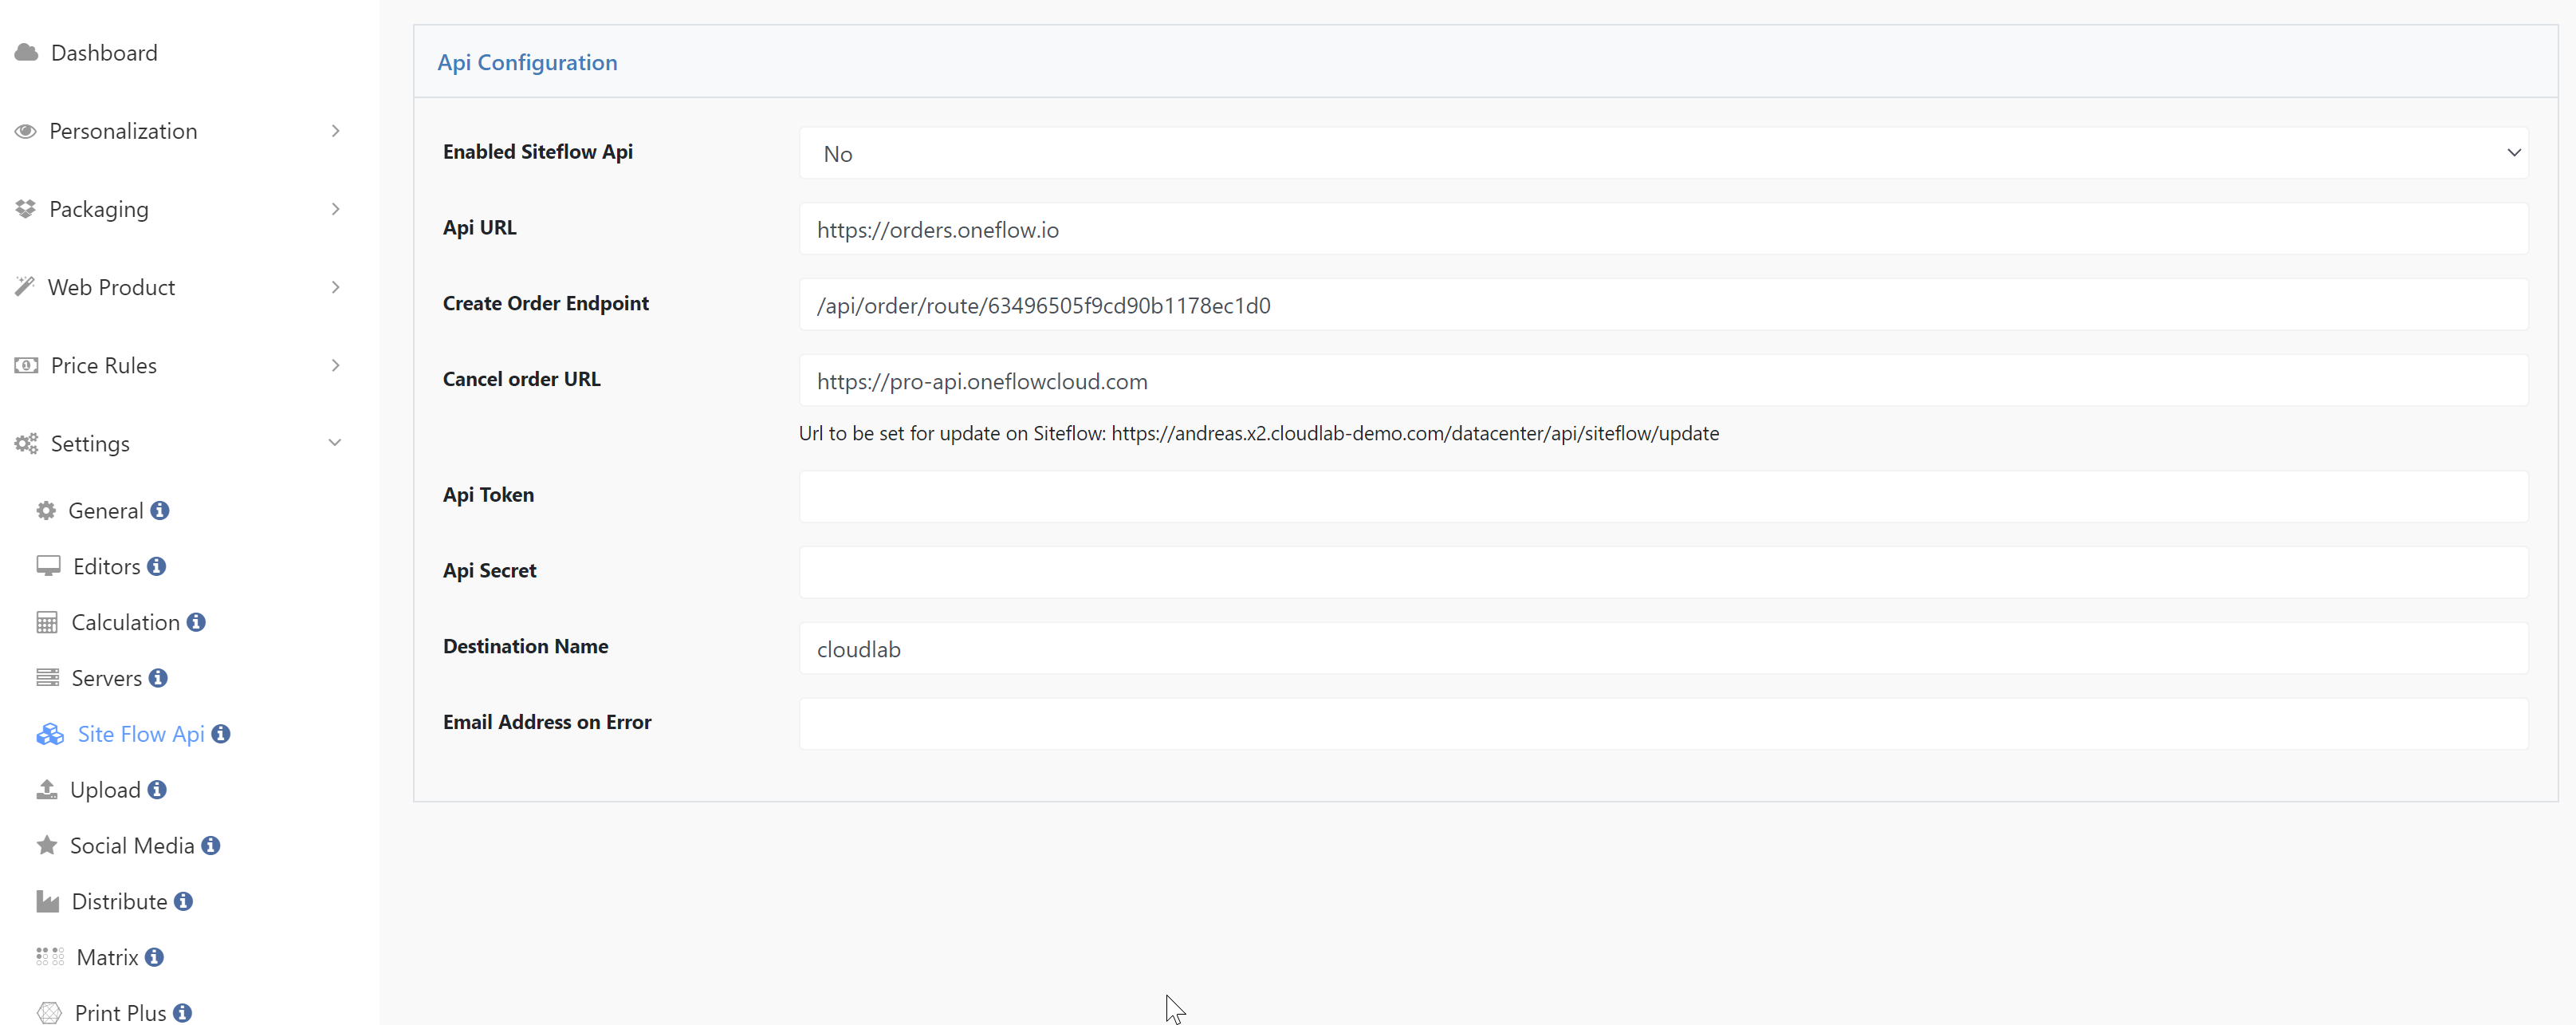
The SiteFlow API connection is configured in the Data Center under Settings > SiteFlowAPI.

Complete All the fields in the API Configuration section:
Api URL Input the API URL here.
This address allows access to the API and its various features.
Order Endpoint Input the Endpoint part of the URL here.
This address allows access to a specific endpoint for job routing.
Cancel Order URL Input the Cancel Order URL here.
This address allows SiteFlow to update the status on the Webshop.
Api Token Input the API Token here.
This Token allows an application to authenticate to the API
Api Secret Input the API Secret here
This Secret allows an application to access the API
Destination Name Input the Destination Name here
This is the user account name from SiteFlow
Destination Name Input the Email address for error messages here
Get error messages sent to your E-Mail
The Customer must provide the details mentioned above.
2. Configure all page options
Follow these steps to set up a Product in Magento and the Data Center that will utilize the SiteFlow integration.
The assumption is that the reader has completed the training on Product Set up on both Platforms. Therefore, only detailed steps will be provided for the Add Page Options Attributes and Values that relate to the integration with SiteFlow.
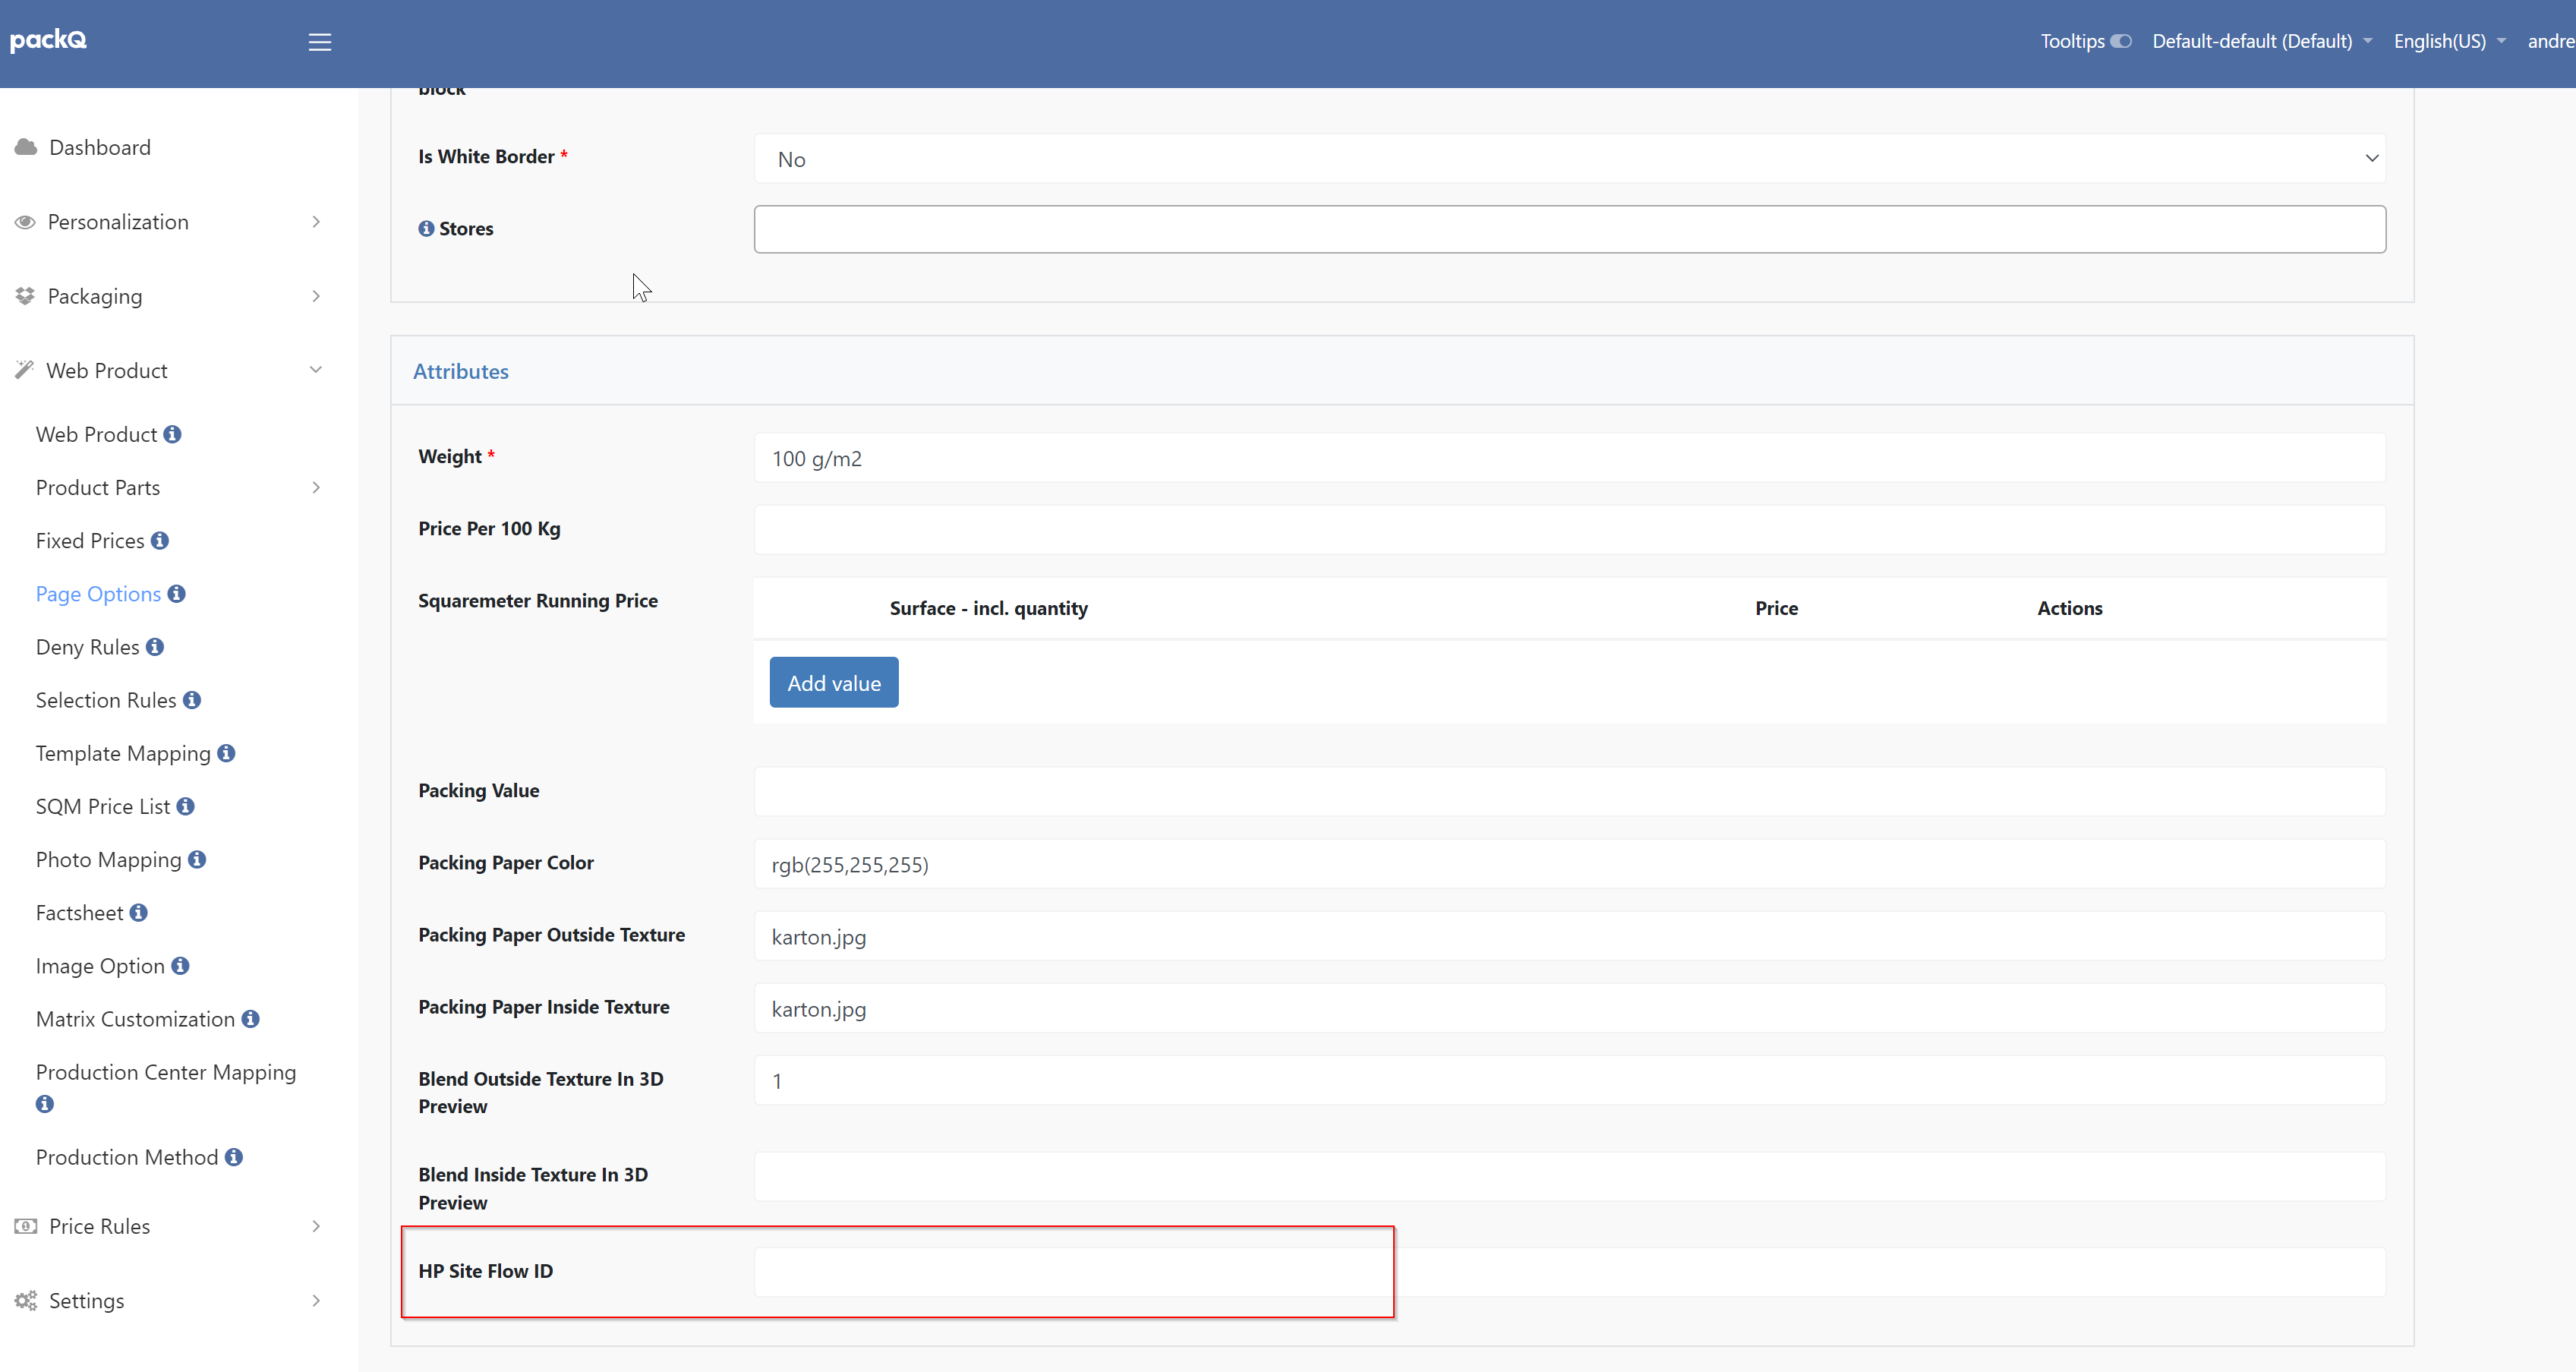
Every page option has the attribute HP Siteflow ID.

This ID needs to be filled for all page options used in the SiteFlow application. The customer gets this information from HP Siteflow. Recommendation is to use IDs in the format lower- and upper case and numbers only and no special signs or spaces.
3. Set up Production Center Mapping
A Production Center Mapping will be used to map the Data Centers Product configuration to a SiteFlow Product.
The key concept here is that with the CloudLab System you can have multiple configurations for a product, (a one-to-many scenario), whereby you do not need to set up a unique product or Skew for each configuration change. For example, in these two configurations:
Stand Up Package - Option A | Stand Up Package - Option B |
|---|---|
3.5x4.75 with a 2-inch Gusset
| 3.5x4.75 with a 2-inch Gusset
|
Each of the above can be handled by the same Web Product linked to a single Magento Product, by using a combination of Page Options, Product Parts, Templates, and a Web Product. In other words, you can have one base Product that has selectable configurations thus producing many SKUs, without having to set up each individually.
Configure a Production Center Mapping
Follow these steps to complete the Production Center MappingIn the CloudLab Data Center, select Web Product > Production Center Mapping
Select the Create button
Complete All the fields in the Name Sections
NameInput a Name for the Production Center Mapping. This should be based on the Product name, for example: Large PouchCodeInput a Code for the Production Center Mapping. in all lower-case letters with no spaces or special characters. Consider using a prefix, for example: pcr_large_pouchProduct PartSelect the Product Part that relates to the Product you will be configuringStoresAdd all the related Stores
Complete All the fields in the Product Parts Options Sections, keeping in mind that this section is dynamic based and is populated from the related Product Parts/Page Options
All Options will appear based on the Product Parts/Page Options Selected
Use the Check all for each of the current Product Parts/Page Options so that future Product Parts/Page Options are selected.
Printq Production Id must be completed with the ID from SiteFlow
The Customer must provide the ID from Site Flow.
4. Testing the Workflow
Use these steps as a guideline for testing:
Place an order in Magento, via the front-end Product page, for a product by selecting the various configuration options and checkout.
Once the order has been approved the Magento status will change from Pending to Processing.
This can be viewed in Magento under Sales > Orders or in the Data Center > Production > Orders.Open the SiteFlow site and confirm the Product and its Attributes have been carried forward.
Test a few different configurations to ensure the Attributes are matching up correctly between each application.
Processing
All Web Products will be sent to the API regardless of the type. Once the order is placed, if it's approved (see Order Approvals) and has files attached (the same rules as the Data Center Distribute process uses) a CRON Job will pick it up and send it to the API. CRON job run approximately every five minutes.
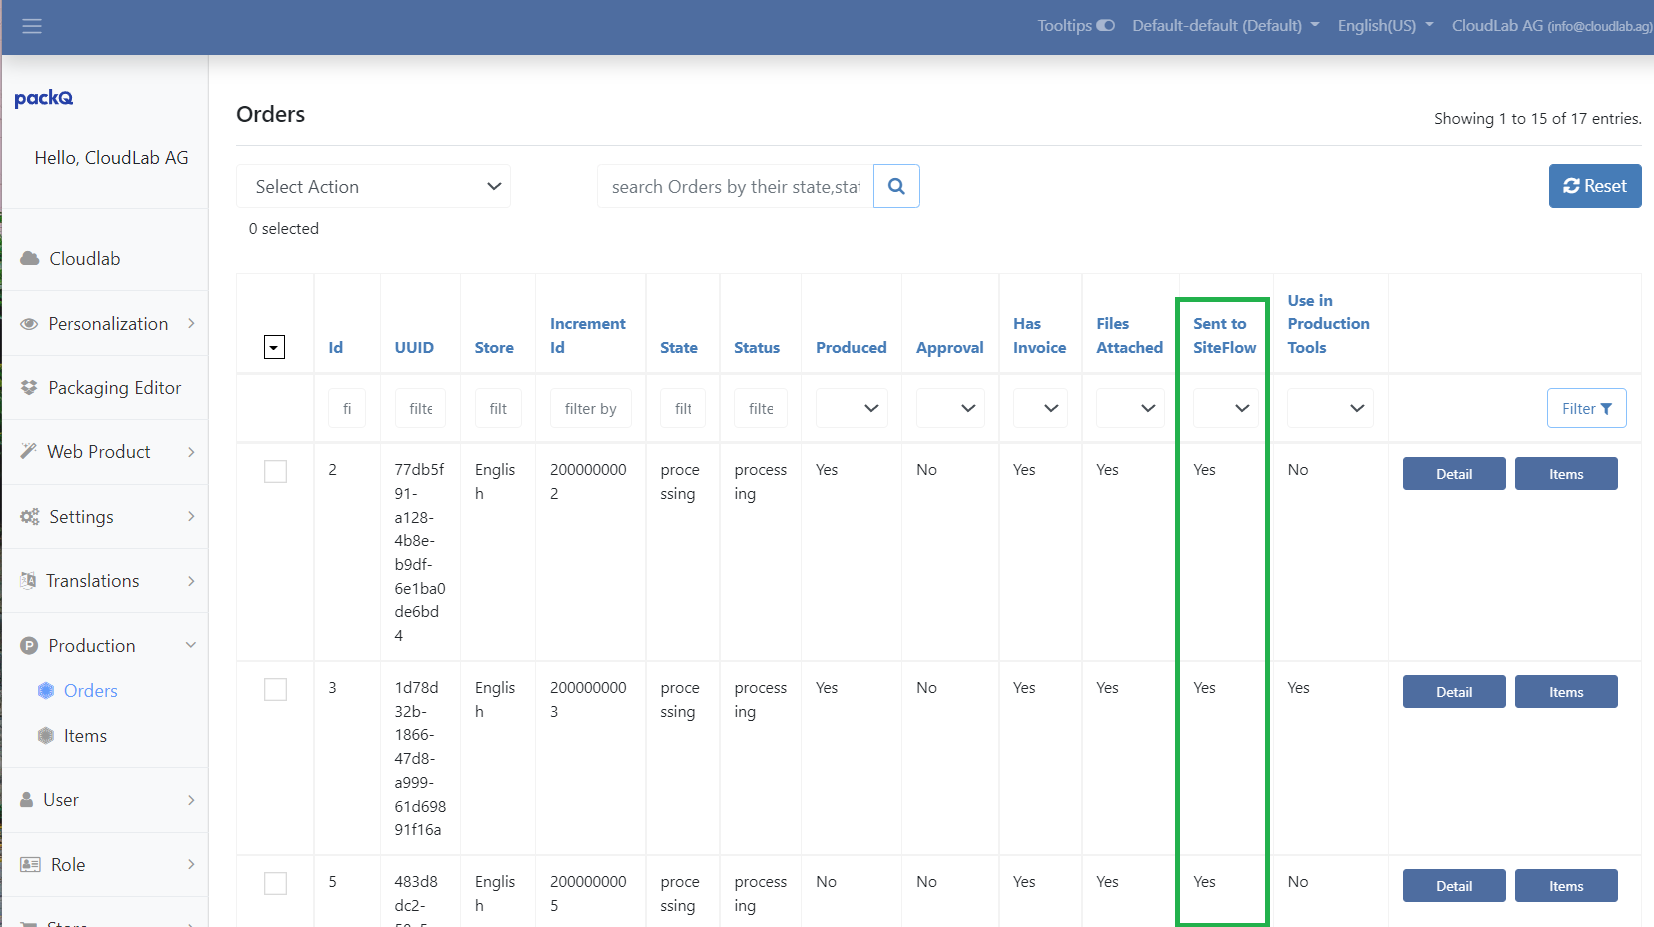
If the order is set up to appear in Data Center’s Production Orders Overview you will see a field called Sent to SiteFlow. This will appear as “Yes” or “No”. In the CloudLab Data Center, select Product > Orders.

Orders View
Order Approvals
Once an Order has been placed it is approved based on the type of payment method made available and the selection of that method at the time of checkout.
PO or Invoice are processed immediately
Credit Card Transactions are processed when the payment has been authorized.
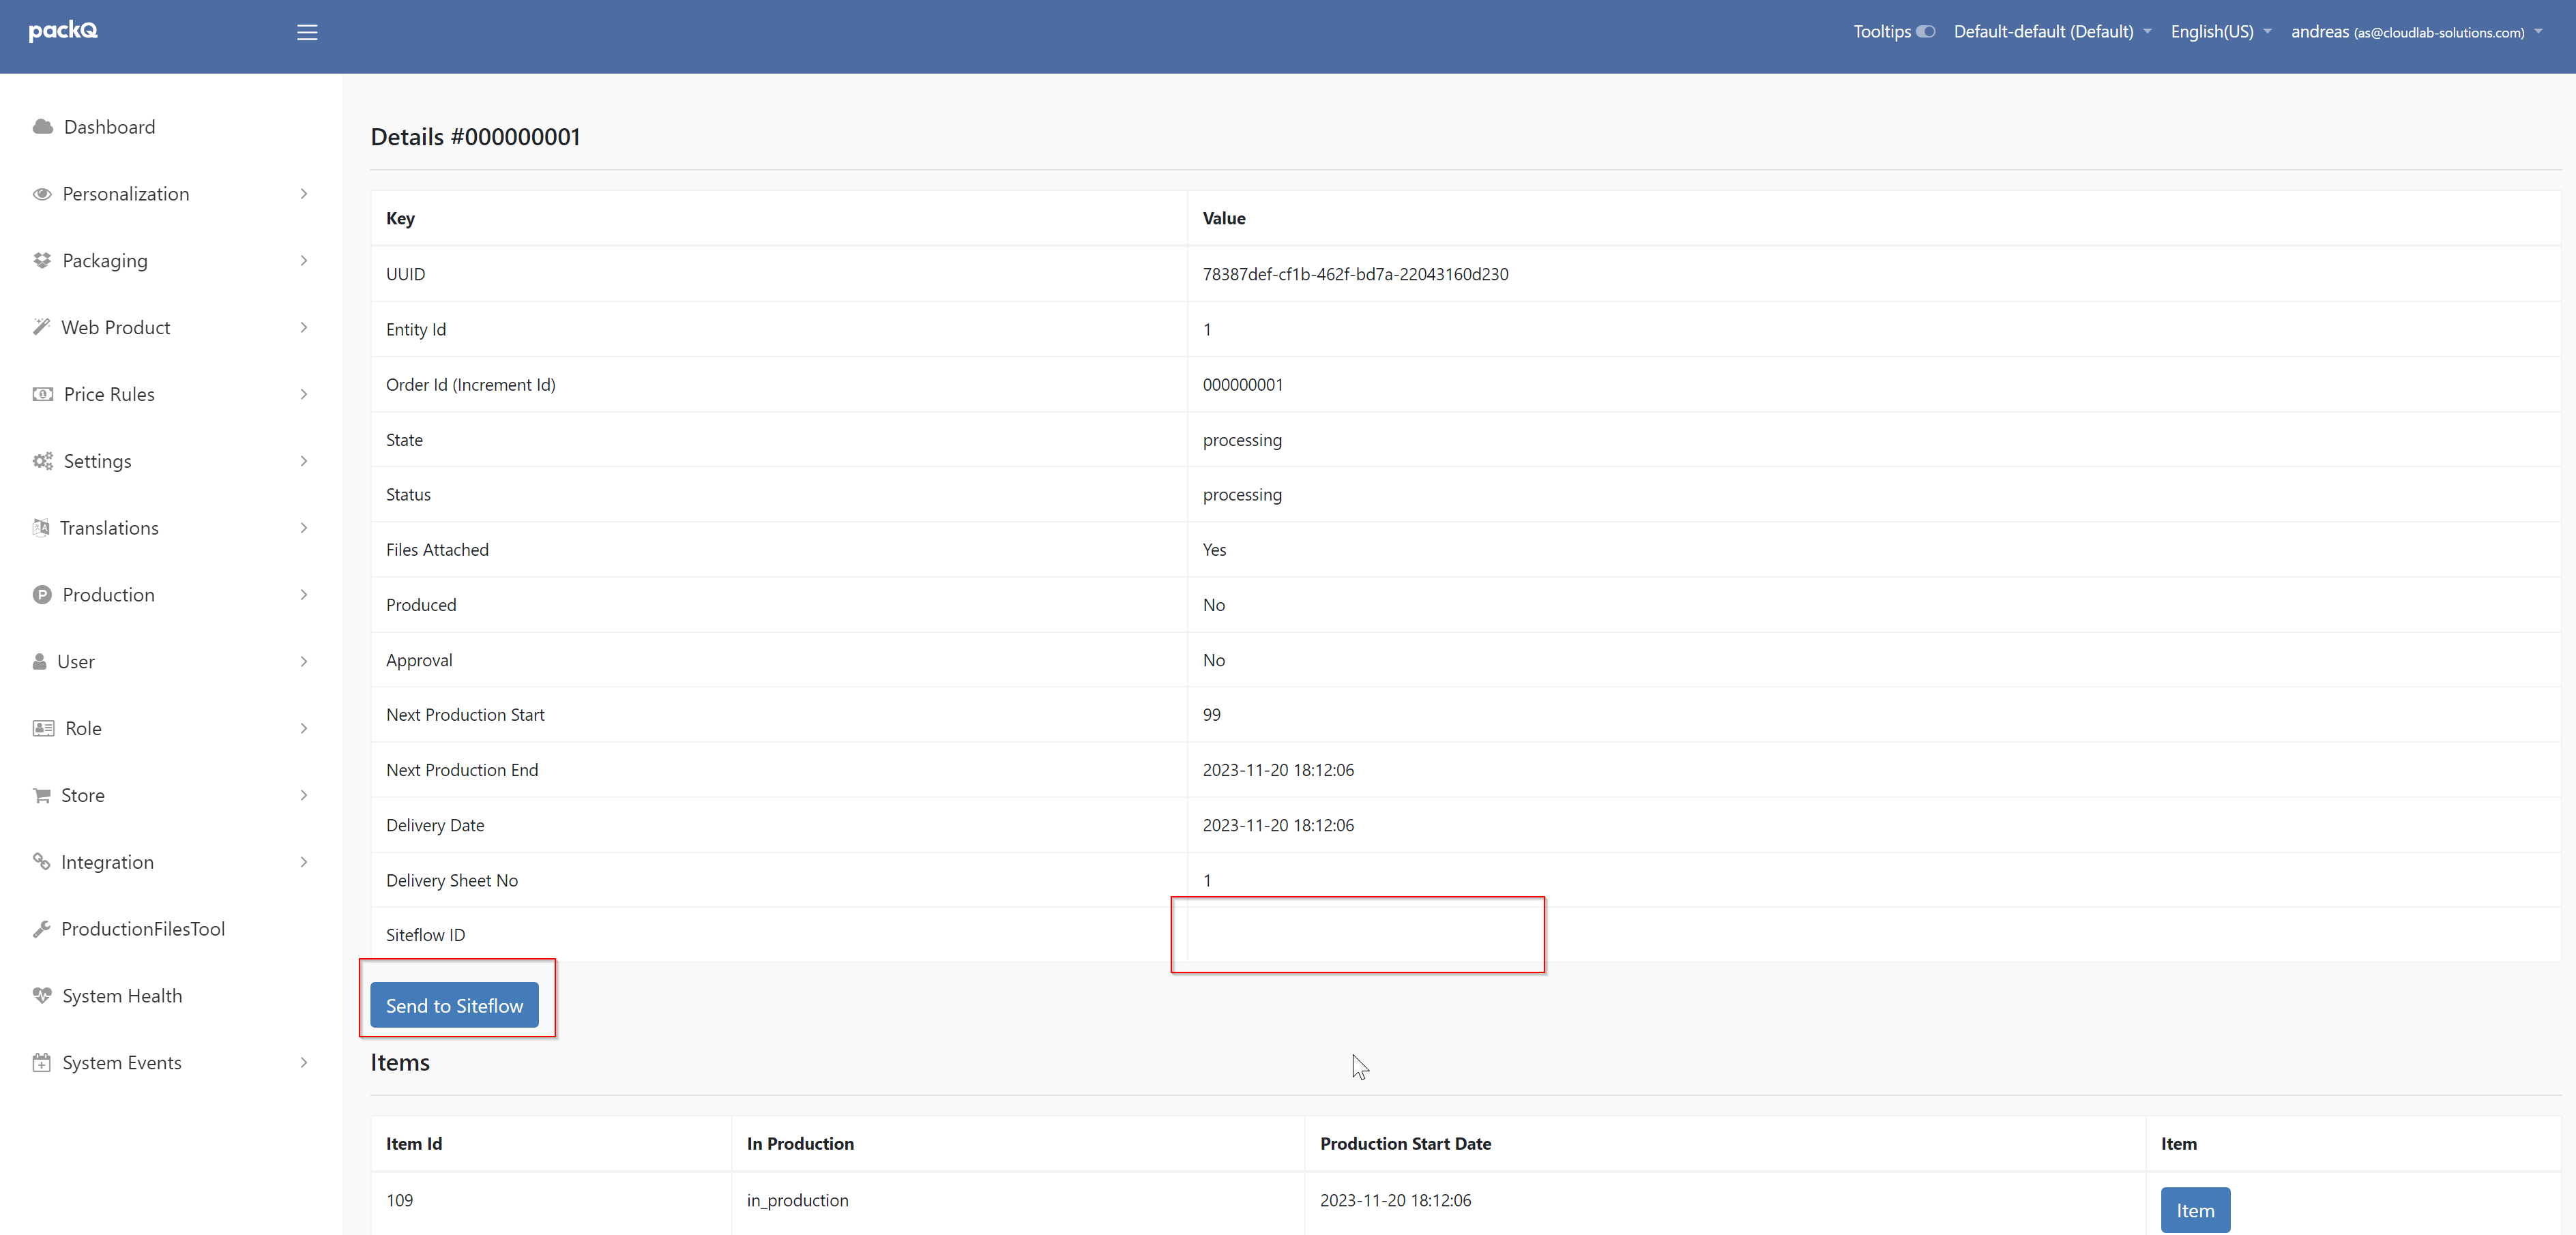
If the order was not automatically sent to SiteFlow the customer can send it manually by clicking the “Send to Siteflow” button in the order. A Siteflow ID will appear if the transfer was successful.
PLease make sure that the order has a PDF attached. If the order is sent without the PDF there is unfortunately no way to add the PDF at a later stage. It’s possible in SiteFlow but not in the webshop.

Files, Logs and Tools
API LOGS
API Logs are available via FTP under /home/ftpuser/siteflow_api
Files
The siteflow_json.phtml can be found under /datacenter/templates. Changes can be made to this file to add features to the integration.
It is strongly recommended to make a backup of the siteflow_json.phtml file before editing it.
Tools
The JSON template works the same as any other production files tool template.
It can be found under the Production Files Test Tool called siteflow_json.phtml
The JSON Template is like the JDF PHTML file available in the Production Files Test Tool. It can be edited here; you can change the structure as well as add/remove variables. Any change made to the siteflow_json.phtml while in the Production Files Test Tool is temporary and will revert to the original format when you close the Production Files Test Tool.
Should the order you wish to test not appear in the orders drop down list follow these steps
Return to the Data Center > Production > Orders page
Select the checkbox corresponding to the Order you want to view in
Production Files ToolClick on “
Select Action”Select “
Use in ProductionFilesTool”Click “
OK” in the alert box that just popped up
Now you should be able to use the Order you just selected in the Production Files Tool.
Other References
See the Site Flow Pro for complete HP information
