Plug&Print setup guide
This user guide will take care of all configurations you need to do to bring your Plug&Print shop live. It will cover Magento and printQ settings. Please keep in mind, that there is no “correct” order in that you have to set up all the topics. The order here in this guide is just a recommendation from CloudLab.
Once you complete all steps from this guide you should be ready to go live.
You can also use this Plug&Print Checklist if you prefer an own order of topics for your go live. This checklist covers all needed parts to go live and should help you to not forget one.
1. Branding
The first step to configure your own shop is to set up an own branding. The branding has to be done in two different parts: Magento and Plug&Print. Follow the steps below to publish your shop in your personal design.
1.1 Porto Theme
Navigate to Porto → Design Panel. There you can find all color settings for your new shop. Choose a branding color and go through the settings to customize the design as you wish. If you would like to have a quick branding, than simply add your favorite color into all fields that contain our Plug&Print blue (#2D5096).

Also you can change the general layout of your shop. For this navigate to “Porto → Setting Panel”. Here you will find general settings like the grid type for your categories, the design of your header, number of columns in the footer and so on.

A detailed documentation about how to use and configure the Porto theme can be found here: https://www.portotheme.com/magento2/porto/documentation/ Please be aware that you do not have access to the code of the theme or Plug&Print. This means, that only the backend settings are available for you to adjust the design of your shop.
Most of the time, an invalide cache is the reason why you do not see your changes in the frontend. If it happens to you follow these steps to “fix it”:
Jump into your Magento backend and navigate to “System → Tools → Cache Management”. There you click on “Flush Magento Cache”.
Clear your browser cache. Browser also cache information from your page. Depending on the used browser the steps to clear the cache can be different. Just look for “Clear cache for YourUsedBrowser” on a search engine of your choice.
Test in private mode/different browser. Even a cache clear does not always work (e.g. for Chrome). Sometimes there are still fragments stored. Just open the page in a private window or, even better, in an other browser.
1.2 Logo/Favicon
To upload the logo you will have to navigate to “Content → Design → Configuration”. Select “Main Website” in the table and click on “Edit”.

Following Tabs are relevant:
HTML Head ← Here you can upload your favicon and change the default page title.

Header ← Here you can upload the logo and change the height and width of it.
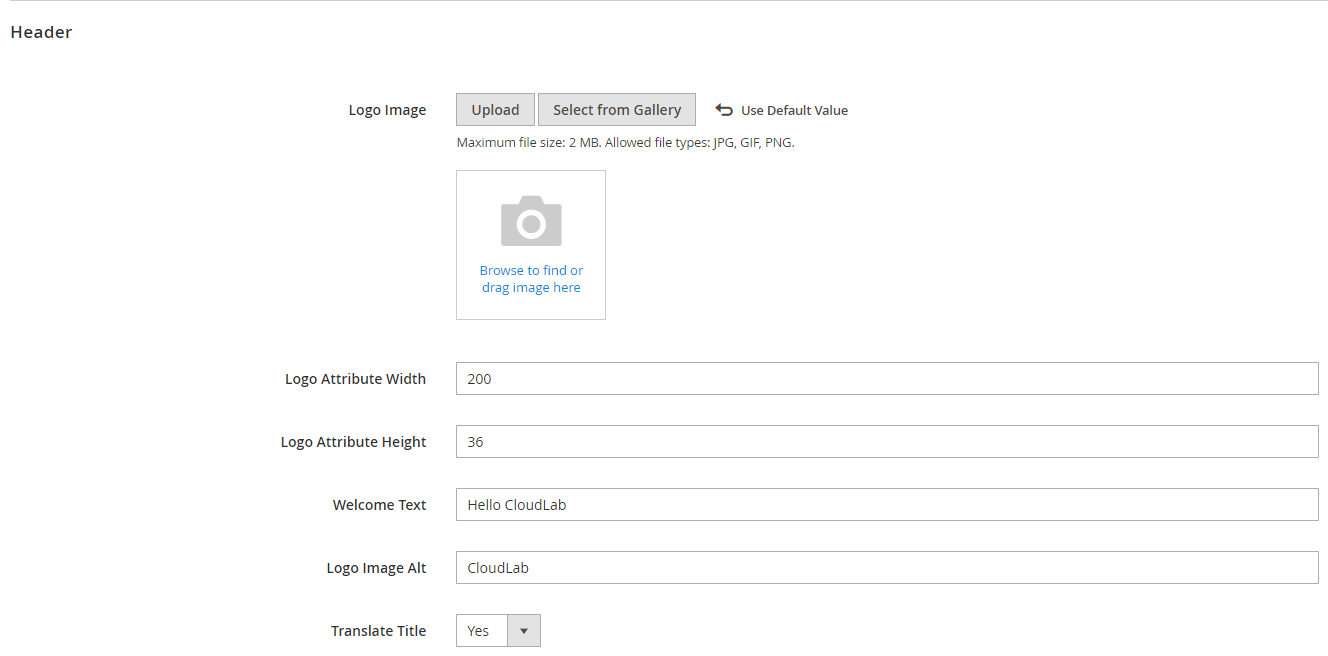
If you use a sticky header from porto theme you have to upload a logo for the sticky header separatly. This is done under “Porto → Setting Panel → Header → Logo Image.
Transactional Emails ← Here you can upload a logo for all your E-Mail Templates.

Most of the time, an invalide cache is the reason why you do not see your changes in the frontend. If it happens to you follow these steps to “fix it”:
Jump into your Magento backend and navigate to “System → Tools → Cache Management”. There you click on “Flush Magento Cache”.
Clear your browser cache. Browser also cache information from your page. Depending on the used browser the steps to clear the cache can be different. Just look for “Clear cache for YourUsedBrowser” on a search engine of your choice.
Test in private mode/different browser. Even a cache clear does not always work (e.g. for Chrome). Sometimes there are still fragments stored. Just open the page in a private window or, even better, in an other browser.
1.3 Slider
Navigate to Content → Pages. You can find a list of all existing pages in your system. The slider is located on the “Home page”. Click on “Select → Edit” in the last column to open the home page.

Next you will have to click on “Content” to open the section followed by a click on “Edit with Page Builder”.

You can change the slider by editing the code. Click on the code part and next on the small gear icon. Next you click on “insert image” to upload your image to the system. Navigate to “wysiwyg/smartwave/porto/header” and upload your image by clicking on “Choose Files”.
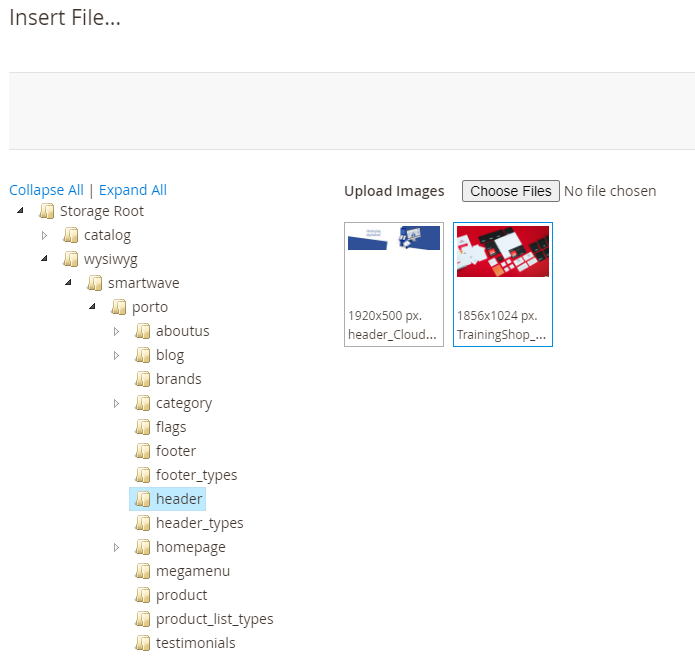
Now close the menu and search the code for this line:
background: url('{{media url=wysiwyg/smartwave/porto/header/header_CloudLab.jpg}}');Simply replace the name and file type of our image by the name and file type of your image.

Once this is done press save on the top right, close the page builder by clicking on the two arrows on the top right and save the page by clicking on save on the top right of the menue.
Most of the time, an invalide cache is the reason why you do not see your changes in the frontend. If it happens to you follow these steps to “fix it”:
Jump into your Magento backend and navigate to “System → Tools → Cache Management”. There you click on “Flush Magento Cache”.
Clear your browser cache. Browser also cache information from your page. Depending on the used browser the steps to clear the cache can be different. Just look for “Clear cache for YourUsedBrowser” on a search engine of your choice.
Test in private mode/different browser. Even a cache clear does not always work (e.g. for Chrome). Sometimes there are still fragments stored. Just open the page in a private window or, even better, in an other browser.
1.4 Plug&Print Editor
Navigate to Cloudlab → Datacenter → Access Backend and there to Personalization → Themes. Click on edit next to the porto theme.
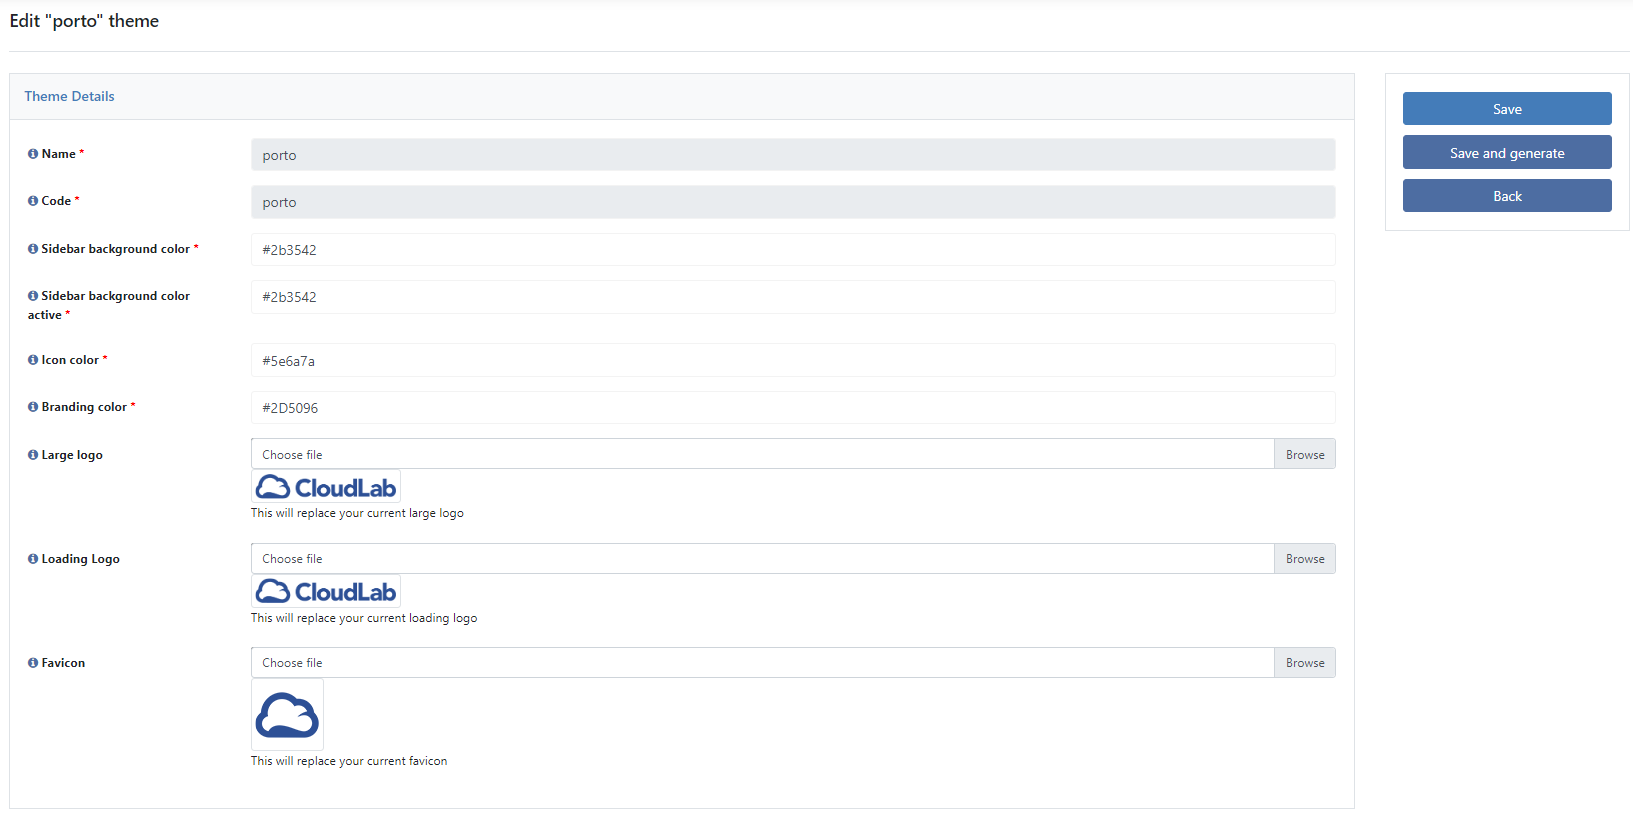
Now you can adjust the branding colors for your editor and upload an own logo and favicon for the editor. Once this is done you will have to click on “Save and generate” to apply your changes.
Important: You will have to wait up to 5 minutes until your design changes appear in the fronend. It the changes still be not visible please clear your browser cache.
Most of the time, an invalide cache is the reason why you do not see your changes in the frontend. If it happens to you follow these steps to “fix it”:
Jump into your Magento backend and navigate to “System → Tools → Cache Management”. There you click on “Flush Magento Cache”.
Clear your browser cache. Browser also cache information from your page. Depending on the used browser the steps to clear the cache can be different. Just look for “Clear cache for YourUsedBrowser” on a search engine of your choice.
Test in private mode/different browser. Even a cache clear does not always work (e.g. for Chrome). Sometimes there are still fragments stored. Just open the page in a private window or, even better, in an other browser.
1.5 Plug&Print product page
The Plug&Print product page can be edited in the datacenter too. Navigate to Web Product → Matrix customization and click on edit next to the porto theme.

Here you can now find several settings like used fonts, button colors, font colors or even the size for the buttons. Once you have done your changes click on save. Make sure to clear your browser cache to see the changes on the product page.
For a quick rebranding only the “Main Color” must be changed. It will replace every blue on the product page with your added color.
Most of the time, an invalide cache is the reason why you do not see your changes in the frontend. If it happens to you follow these steps to “fix it”:
Jump into your Magento backend and navigate to “System → Tools → Cache Management”. There you click on “Flush Magento Cache”.
Clear your browser cache. Browser also cache information from your page. Depending on the used browser the steps to clear the cache can be different. Just look for “Clear cache for YourUsedBrowser” on a search engine of your choice.
Test in private mode/different browser. Even a cache clear does not always work (e.g. for Chrome). Sometimes there are still fragments stored. Just open the page in a private window or, even better, in an other browser.
2. Content
Beside the design of your shop the content is also important. Magento offers an easy to use page builder to create your own content like landing pages, home page, about us and more. The content is split into two different types, pages and blocks. Both will be explained below:
2.1 Static blocks
Static blocks are content elements that will be visible on predefined positions related to the porto theme. Static blocks will be used to show content e.g. in the footer, on a category page or within a page like the home page or a landing page.
To create a static block you need to navigate in Magento to Content → Blocks. You will get a list with all existing Blocks. You can edit the existing ones or create your own one by click on “Add New Block” on the top right.

The first thing you have to do is to activate the block and give it a name, an identifier and assign it to a store view/language. The identifier is used for the internal reference and is only allowed to use a-z, A-Z, 0-9, _
But why are there two fields for both of them? The reason is because you will have to create a block for every page separatly. Let's use an “About Us” block as example. “About Us” should be displayed in English, German and French. To achieve it you have to create 3 Blocks but all of them will use the same Identifier. This is the internal reverence for the Magento system. You can think about it as following:
The frontend opens to the customer and a static block should be displayed. First, Magento checks the identifier that should be opend at a specific position. Once the identifier is found the system will check which language is selected and open the correct block.
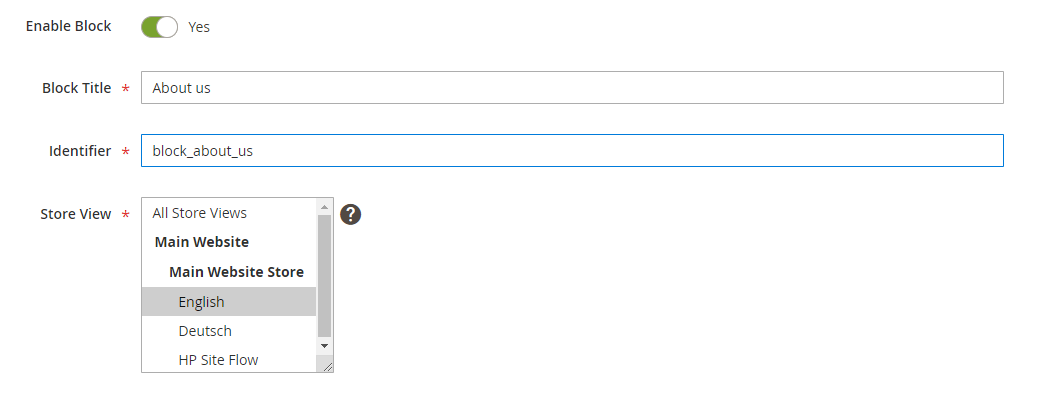
For our example it means that we will have three static blocks (you can duplicate blocks by clicking on the arrow next to save and select “Save and dublicate”), that have 3 different names to identify them in the backend but with just one identifier. The example looks like this (names and identifier are just examples and can be names however you want) :
English:
Name: About Us (EN)
Identifier: block_about_us
Store View Selected: English
German:
Name: About Us (DE)
Identifier: block_about_us
Store View Selected: German
French:
Name: About Us (FR)
Identifier: block_about_us
Store View Selected: French
After the assignment is done you can start to create your contend. Click on the empty area below to get access to the Magento Page Builder.

The page builder allows you to create layouts via drag & drop and add content to it. A detailed documentation including a walkthrough with an example block can be found here: https://experienceleague.adobe.com/docs/commerce-admin/page-builder/walkthrough/2-blocks.html?lang=en
Last but not least you will have to bring the static block into the frontend. There are three different ways to do so:
You can add the identifier of a static block to the Porto Setting Panel to show it in the frontend. Navigate to “Porto → Setting Panel”, scroll to the section where you would like to use a block (e.g. in the footer) and paste the identifier of the block into the field.
You can use Magento pages to display blocks. For this you use the function “Add Content” from the Magento page builder.
You can use categories to display content. This is used if you would like to have a link to the content within the navigation bar. Instructions about how to link it can be found HERE
2.2 Pages
The difference between pages and Blocks is, that a page is opened via URL. This URL can be put as a link into your E-Mail templates, into a button on a static block, and so on. The general set up is nearly equal. To create or edit a page navigate to “Content → Pages” and click on “edit” or “Add new page”.
You have to create a page for every store view (language) similar to the behavior in the blocks. Instead of an identifier the pages use an URL. This means that you use the Page Title as the unique name (e.g. including the language) and the URL under “Search Engine Optimization” for the internal reference. Under “Page in Websites” you select the store view (language) the page belong to. The example from our blocks would look like this for pages:
English:
Page Title: About Us (EN)
URL Key: block_about_us
Store View Selected: English
German:
Page Title: About Us (DE)
URL Key: block_about_us
Store View Selected: German
French:
Page Title: About Us (FR)
URL Key: block_about_us
Store View Selected: French
After the assignment is done you can start to create your contend. Click on the empty area under “Content” to open the Magento Page Builder.
The page builder allows you to create layouts via drag & drop and add content to it. A detailed documentation including a walkthrough with an example page can be found here: https://experienceleague.adobe.com/docs/commerce-admin/page-builder/guide-overview.html?lang=en
Once you save a page you can directly open them in the frontend. Just add the URL you assigned to the page behinde your shop URL like this: https://your-domain.com/about-us.
If you get an error message that the page could not be found check the URL and the assignment in the page. Most common issue is that there is a miss writing or a wrong assignment.
3. Taxes
Before you edit products you will have to set up the taxe rates and zones for your shop, set up the rules and decide how taxes are calculated and displayed on the shop. Otherwise the system will not be able to calculate taxes. There are different ways to do so depending on your location and the number of countries you ship to.
3.1 Taxe Zones and Rates (Manual)
If you only have to set up a couple of tax rates (e.g. in Germany only 3 rates are required) you can do it by hand.
Navigate to “Stores → Taxes → Tax Zones and Rates”. Here you can see a table with all already set up tax zones and rates. Click on “Add New Tax Rate” on the top right to start.

The Identifier is the name of the tax rate you would like to use. So e.g. for Germany you could call it “19% MwST.”. Next you can set up if there is a ZIP/Post Range (Depending on if there are different tax rates for each state e.g). Once you activate it you can set up the from/to range of your rate. Select the State and Country next the rate should be available for and finish it by adding the percente rate.
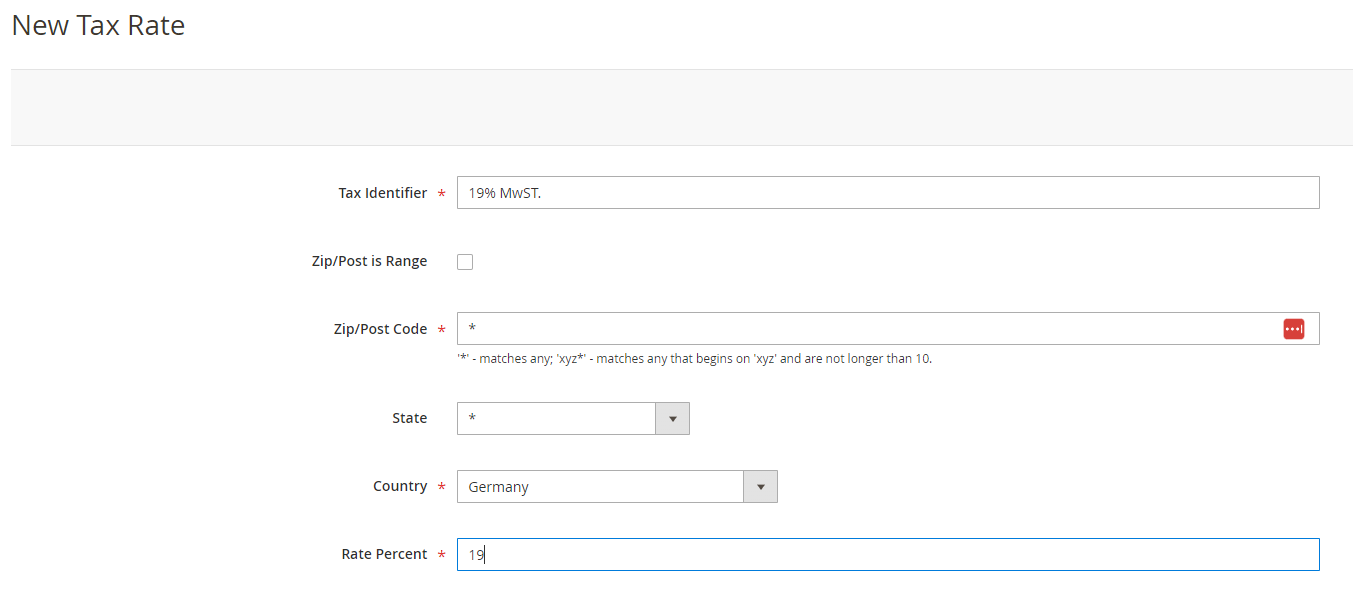
Last you can set up the name of the tax rate that should be displayed in the frontend including translations for all your store views. If you leave it empty the Tax Identifier will be displayed.
Click on “Save Rate” to finish the configuration. This needs to be done for every tax rate you want to apply in your system.
3.2 Taxe Zones and Rates (Import)
If you have a lot tax rates because e.g. you sell to the whole European Union or United States the import is more valuable for you. Magento is open source so for nearly all countries there should be .csv files with all tax rates on the internet. Just google for “Magento 2 country name tax rates”. Mostly you will find a GIT page where you can download a .csv file with all rates included.
Navigate to “System → Import/Export Tax Rates” click on “Choose File”, select the file on your local storage and import them via click on “Import Tax Rates”.

Thats it. If you go back to “Stores → Taxes → Tax Zones and Rates” you will see all tax rates from your imported .csv file.
3.3 Taxe Rules
The taxe rates are just the percent value that needs to be calculated. So we have to set up rules for them.
Navigate to “Stores → Taxes → Tax Rules” to begin. Again you can see a list with all existing rules within your system. Now we have to create rules for e.g. full taxable products by clicking on “Add New Tax Rule” on the top right.

First select a name for the rule (e.g. Full Tax) and then select all tax rates that shall belong to this rule. Once you have selected all required tax rates click on “Additional Settings”.
Now you can assign the rule to a specific customer group and to a Product Tax Class. You can also create new by click on “Add New Tax Class” below the list. To finish the set up select a priority and a sort order and save the rule by click on “Save Rule” in the top right.

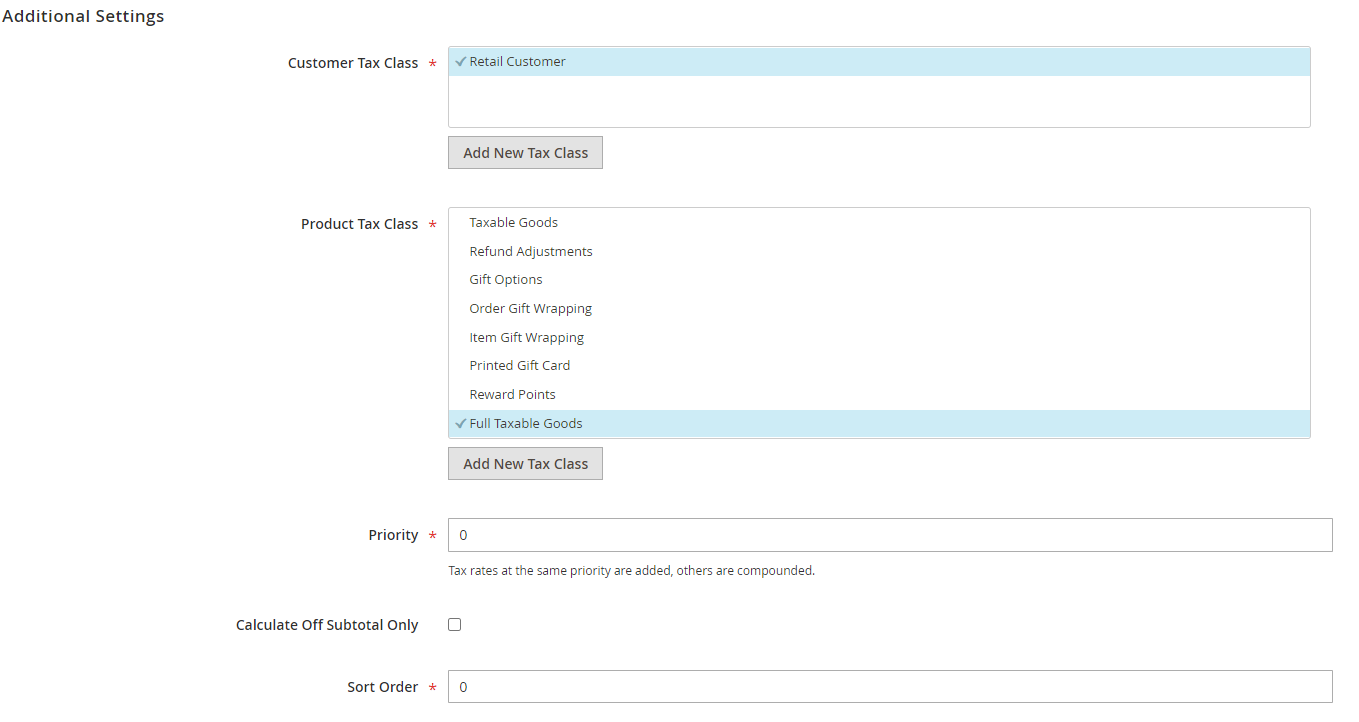
The new created rule is now active and will be used if you select the assigned tax class or new created tax class in the products or customer groups.
3.4 General Tax settings
Once the rates and rules are set up the way Magento calculates and displays the taxes needs to be configured.
Navigate to “Stores → Settings → Configuration → Sales → Tax”. Here you find the general tax settings from Magento like
Tax Classes → Select tax class for shipping and the default tax classes

Calculation settings → Select if prices set up by you are already including tax or excluding tax, how to calculate tax for shipping costs or discounts
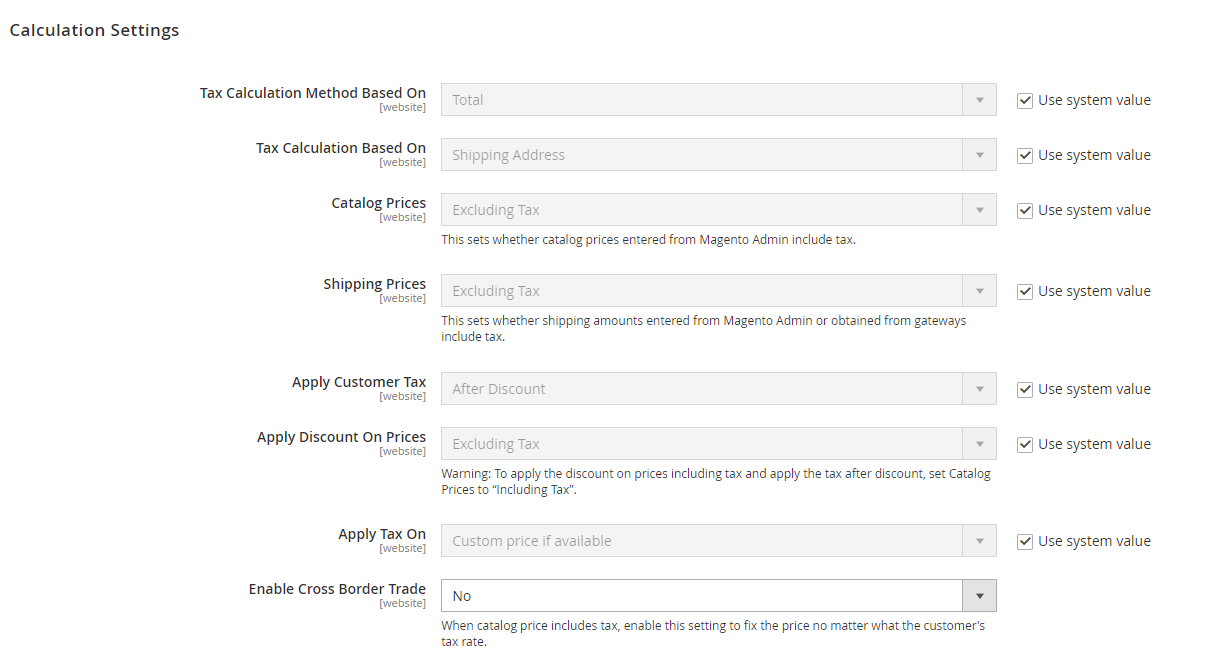
Default Tax Desination Calculation → What is your default country/state and post code for calculation

Price Display Settings → How taxes are displayed on product page and catalog

Shopping Cart Display Settings → How taxes are displayed on shopping card
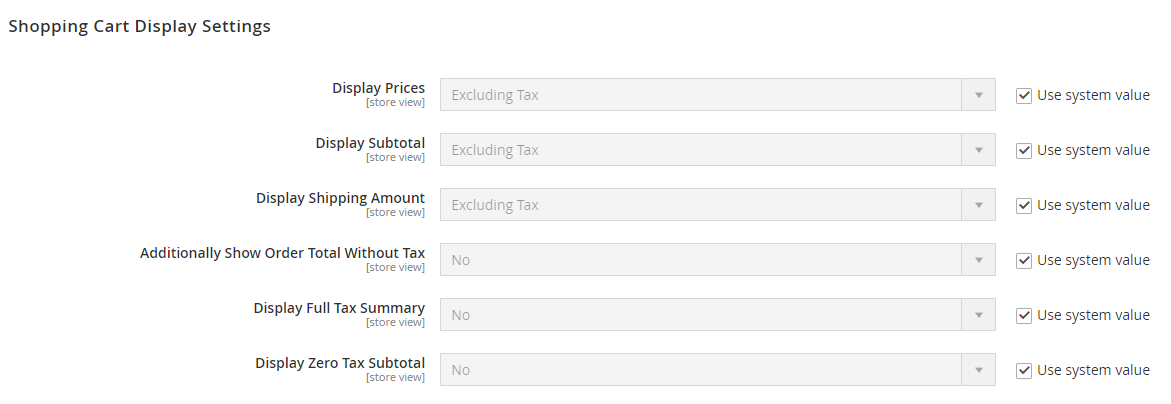
Orders, Invoices, Credit Memos Display Settings → How taxes are displayed on several files send to customer

After saving, the system is tax ready and you can set up products and prices.
Please note: CloudLab cannot provide you with legal advice on taxes. If you are unsure about the laws and rules, contact your tax advisor.
4. Currencies
If you want to switch from € to an other currency navigate to “Stores → Settings → Configuration → General → Currency Setup”.
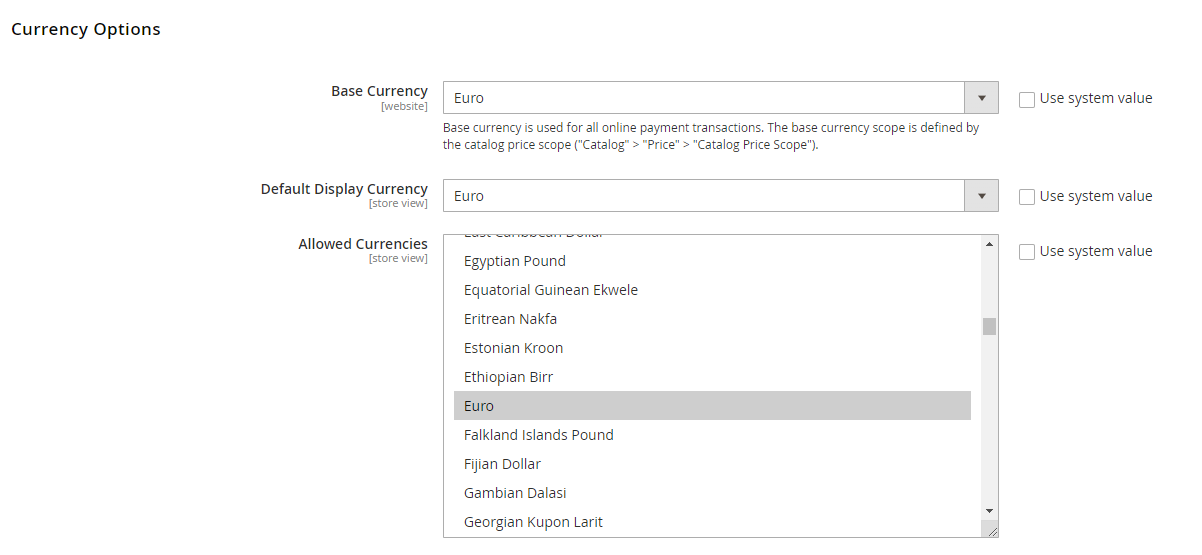
Here you can set up the Base currency (so all prices you add are in this currency), the default displayed currency and all currencies you allow next to the default one. If you select multiple currencies there will be a drop down in the frontend where customers can switch the currency.

If you allow mutiple currencies you have to set up the change rate. Navigate to Stores → Currency → Currency Rates.
Here you can now add the change rate for your currencies. The base currency is not editable and set to one. You now have to add the value of your currencies that is equal to 1 of your base currency.

Last but not least you can also edit the default currency symbol if needed. For this navigate to Stores → Currency → Currency Symbols. Just uncheck the “Use Standard” checkbox and replace the default Symbol by whatever you would like to display there.

Once this is saved your system is set up to use the correct currency for all your prices.
5. Categories
Before you add products to your catalog, you need to establish the basic category structure of your catalog. Products can be assigned to zero or more categories. Usually, categories are created in advance, before products are added to the catalog. However, you can also add categories on the fly while creating a product.
The category structure of your catalog is like an upside-down tree, with the root at the top. Each section of the tree can be expanded and collapsed. Any disabled or hidden categories are grayed out. The categories at the first level typically appear as options in the main menu. You can create as many additional subcategories as needed, according to the maximum menu depth that is set in the configuration. Categories can be dragged and dropped to other locations in the tree if you missplaced them.
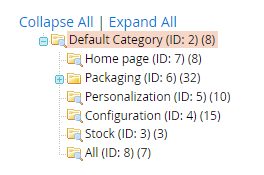
Mark a category where you would like to add a new category to and click on “add new subcategory”. Next you will have to decide if this category should be active and if it should be displayed in the navigation bar in the frontend. Also you have to set up the category name for the frontend.

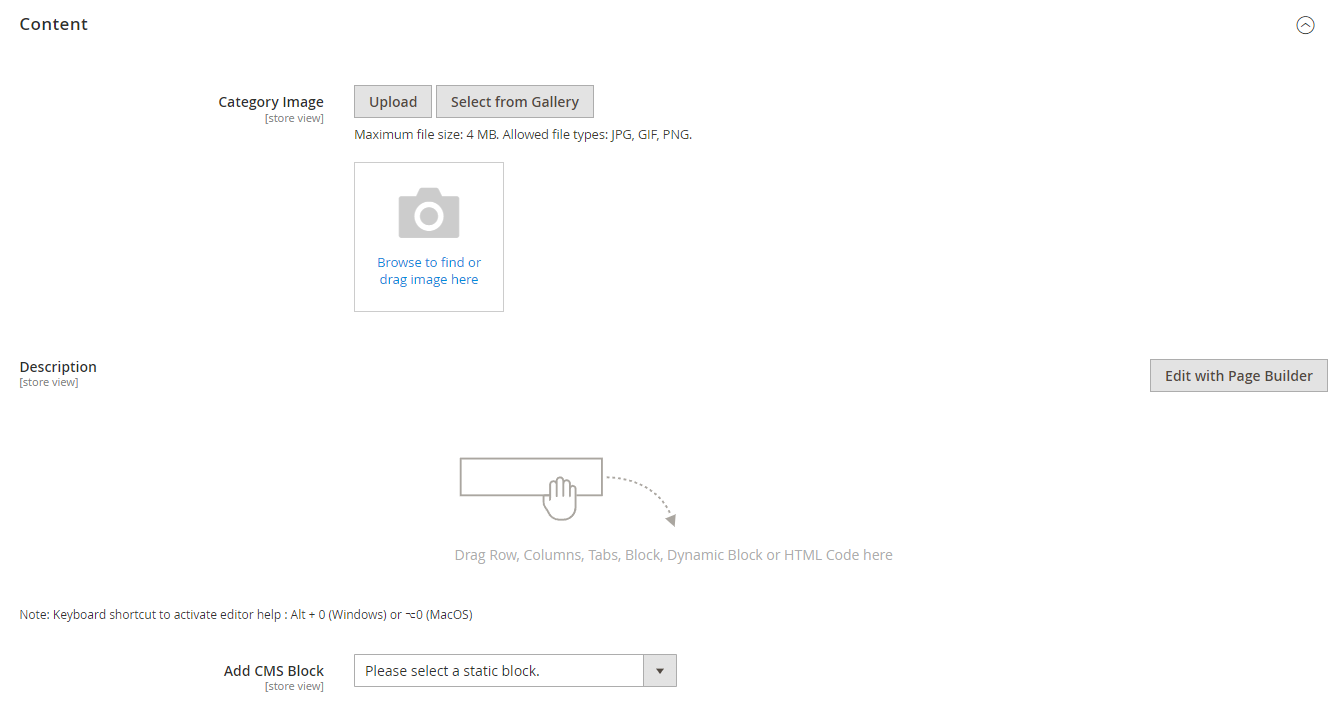
Under Content you can now set up a category image, a description and assign a static block. Here we come back to 2.1 Static blocks. If you want to display content within the navigation bar you will have to assign the static block to a category.
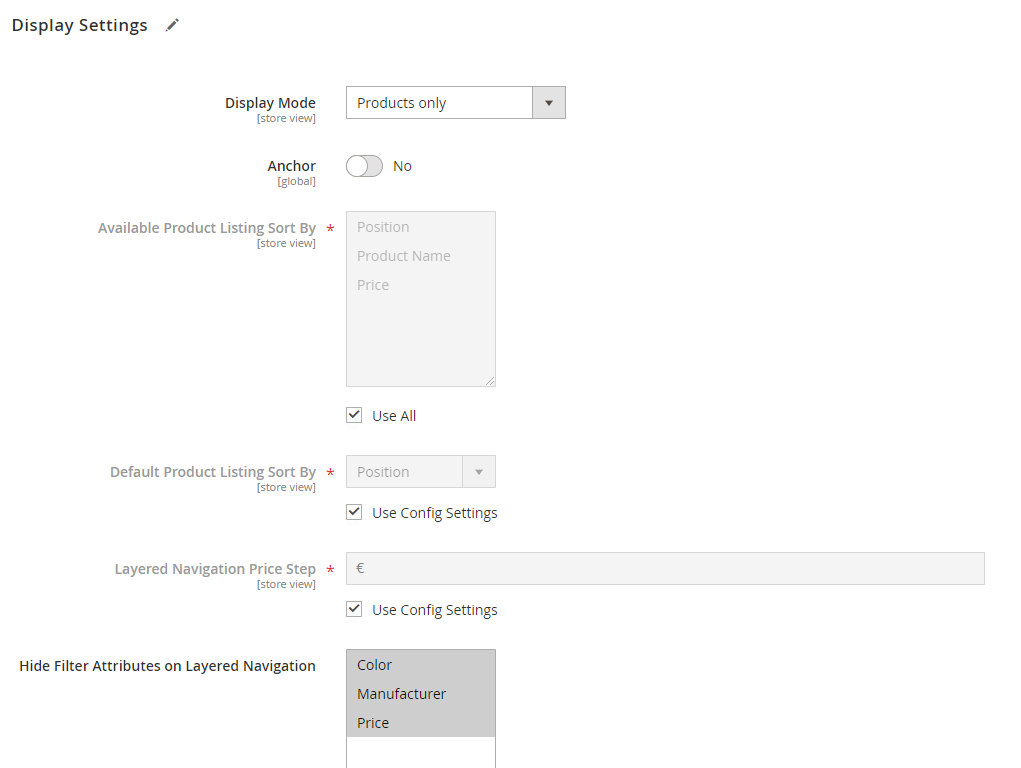
Next navigate to Display Settings and select if there should be products, only static blocks or both displayed within this category. Also you can set up the sorting like “Sort by name” and select the default sorting and which filters should not be displayed on the category page
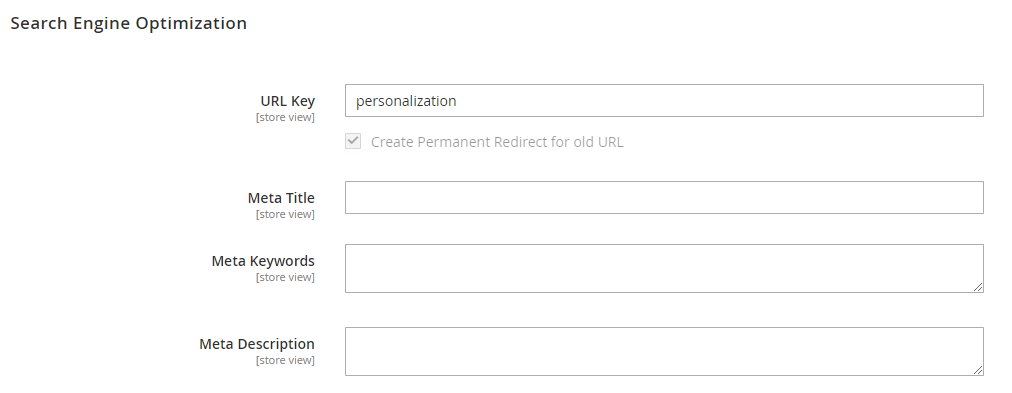
Once this is done you will have to configure the SEO Optimization like URL Key, Meta Titel, Meta Keywords and Meta Description.
Last but not least you can assign products to the new created category. The table will only display products that are already assigned to a category (if you edit an existing one). So click on “Yes” in the first column on the table and change it to “Any” and confirm your filter with a click on “Search” above it. Now you can see all existing products in the system and assign them by check the checkbox in the first column.
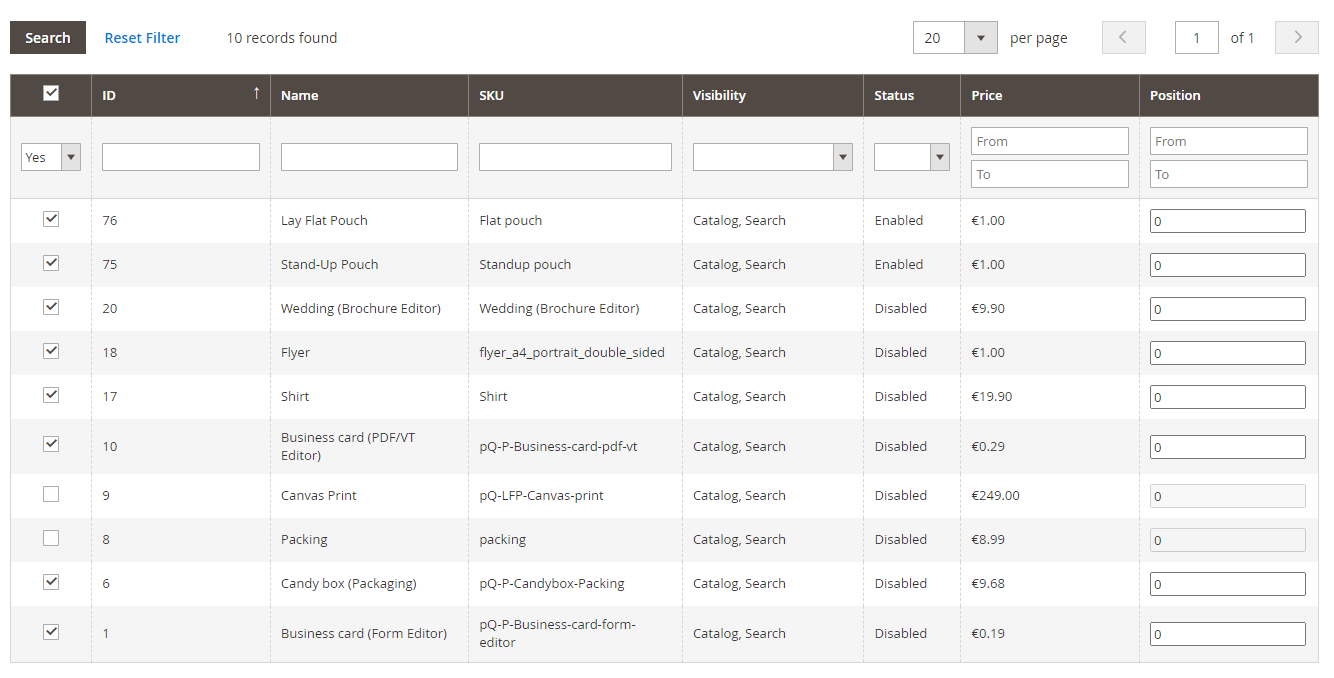
Save your category and repeat it until you have all categories created that you would like to see in the frontend. Once this is done clear the Magento cache (System → Cache Management).
To change the hierarchy of your categories is something that will be displayed live on your frontend. So we suggest not to do so while you have a lot of traffic on the page.
6. Product Setup
Next we will talk about the product configuration. Again, there is no correct order in that you have to configure the product. We will start by editing the Magento products. After this we will switch to our Plug&Print Datacenter to configure the print options and prices. But, if you would like to, you can also start with the print options and finish the Magento product afterwards.
But why do we have two products?
Magento is one of the worlds most used E-Commerce system. But Magento is not able to set up print products. This is where Plug&Print jumps in. We take the default Magento product and extend the features by adding a print selection, dynamic pricing, editors, parametric 3D Product Models etc.
This means, that the general information like product name, sku, description, etc. have to be set up in the Magento product. Everything related to print will be set up in our Plug&Print Datacenter.
You do not have to worry about the link between the products. This is already set up for our product catalog and you just have to make the changes like upload an other product image.
6.1 Magento Product
This step will show you how to adjust the Magento product to customize it (add description, product images, meta information etc. ). Our example product will be “Reversed tuck end - locking mechanism”:

First, navigate to “Catalog → Products” to get a list with all products in your Plug&Print System. Pick the product you would like to edit by click on “edit” in the last column on the right side.

You will see a lot of settings to configure the Magento product. Because most of the product configuration will come from Plug&Print only a few of these settings will be relevant. We will skip the settings that are not needed.
Setting name | Description | What to set up |
|---|---|---|
Enable Product | This activates or deactivates the product for your customers and delete it from the frontend. | If you do not want to sell/offer a predefined product from our catalog just switch it to “no”. |
Product Name | The product name that is displayed on the frontend. | You can change the name to whatever you want. Please keep in mind that if you change it you will still have a so called “Product Part” in out Datacenter. We recommand to rename this too (explained in 6.2) to avoid confusion. |
SKU | Article number that is also displayed on the frontend | The article number only allows A-Z, a-z, 0-9, _ and must be unique. |
Price | Magento Product Price in your base currency. Max. 2 decimals allowed. This price will be displayed on your category page and be used by search engines. | The set up here depends on the product type: Stock product (without Plug&Print configurations): Use the product price Printing product (with Plug&Print configurations): add the smallest possible price for your product. The detailled price calculation is then done in our datacenter. |
Tax Class | Set up the tax class and the calculated tax rates for the product. For more information see 3. Taxes | The needed tax class for your product |
Quantity | A small inventory management from Magento. You can set up min. and max. quantities in the shoppingcart, a stock and also a notification quantity. Important: A notification via E-Mail is not possible in Magento default system. | If a stock management is needed, click on “Advanced Inventory” and activate it (uncheck the first checkbox and change the drop down to “yes”). Configure as you need. |
Stock Status | Change the status to “Out of Stock” or “In Stock”. | Configure as you need. |
Weight | This is the weight for the Magento product. | If you have a stock product you just add the weight of it. If you use a plug&print product the weight will be calculated directly from the product configuration. In this case, everything you add here will be summed up to the calculated weight. This means that the weight can be “0” for Plug&Print Products. |
Categories | Assign a product to one or more categories. Please see check 5. Categories for set up instructions. | Select the categories that should display your product. |
Set Product as New From | A small flag that marks a product as a new one. Color and text within the flag can be edited via Porto Theme Settings. | Configure as you need. |
Content | ||
Short Description | The Short description is displayed right next to the product image. A small “WhatYouSeeIsWhatYouGet” Editor helps to set it up. | Configure as you need. |
Descrption | A detailed description for your product. This one is displayed below the product page. You can use the Magento 2 page builder to configure the product description. | Configure as you need it. Small hint: Create one nice product description in the page builder. Once this is done, you can click on “Save as a Template” on the top right. Now you can use your created product description for all products and do not have to rebuild it all time again |
Images And Videos | ||
Images And Videos | Allows the upload for product and category images and also to add a link to a video that should be displayed on product page. To use a YouTube video you will have to add a YouTube API Key first under “Stores → Configuration → Catalog → Catalog → Product Video” | Upload the images you would like to see on the product page and in the category. Packaging product from Plug&Print do not have a product image on the product page. Instead a 3D Preview is displayed. The image you upload is only for the category page |
Search Engine Optimization | ||
Search Engine Optimization | Here you can add an own URL for your product and add meta information. | Configure as you need. |
Related Products, Up-Sells, and Cross-Sells | ||
Related Products, Up-Sells, and Cross-Sells | Allows you to add product link on different positions for this specific product. Related Products: Displayed on a right column on the product page (not supported for Plug&Print products) Up-Sell Products: Displayed below the product page Cross-Sell Products: Displayed in the shopping cart one the product is added to it. | Configure as you need. |
The settings above are all needed settings to configure products for Plug&Print. Other settings might not appear in the frontend or can cause issues.
6.2 Plug&Print
Everything related the print configuration is done in our Plug&Print Datacenter. Navigate to “CloudLab → Datacenter → Access Backend” to open it.
Plug&Print Products are separated in multiple parts. This allows a much more flexibility for complex products.
6.2.1.1 Product Part backend
Plug&Print Products already contain a number of different configuration possibilities for your customers like different materials, formats, number of pages, and so on. This can be changed by you via the so called “Product Part”.
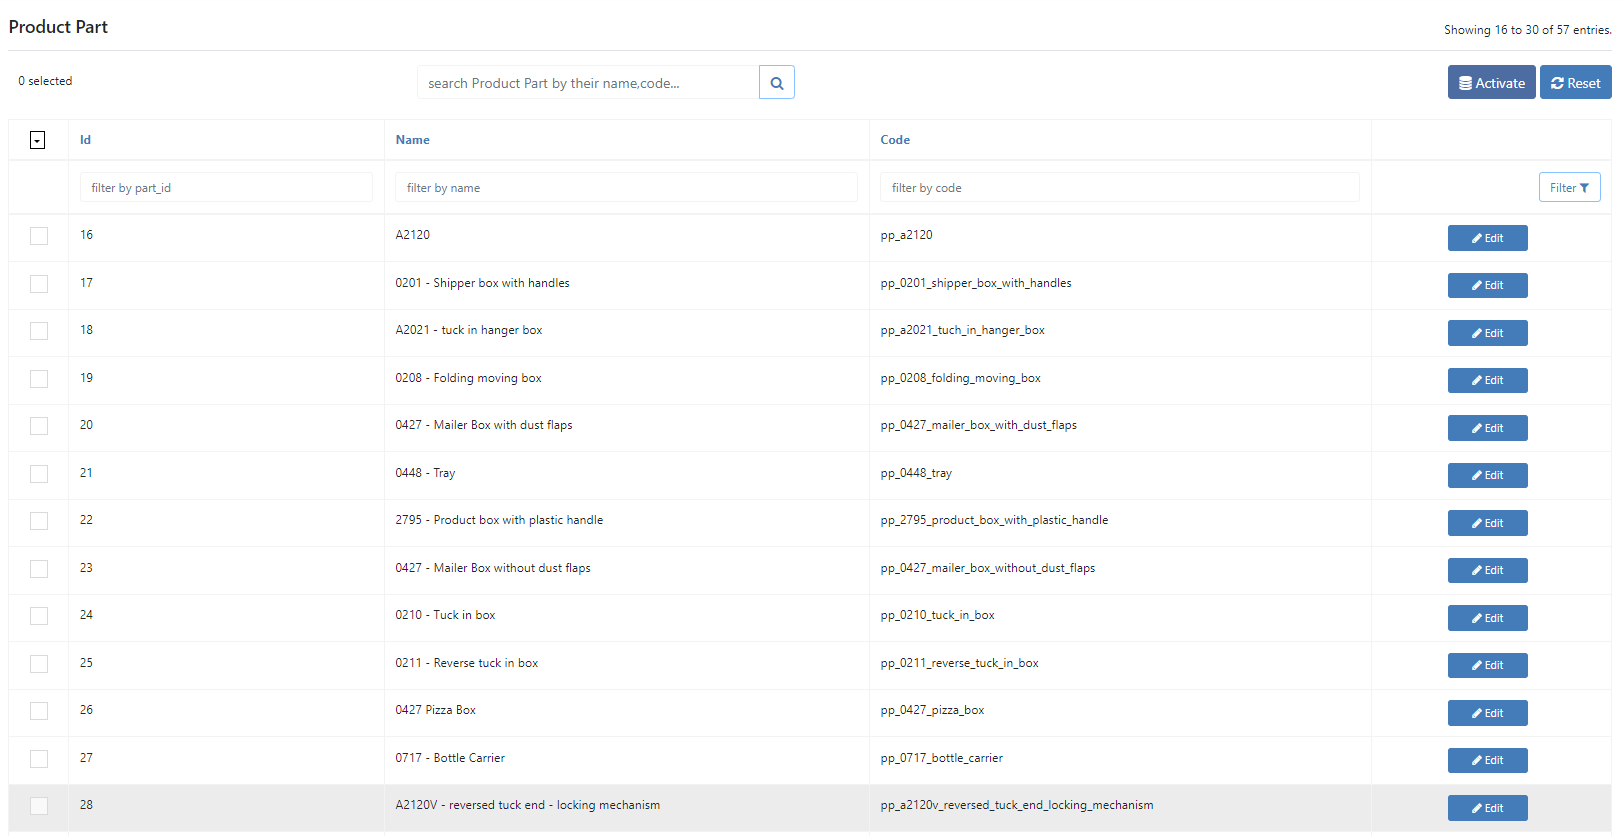
Every product has it’s own product part. This means that you can fully control the components for every product separatly. Just click on “Edit” to see a list with all available components and the already assigned components for a product/product part.
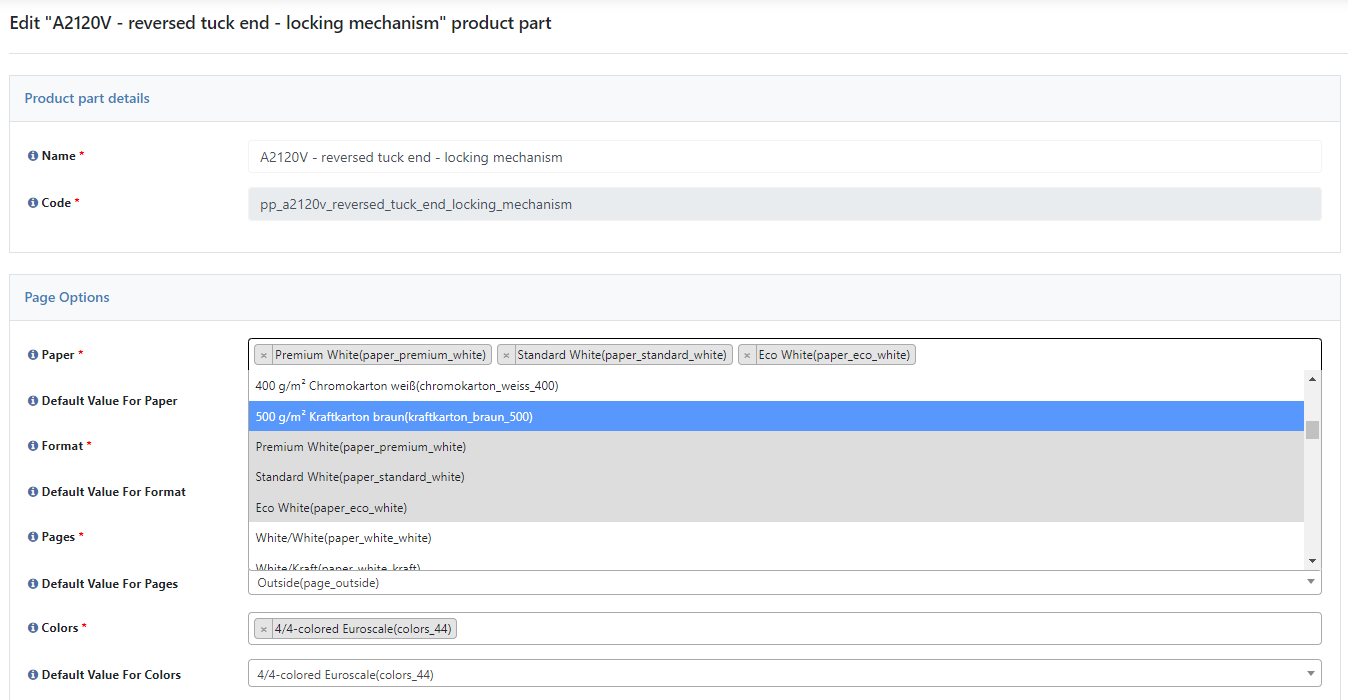
The name of the product part should not be changed to make it easier for you to find the correct product part for each product. What you can/should do is to go through our so called “page options” like Paper, Format, etc. and check the two drop down menus.
The first on shows all available values for the page options and the selected ones. Whatever you select here will be selectable for your customers in the frontend:
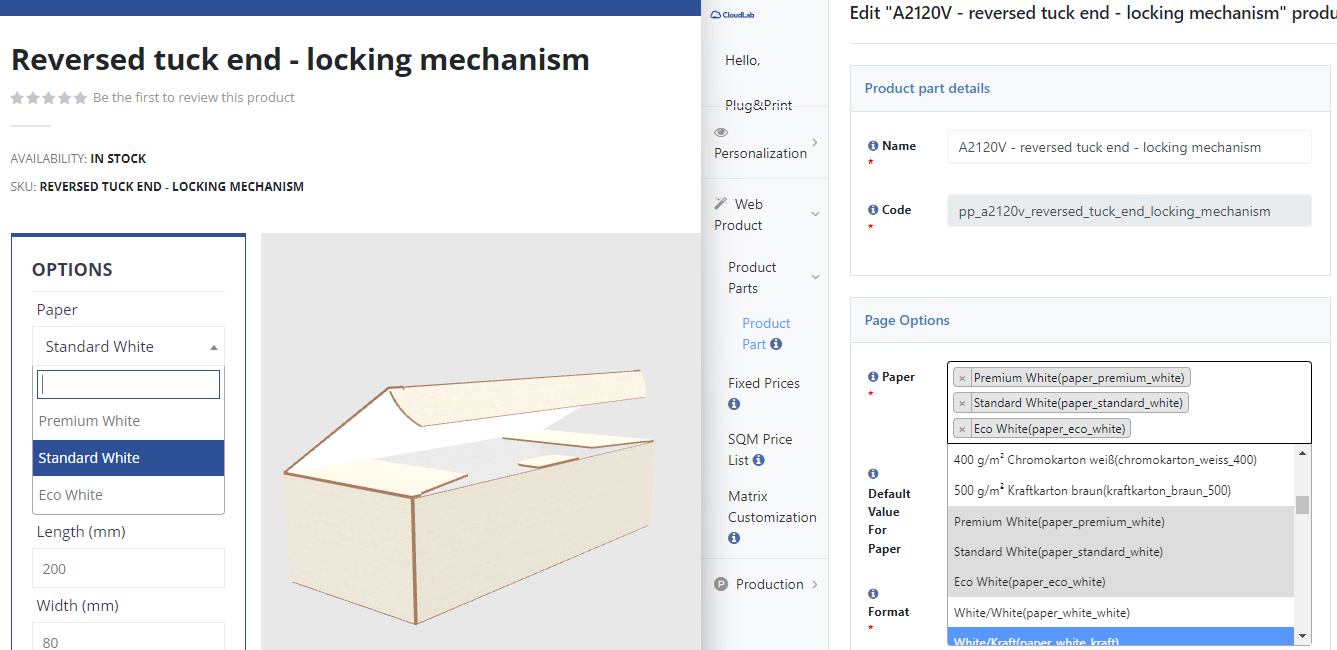
This means that you can select whatever should be choosable for your customers in the frontend. Please make sure that at least always one value is selected.
The second drop down allows you to choose which of these values is preselected once the customer open the product page.
Plug&Print offers you a huge variety of components to use. It’s not possible to add new values like a complete new material to the backend. If you are interested in other values please let us know.
6.2.2 Fixed Prices
Once the product part is configured you can start adding prices for your product. In Plug&Print we offer so called “fixed price lists”. This is a list that offers a price (including tier prices) for a specific configuration of the product. So let’s use our Reversed tuck end - locking mechanism as an example again.
This product allows the customer to choose from (default configuration):
3 different materials: Premium White, Standard White and Eco White
3 different numbers of pages (where to print): Outside, Inside and Inside&Outside
3 different finishings: None, Matt and Gloss.
All other page options have only one value so we can ignore them. This brings us to a maximum of 27 possible combinations. Fixed prices allow you to add a unique tier price list for all of them (if needed).
If you products have a flexible size like the packaging products, the fixed price list will only take care of the components. Later you will add an additional fee depending on the actual size of the product.
Fixed price lists can be added in two different ways: directly via backend or via .csv import.
6.2.2.1 Fixed Prices backend configuration
Click on “Create” to open a new fixed price list. The firsts things you have to do is to give your list a name and a code.
We highly recommand to add names and codes in a “speaking” was. Whenever you add one it should directly explain what you do so that you also know what it was for when you haven't looked for it in a while.
Bad example:
Name: List1 Package
Code: codeForList1Package_new
Good example:
Name: Reversed tuck end, standard white, matt finishing
Code: reversed_tuck_end_standard_white_matt_finishing
After this you have to add a number. This is the quantity your prices are set up for.
If the price field here is set to 1 it means that all prices you add are for 1 pcs. So if customer order 10 the price will be multiplied by 10.
If the price field here is set to 10 it means that all prices you add are for 10 pcs. So if customers order 5, the price is devided by 10 and then multiplied by 5.
Next you select the product part you would like to use. Below you can see the example how it could look like.

After the general settings you have to set up the tier price table. Qty is the quantity (and above) at that the Price should be taken.
Our example product has by default a quatity range from 1 to 10000 pcs. Let’s say you would like to add three price steps (1 and above, 50 and above and 100 and above). Your table will look like this:
Qty | Price |
|---|---|
1 | 10.99 |
50 | 8.99 |
100 | 3.99 |
You can read this table now lie this:
IF the qty is 1 and above, THEN X (Price unit from general tab) will cost 10.99
IF the qty is 50 and above, THEN X (Price unit from general tab) will cost 8.99
IF the qty is 100 and above, THEN X (Price unit from general tab) will cost 3.99
Important to mention is that there is also an interpolation already integrated. This means that Plug&Print will calculate now a new price per x for every new quantity between two values in the table. E.g. if the customer selects 25 the price will be calculated new per x by getting closer to the next price step in the table (50 for 8.99).
This will help you by make it impossible to have a price step at that the total price becomes lower as on a lower quantity. If you e.g. check this example you will see that without an interpolation the total price for 85 pcs would be 399 but the total price to 85 would be 764,15. Our interpolation will not allow this by calculate a price between automatically depending on your steps.
If you do not want to use the interpolation you can simply add side steps to prevent the system to calculate prices between. The table would look like this then:
Qty | Price |
|---|---|
1 | 10.99 |
49 | 10.99 |
50 | 8.99 |
99 | 8.99 |
100 | 3.99 |
In this case Plug&Print is simply not able to automatically calculate a new price because the price between your steps is already the same.
After the price table is finished you have to choose for what kind of product configuration the price table should be valid. This will happen via the available page option values assigned to your product part. Below the table you can see all page options:
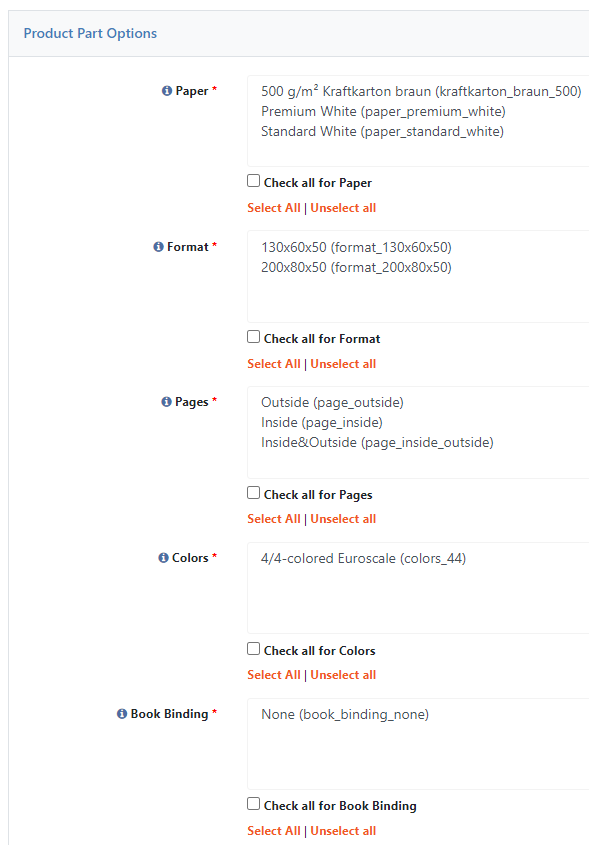
Here you now select whatever must be selected by the customer on the product page to make this price rule valid. This means, you can create one unique rule for every possible combination within a product.
When we have a look back on our rule name you will quickly see that the selection is already mentions in my example name. The name says that this rule should be valid
IF material is Standard White AND the Finishing is Matt
This means that we select Standard White in material, everything in Format, Pages, Colors, Binding and Refinement and Matt under Finishing.
If you “do not care” about a selection within a page option you can also use the checkbox below the list of each page option. The checkbox makes sure that the rule will be valid no matter what is selected by the customer in this page option.
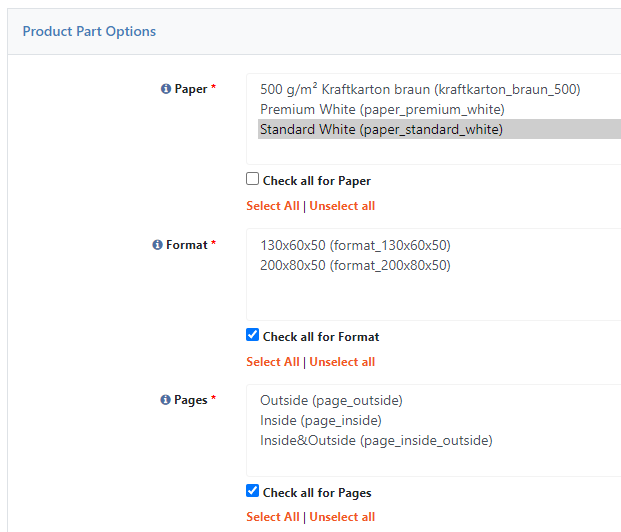
Once you save the list will appear in the table under “Web Product → Fixed Prices”.
6.2.2.1 Fixed prices import/export
Invalid file id - bba9282c-2251-4ad9-a5f4-6617e7c153e6
An other way to add fixed price lists to your system is via import/export of a .csv file.
Important! The .csv file is semicolon separated. Please make sure to use the correct separator if you open the files with e.g. Excel

Within the .csv file you will add the same settings like above. Here you just have to use the codes of the product part or the page option values. Multiple values withing on cell will be separated with a comma (e.g. the rule should be valid if material A and material B is selected. Then the cell would look like this: code_material_a,code_material_b
If you are done the list can be uploaded to Plug&Print and all your prices will be available.
It is not possible to delete entries via import. If you have 500 lists and import only 1 new list it’s not gonna crush something.
Our import focus on the code. This means that if you import a file we will check if the code of this list is already existing or not. If not it will be added at the end of the table. If yes it will override the existing one.
Lists of all components including their codes:
Materials:
Formats:
Pages:
Colors:
Bindings:
Refinements:
Finishing:
6.2.3 SQM Price Lists
Fixed price lists are a good way to set up prices for different product configurations. But if we talk about parametric packages with a flexible size the price list needs some help. Here we use SQM Price Lists.
SQM Price Lists are prices related to an area of a package that will be added on top of the Fixed Price Lists. This offers you the possibility to take care of different sizes and add additional margins related to the usage per box and sheet.
You can think of it like this: If the size of a box is x and above, you can add y on a print sheet and therefore you can add a margin on top of the Fixed Price List.
Bigger Size = Less boxes per sheet = Higher margin on top.
6.2.3.1 SQM Price Lists Backend
Navigate to Webproduct → SQM Price List and click on Create.

First you have to add a name for the list followed by the size of your box. So in this example we say that the size is up to 0.72 sqm per box.
After this you set up a tier price list similar to the one from our Fixed Price List. You start with the quantity (and above) at that the price should be summed up with the Fixed Price List. So our table can be read like this:
IF the box has a size of 0.72 sqm (and above) AND the quantity is 1 (and above) THEN 16.76 will be summed up to the price from the Fixed Price List.
IF the box has a size of 0.72 sqm (and above) AND the quantity is 100 (and above) THEN 11.11 will be summed up to the price from the Fixed Price List.
IF the box has a size of 0.72 sqm (and above) AND the quantity is 200 (and above) THEN 6.28 will be summed up to the price from the Fixed Price List.
After you set up all the tier prices for this area you can save the list. The prices are directly available in the frontend and ready to use.
Important to mention is that there is also an interpolation already integrated. This means that Plug&Print will calculate now a new price per x for every new quantity between two values in the table. E.g. if the customer selects 25 the price will be calculated by getting closer to the next price step in the table (100 for 11.11).
If you do not want to use the interpolation you can simply add side steps to prevent the system to calculate prices between. An example can be found here.
6.2.3.2 SQM Price Lists import/export
There is an import/export possibility for SQM Price lists similar to Product Parts and Fixed Price Lists.
Important! The .csv file is semicolon separated. Please make sure to use the correct separator if you open the files with e.g. Excel
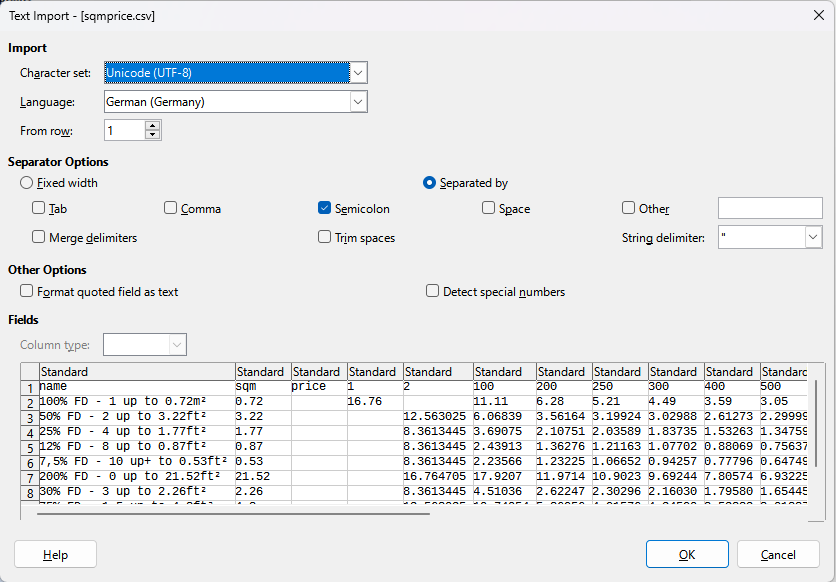
Within the .csv file you will add the same settings like above. If you would like to add a new quantity as a tier price just add a column to the file (best directly on the right position so e.g. 150 will be added between 100 and 200)
If you are done the list can be uploaded to Plug&Print and all your prices will be available.
It is not possible to delete entries via import. If you have 500 lists and import only 1 new list it’s not gonna crush something.
Our import focus on the area. This means that if you import a file we will check if the area of this list is already existing or not. If not it will be added at the end of the table. If yes it will override the existing one.
7. Promotions
Once the products are configured and set up we can have a look on promotions. This Magento feature allows you to set up different discounts or cupon codes and is separated in two different parts:
7.1 Catalog Price Rules
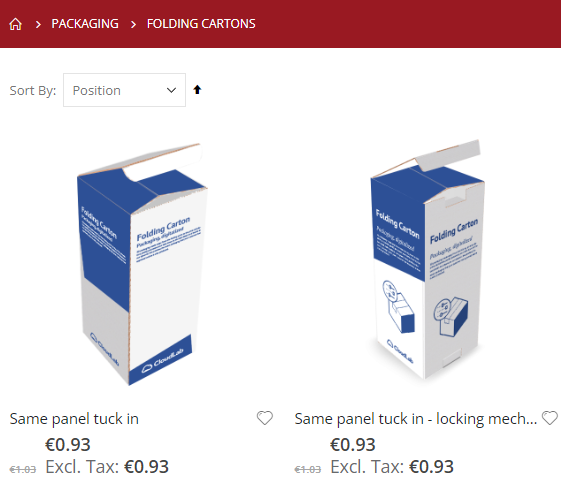
Catalog Price Rules are discounts that are linked to a specific category in combination with a validation date or customer group. This discount is displayed directly on the category page and the new price is directly applied to the product price. An example could be 10% on all folding cartons or 5% discount for logged in customers.
First you have to navigate to Marketing → Promotions → Catalog Price Rules

Here you can now see all your existing rules and create new one by clicking on “Add New Rule”. Once the new rule is open you have the following settings available:
Name | Description | What to set up |
|---|---|---|
Rule Information | ||
Rule Name | Name of the rule (only for backend reason) | Name it as you like it |
Description | Detailled description for the rule (only visible in the backend) | Add es description for your rule however you would like. |
Active | Enables or disables the rule. So e.g. if you have a christmas discount you maybe do not need it in May. You you can set it to “No” and activate it whenever you need it again | Activate or Deactivate the rule |
Websites | Select the website/shop this rule is used for. Please keep in mind that Plug&Print only supports one shop! | Select the only existing shop (Main Website). |
Customer Groups | The rule can be assigned to specific customer groups. Example: registered customers should get the discount but not guests. | Select the customer groups this rule should be valid for. |
From/To | Rules can be created and automatically be activated on a specific date. The can also end on a specific date | Select start and end date for this rule or leave it empty if you would like to have it valid for unlimited time |
Priority | If multiple rules are valid at the same time the system needs to know which rule starts and which follows. | Set up a priority for your rule. |
Conditions | ||
Conditions | A rule can be assigned to a specific condition. Anyway there is only one usable condition here called “Category”. This means that the rule is only valid for products that are assigned to this specific category/categories | Select a condition that fits your needs. |
Actions | ||
Apply | Different discount possibilities are available: | Select the way the discount should be added. |
Discount Amount | Discount in % or fixed value. The kind of discount depends in the setting “Apply” | Add the discount you would like to apply |
Discard subsequent rules | If this is set to “yes” it means that an other valid discount that has a lower priority (higher number) is not calculated. | Set to yes or now depending on your needs. |
Once you save a rule it is important that it is also activated/applied. This can be done by ether directly click on “Save and Apply” or by click on “Apply Rules” in the overview of all rules.


If this is done you can see your discounts directly on the category page
To apply discounts to the frontend the indexes have to be refreshed. This is done automatically via cron job and happens every minute. This means: You have to wait up to 1 minute until discounts are ready to use after you saved them.
7.2 Cart Price Rules
nb
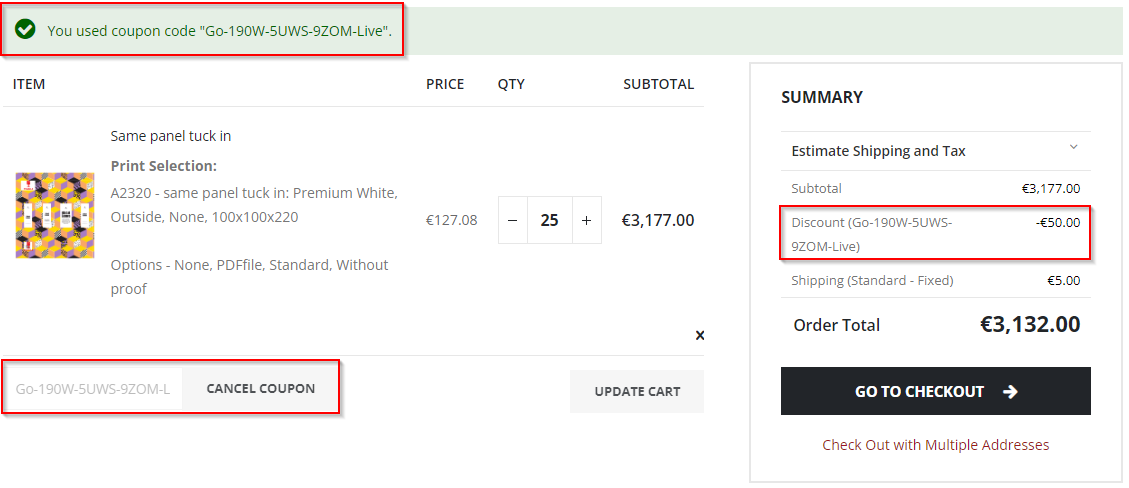
Cart price rules are applied directly in the shopping cart. So there is no visual effect on the product page or category. Instead the cart price rules will be displayed in the summery of the shopping cart. Examples are e.g. 10% discount if your subtotal is over 10000€ or 5% discount with the cupon code “Discount”.
The setup works quite similar to the catalog price rules.
Navigate to Marketing → Promotions → Cart Price Rules to get an overview of all existing cart price rules.

Click on “Add New Rule” to set up a new one. Below you find the list with all settings:
Name | Description | What to set up |
|---|---|---|
Rule Information | ||
Rule Name | Name of the rule (only for backend reason) | Name it as you like it |
Description | Detailled description for the rule (only visible in the backend) | Add es description for your rule however you would like. |
Active | Enables or disables the rule. So e.g. if you have a christmas discount you maybe do not need it in May. You you can set it to “No” and activate it whenever you need it again | Activate or Deactivate the rule |
Websites | Select the website/shop this rule is used for. Please keep in mind that Plug&Print only supports one shop! | Select the only existing shop (Main Website). |
Customer Groups | The rule can be assigned to specific customer groups. Example: registered customers should get the discount but not guests. | Select the customer groups this rule should be valid for. |
Cupon | A cart price rule can be linked to a cupon code, a specific condition or both combined. | Select if the rule is linked to a cupon code or not. |
Coupon Code (Only visible if “Cupon” is set to “Specific Cupon”) | You can set up one general cupon code for all your customers. E.g. all customers can use the code “GoLive” to get a discount. You can also create unique cupon codes by check the “Use Auto Generation” checkbox. This will allow you t create as many individual cupon codes as you wish. | Add a general cupon code or use the checkbox to create unique ones. |
Uses per Cupon (Only visible if “Cupon” is set to “Specific Cupon”) | How many times can a cupon code be used. If you use a general code the usage should be quite high because all your customers share the same code. | Select the number of usages per cupon code. |
Uses per Customer (Only visible if “Cupon” is set to “Specific Cupon”) | How many times a code can be used per customer. If you would like to make sure that every customer can use a cupon code only once you have to set this to 1. | Select the number of usages per customer. |
From/To | Rules can be created and automatically be activated on a specific date. The can also end on a specific date | Select start and end date for this rule or leave it empty if you would like to have it valid for unlimited time |
Priority | If multiple rules are valid at the same time the system needs to know which rule starts and which follows. | Set up a priority for your rule. |
Public in RSS Feed | This is not supported for security reason! | This is not supported for security reason! |
Conditions | ||
Conditions | A rule can be assigned to a specific condition. Anyway there is only one usable condition here called “Category”. This means that the rule is only valid for products that are assigned to this specific category/categories | Select a condition that fits your needs. |
Actions | ||
Apply | Different discount possibilities are available: Fixed amount discount: Fixed discount per product. Fixed amount discount for whole cart: Fixed discount for the whole shopping cart. By X get Y free (discount amount is Y): By X get Y free | Select the way the discount should be added to the cart. |
Discount Amount | Discount in % or fixed value. The kind of discount depends in the setting “Apply” | Add the discount you would like to apply |
Maximum Qty Discount is Applied To | You can limit the discount to a fixed quantity so that your discount is e.g. now applied to all 10000 pcs of a product. If you e.g. add “100” to it it means that 100pcs (per product) get the discount and the rest is calculated normal. | Add the quantity as you need it or leave it empty |
Discount Qty Setp (Buy X ) | Only used for apply methode “By X get Y free (discount amount is Y)”. This is the quantity the customer has to purchase to get Y (Discount amount) for free. | Add the quantity as you need it or leave it empty |
Apply to shipping amount | Discount amount is applied to subtotal only | Set to yes or no as you need it. |
Discard subsequent rules | If this is set to “yes” it means that an other valid discount that has a lower priority (higher number) is not calculated. | Set to yes or now depending on your needs. |
Apply the rule only to cart items matching the following conditions (leave blank for all items). | Here you can add conditions to make the free shipping valid for. Example: You sell printing products (business cards) and also heavy stock products (marmot sculptures). You would like to add a free shipping if the subtotal is over 500€ but not for the sculptures. In this case you cloud create two categories (not visible in the frontend) and say that the free shipping is only valid if the products in the shopping cart are part of the “free shipping category”. | Set conditions for free shipping. |
Labels | ||
Default Rule Label for All Store Views | Here you can select the name title of the discount how it should be displayed on the frontend. If you leave it empty the name is used or the cupon code (if set up). | Set up the name of the rule how it should be displayed on the frontend (summery of the shopping cart). |
Manage Cupon Codes (only visible if “Use Auto Generation” is set to yes) | ||
Cupon Qty | Select how many cupon codes you would like to generate | Add the qty of cupon codes you would like to generate |
Code Length | Set up the length of every cupon code | Set up the length of every cupon code |
Code Format | Select the format of your cupon codes. | Select the format of your cupon codes. |
Code Prefix | You can add a fix prefix to every generated cupon code. Example: You set up a GoLive discount. You cound add “GoLive-” in front of all the cupons or split it in “Go-” and a suffix. | Add a Prefix if needed |
Code Suffix | You can add a suffix to every generated cupon code. You set up a GoLive discount. You cound add “-GoLive” behinde every code or split it in “-Live” in combination with a prefix | Add a Suffix if needed. |
Dash Every X Characters | You can add a “-” between every X characters to make codes easier to reed. | Add number of characters that should be used before a “-” is added. |
Generate (Button) | Click on generate to get your codes. | |
Rules need to be saved before you can generate unique cupon codes. Also the generation of codes is done via cron job. This means that you have to wait up to 2 minutes to get the list with all generated codes.

Cart price rules do not have to be applied like catalog price rules and are usable for customers directly.
8. Transactional E-Mails
There are many E-Mails that are sent from a shop like “Password forgot”, “Order confirmation”, “Invoice” and more. All these E-Mails are already existing with default templates and all of them can be configured and rebranded.
Advanced knowledge in html, css and php is needed to change the Transactional E-Mail Templates. The templates are provided in code and there is no editor, available in the Magento basic system.
If you want to change a template you first have to navigate to Marketing → Communications → Email Templates and then click on “Add New Template” on the top right. The table only displays templates created by you.

Next you can select one of the already existing templates like e.g. the new order confirmation template. Once you click on “Load Template” all other settings are prefilled with the existing template and can be changed from here. You can also get a list of existing variables by click on “Insert Variable…”.
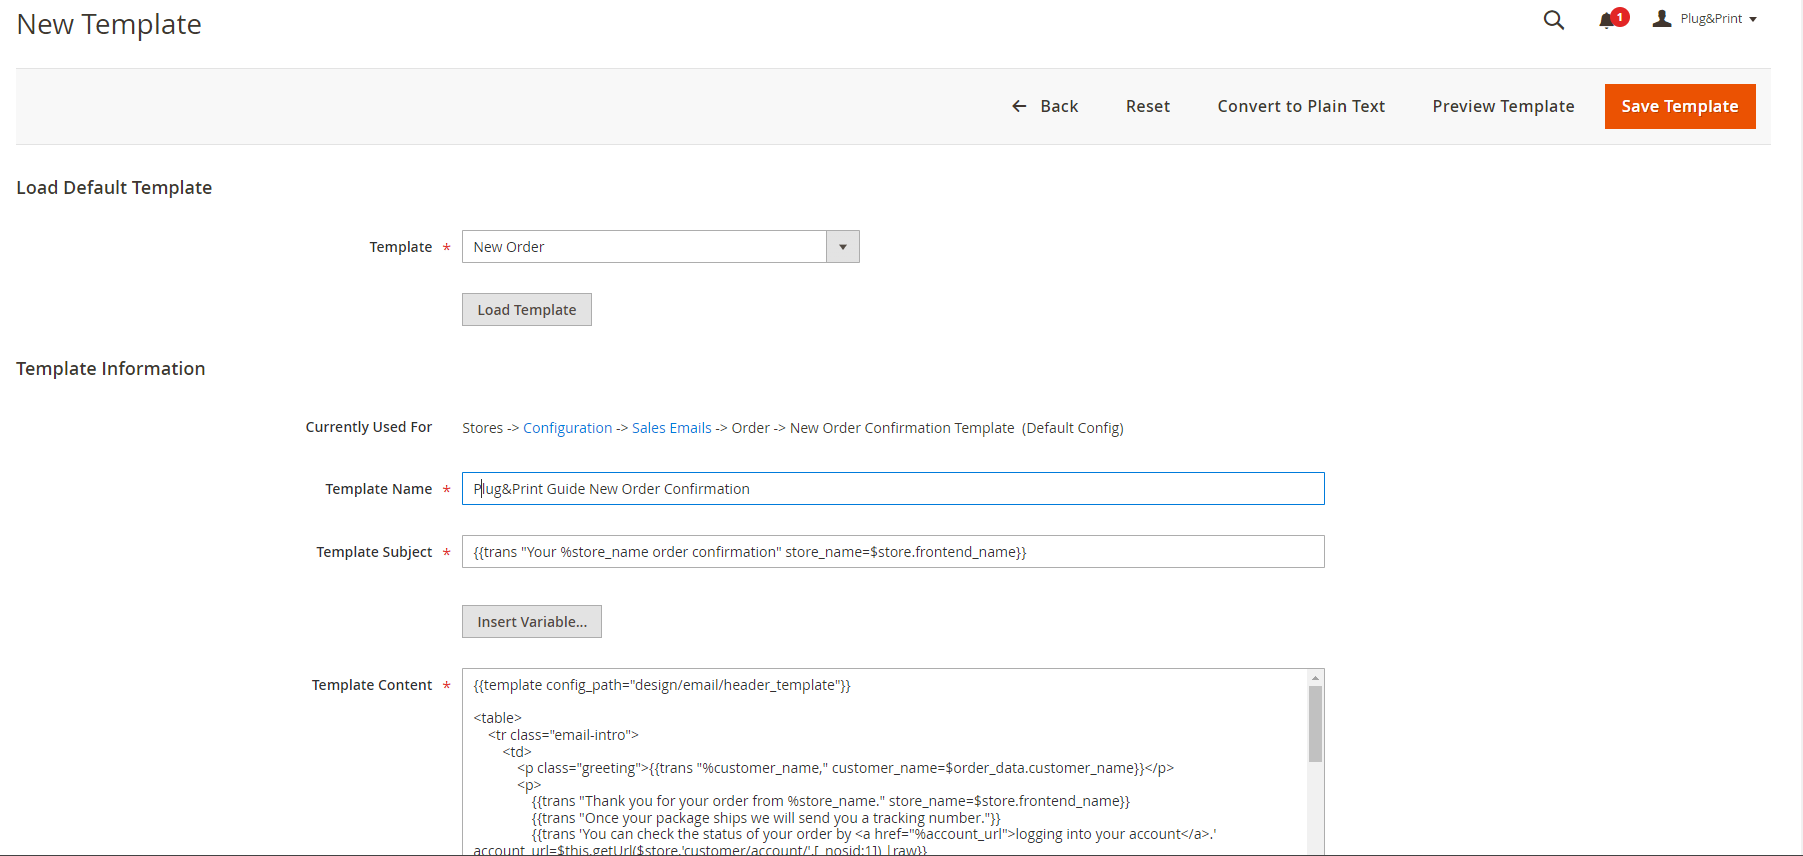
Click “Save Template” to get back to the table. Now you can see your new created template for the transactional email and it can be used.
E-Mail templates will be assigned in the store configuration. This is explained here .

9. General Settings
There are a couple of settings that need to be configured before you can go live now. For these settings you have to navigate to Stores → Settings → Configuration and switch the scope on the top left from “Default Config” to “Main Website”.
The following table contains all menus and settings that needs to be configured with a link to the official documentation and recommandations. Already configured parts like Porto Theme oder currencies are ignored here. Please check the topics above for detailled information about the configuration.
Name | Description | User Guide |
|---|---|---|
General | ||
General | General shop settings like allowed countries, time zone and weekend days or store information like name, and adress | |
Web | General web settings like your new URL or the usage of an SSL Certificate Important: The installation of the SSL Certificat is only possible via Plug&Print Support. Please provide the certificate and key (both separate). | |
Currency Setup | General settings for currencies. Please check the currency topic for more information here. | |
Store Email Addresses | Here you can set up names and e-mail adresses that appeas as “sender” for Eemails. Important: SMTP extension for email communication with customers is highly recomanded. | |
Contacts | General information about the “Contact Us” like contact person or E-Mail adress the request should be send to. | |
Security | ||
Security.txt | Allows the system to save a security.txt file that that contains information that is needed by security researchers to report potential vulnerabilities to you. | |
Google reCAPTCHA Admin Panel | General settings for Google reCAPTCHA for the backend. Important: Google API Keys are needed! | |
Google reCAPTCHA Storefront | General setting for Google reCAPTCHA for the frontend. Important: Google API Keys are needed! | |
Sales | ||
Sales | General sales settings like order of information in the checkout, minimum order amount, cron settings and more. | |
Sales Emails | Settings about which Email template is used for which case, who is the sender and if there should be a copy send to you. Here you link the templates from topic Transactional-E-Mails | |
Tax | General Tax setting like classes, calculation and display configurations. Please check Taxes configuration for detailled information. | |
Checkout | Checkout Settings like allowed onepage checkout, checkout as guest, shopping cart livetime, and more | |
Shipping Settings | Here you can set up the shipping origin for your shop. | |
Multishipping Settings | Here you can allow a multi shipping (ship one order to multiple adresses) and set up a maximum quantity in cart for that multishipping is allowed | |
Delivery Methods | Here you can set up the different delivery methods you would like to offer to your customers. Mostly you will use a shipment provider like DHL, UPS or else for shippment configuration. The installation of the modul for the shipment provider needs to be done via CloudLab Support and is for free. The detailled configuration varies from provider to provider. Please follow the user guide of your used shipment provider extension. | |
Payment Methods | Here you can set up the different payment methods you would like to offer to your customers. Mostly you will use a payment provider like Klarna, Paypal or else for payment configuration. The installation of the modul for the payment provider needs to be done via CloudLab Support and is for free. The detailled configuration varies from provider to provider. Please follow the user guide of your used shipment provider extension. | |
AMASTY EXTENSIONS | ||
GDPR (Pro) | GDPR (General Data Protection Regulation) is a Regulation in EU law. To prepare your system in the best way the GDPR (Pro) extension is already delivered and installed. For a detailled documentation check the user guide. The guide can be found in the column right or directly in the backend under Amasty → Solutions → GDPR (Pro) → Personal Data Protection → User Guide | |
10. Checkout and production
Now your system is ready for the first orders. Plug&Print offers an easy to use checkout that is quite self explaining.
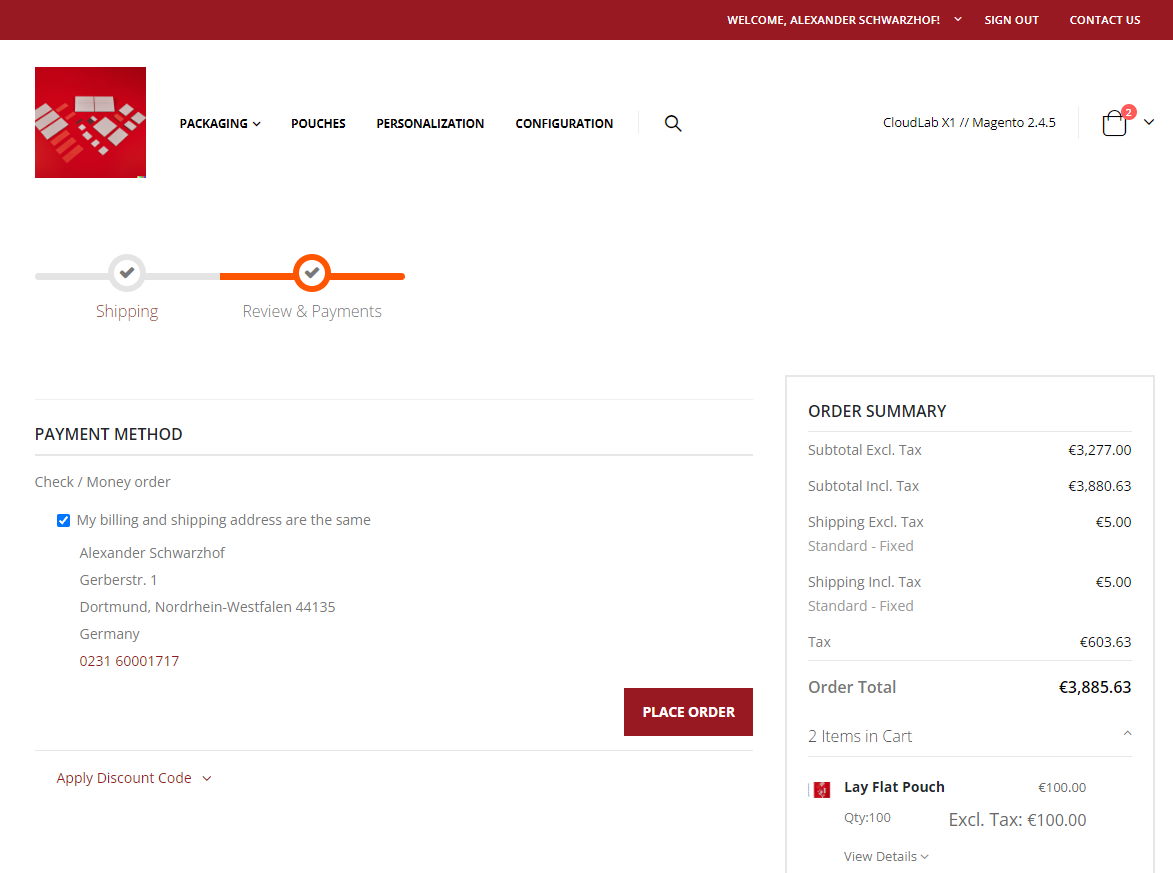
Once the customer has placed the order and paid the print files will be generated.
Distribute Type Open Shop: The Plug&Print system use the distribute type “Open Shop”. This means “print files for money”. Customers have to pay before the files are generated and sent to your server.
If a customer pays via payment provider the status of the payment is directly sent to the system and everything works automatically.
If you offer a default Magento payment method like “Bank Transfer” or “Check/Money Order” you will have to create an invoice from the backend to change the status of the order to “Processing” and get the print files.
Navigate to “Sales → Orders” and click on “view” in the row of your order you would like to add an invoice too. Then click on “Invoice” on the top, scroll down and click on “Submit Invoice”.
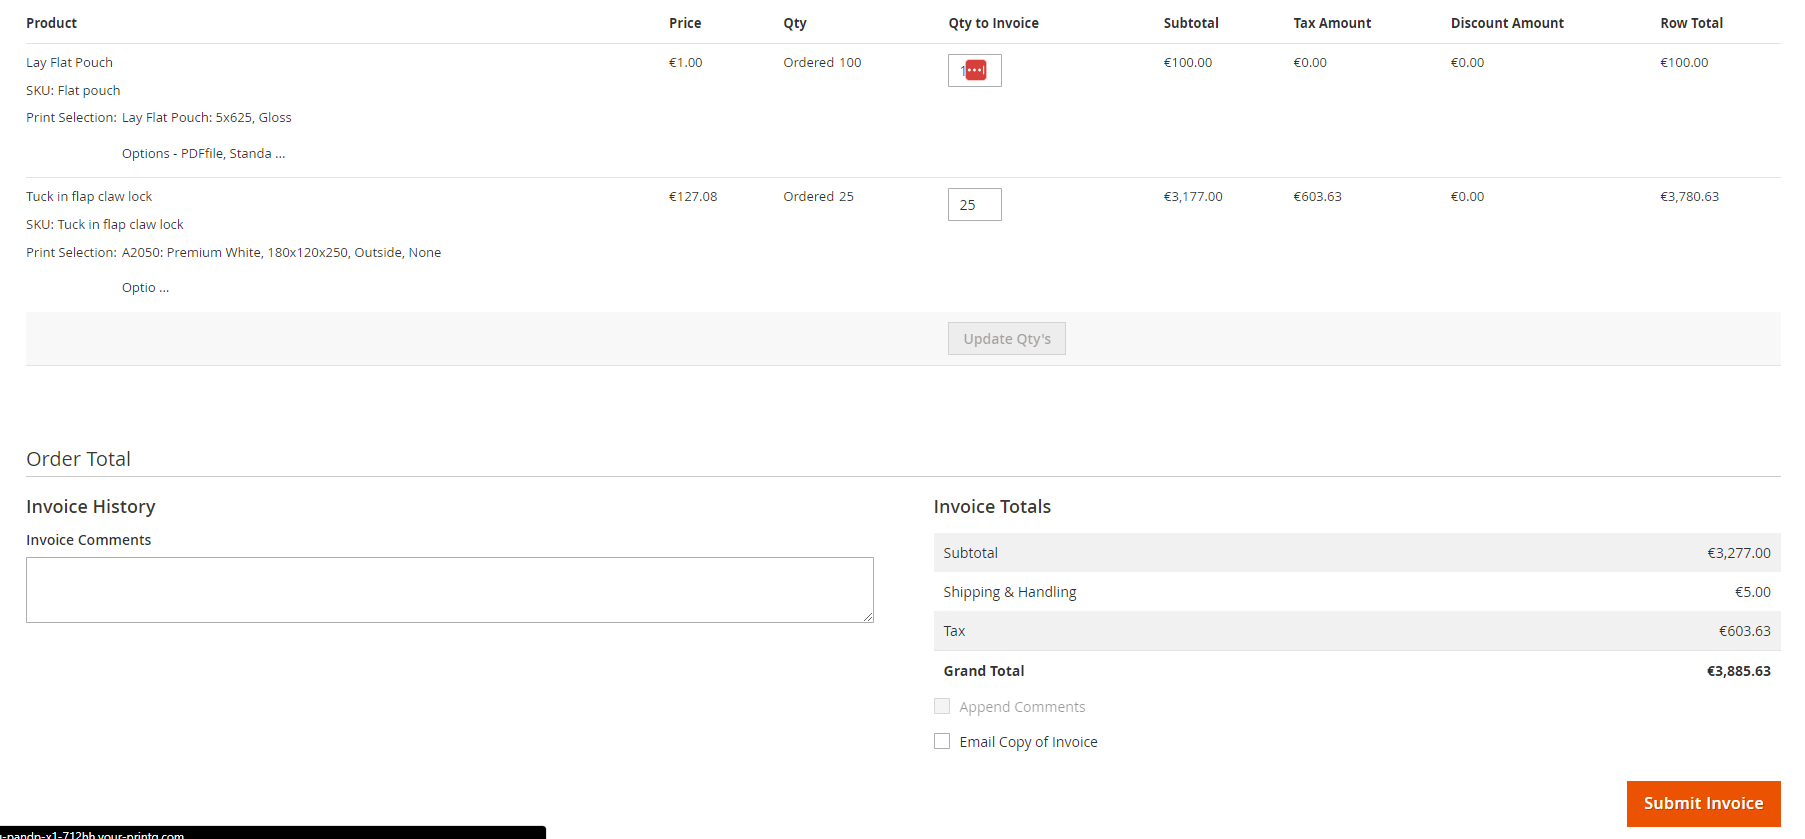
You can see the orders and all details in Magento and in our Plug&Print Datacenter.
Magento: Sales → Orders

Datacenter: CloudLab → Datacenter → Access Backend → Production → Orders

From both tables you can get the print pdf and the jobsheet. Just open the order, navigate to the job and download the files.

The print files will be generated every 5 minutes. If your files are not directly visible after invoice/payment is done it means the workflow is not done yet.
Also it is possible to get the files directly transfered. For this we offer a connection to HP Site Flow and a so called “Production Method”. This production method will sent the files (print pdf and jdf) to a hotfolder of your choice on a server of your choice.
Both transfers need to be configured by the plug&print support team. Just get in contact with us and we will set up the connections with your data.
