
X3 Product previews (Basic, Live, 3D, Video) (X3 EN)
PRINTQ PREVIEWS
printQ allows you to present your print products in various different previews, in order to facilitate the purchase decision for your customers based on a realistic simulation.
SVG-LIVE PREVIEW
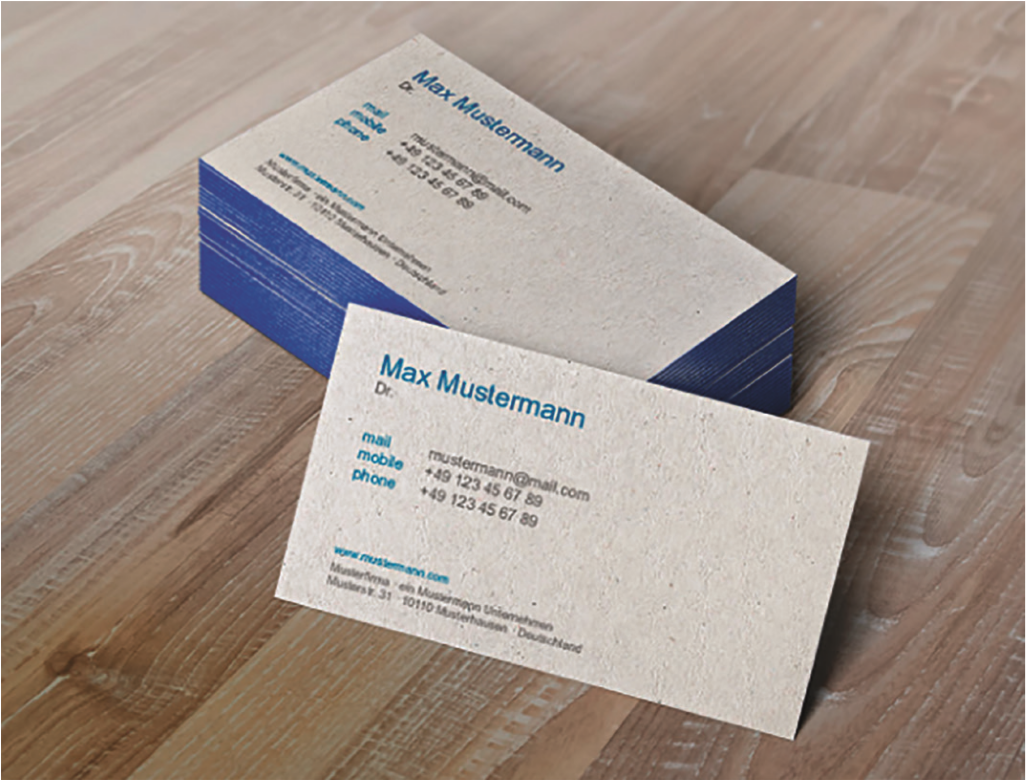
Let us use the example of a customizable business card. In the live preview, your customer can immediately see his design in a real environment and right on the object.

This kind of live preview template is based on a SVG-file with several groups, in which the object in the group to be personalized needs to have the id artwork.
So when you create the SVG-file pay attention to add the attribute id=”artwork” to the layer that should be replaced with the personalized template.
See the following example code, wheren the replaced object can be found in line 4.
<?xml version="1.0" encoding="utf-8"?>
<svg version="1.1" xmlns="http://www.w3.org/2000/svg" xmlns:xlink="http://www.w3.org/1999/xlink"x="0px" y="0px" viewBox="0 0 1190 830" style="enable-background:new 0 0 1190 830;" xml:space="preserve">
  <g id="business_card">
    <image id="artwork" style="overflow:visible;" width="1177" height="676" xlink:href="business_card/artwork.png" transform="matrix(0.5947 0 0 0.5947 242 202)"></image>
  </g>
  <g id="background">
    <image style="overflow:visible;" width="1190" height="830" xlink:href="business_card/background.png"></image>
  </g>
</svg>
Images in SVG-Live Preview
You are also allowed to use predefined images in your SVG-Live-Preview, but please be aware to add the reference including the top level domain, otherwise it can’t be recoginzed.
So instead of simply referencing href=”image.png” use href=”https://mydomain.com/path1/subfolder/image.png”
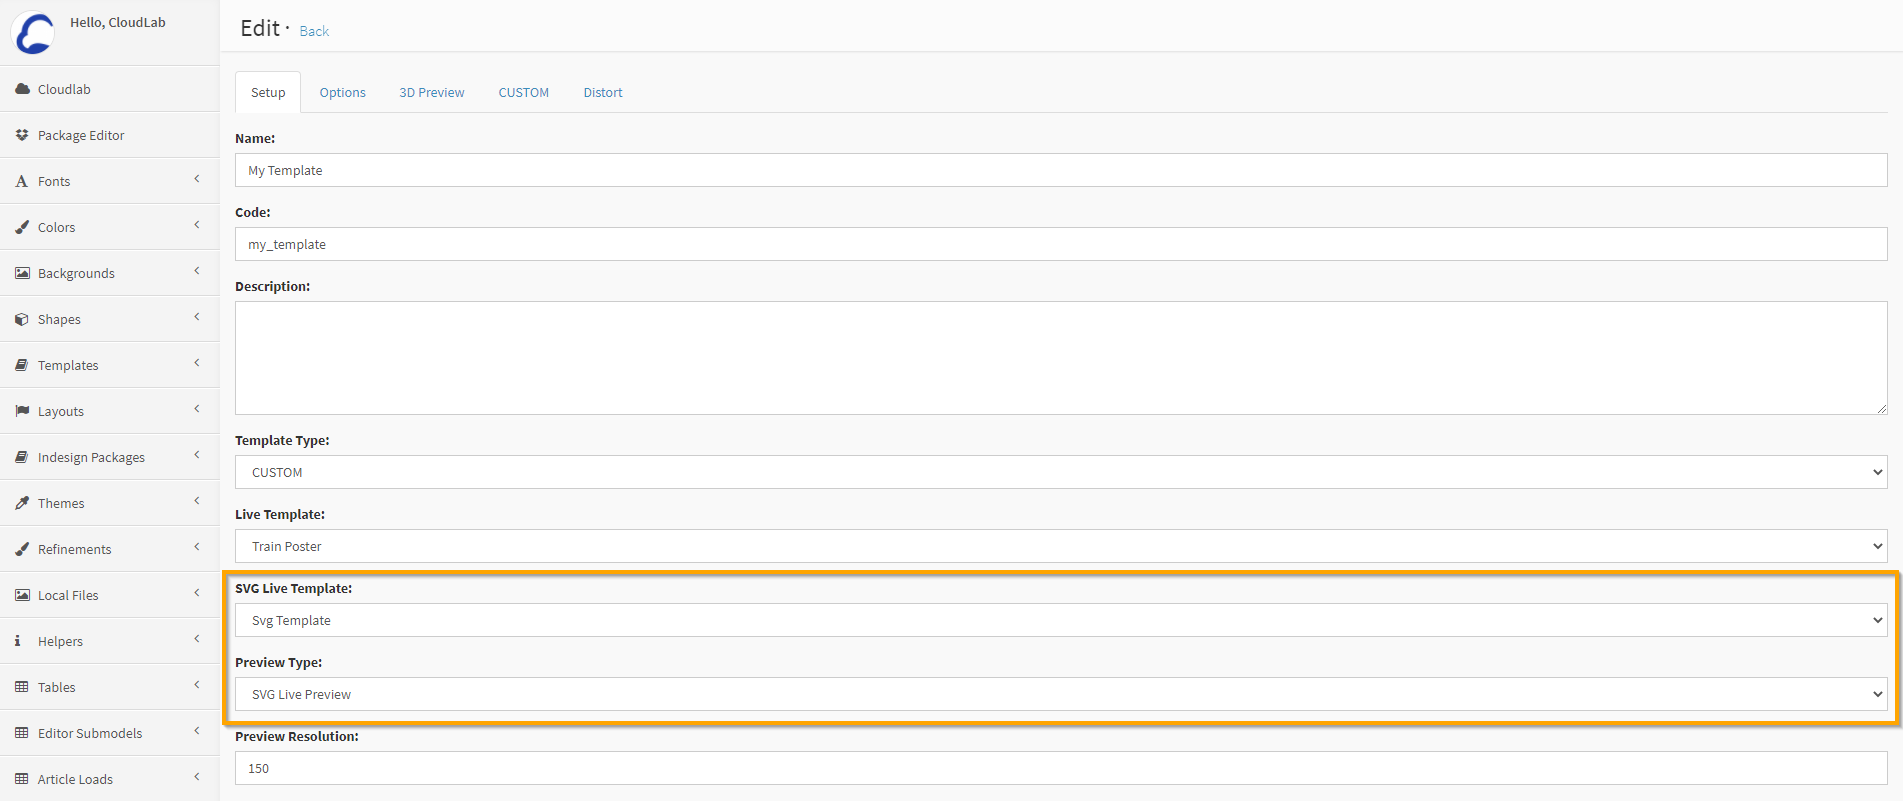
The final SVG file needs to be uploaded in /datacenter/public/personalization/svg_live_template on th FTP-Server.
Finally the SVG-File must be selected in the Data Center under Templates > All Templates > Select Template > SVG Live Template, and the Preview Type set to SVG Live Preview
An example file can be downloaded here:
PSD-LIVE PREVIEW
Let us use the example of a customizable business card. In the live preview, your customer can immediately see his design in a real environment and right on the object.
This kind of live preview template is based on an Adobe-Photoshop-file with several layers, in which the layer to be personalized with the label “layer“ is created as a “smart object“ at the top.
For your own live preview you need a PSD-file, which must meet the following requirements:
There can not be any folders or groups on the level of the layers.
None of the layers can be created as background.
There has to be a smart object named “layer“ marking the top layer. Later, this object is replaced by the preview of the personalization.
The name of the PSD-file may not contain umlauts or spaces.
The “layer”-level and the PSD must have a resolution of at least 150 dpi and be exactly of the same size as the PDF-file, which is uploaded there.

After you have created your own live previews, please contact our support. We will then deposit them on the personalization server for you. Now you can set the preview type to “Live Template“ and select the new live preview in the personalization template under CloudLab > Data Center > Personalization > Templates.
After CloudLab installed the Live Preview you can select it in the template, within the option Live Template

And example file can be downloaded here
letterpress_LivePreview_cl.psd
3D Preview
CREATION OF A 3D MODEL
For a 3D-preview you will need a 3D-model, which you should create with a 3D-program like Autodesk 3ds Max, MAXON Cinema 4D or the open source program Blender.
You can create 3D-models as usual, a multitude of shaders and effects is supported. To ensure that all effects are displayed as desired in the browser, we recommend you to check from the current WebGL-specifications, what exactly is supported. It is important that you name the surfaces and/or textures to be replaced correctly, so that these can be easily found in the WebGLfile later.
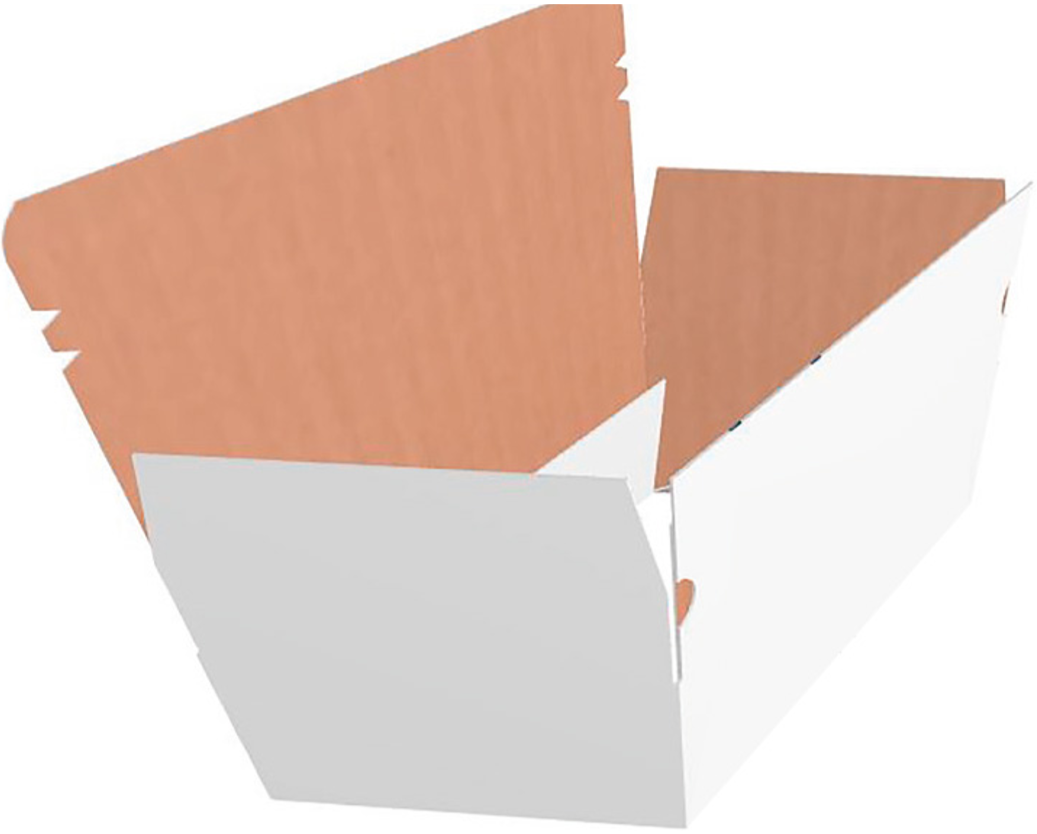
printQ exchanges the texture you created with a page from the PDF, which is being customized. An example is shown in the illustration below.
In the preview we replace the outer texture of the box with the element personalized here:
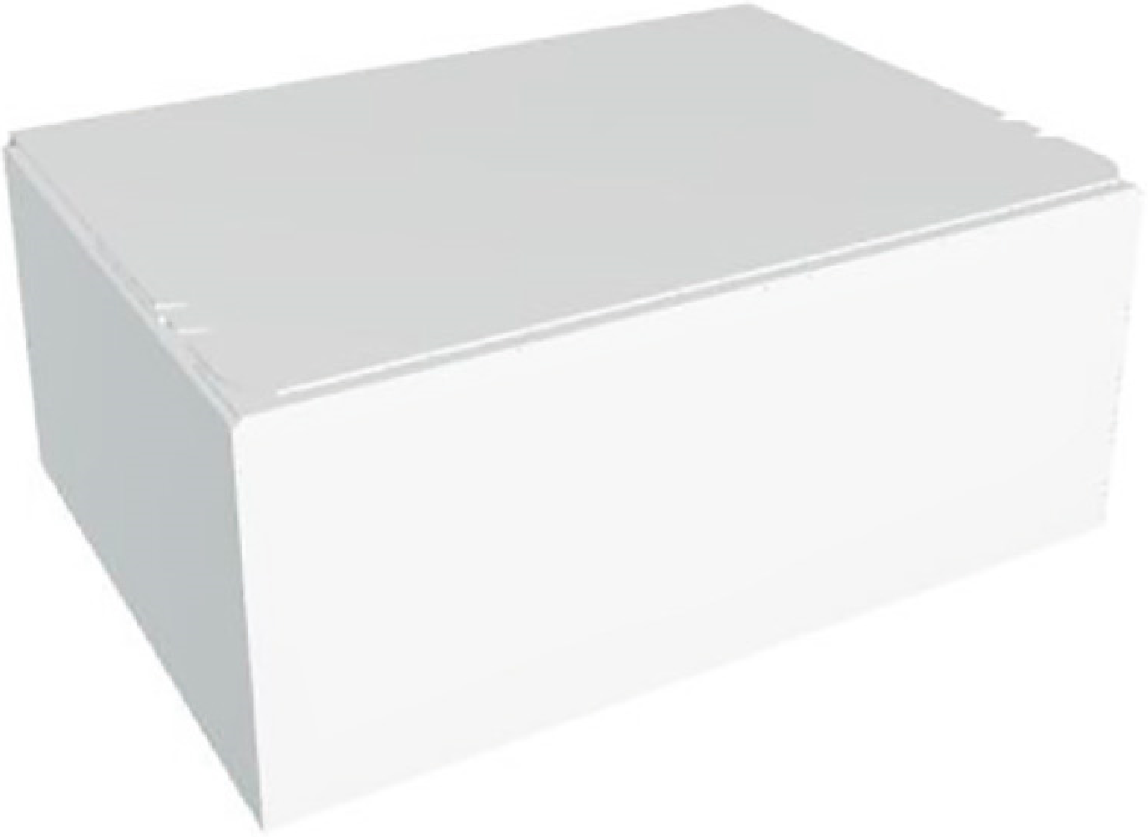
The texture of the inside was not adjusted. It is static and shows the customer the classical brown of the cardboard box.
Please make sure to export the files in the format Babylon or x3dom and html, so that they can be used in the printQ-system. (A detailed explanation of x3dom can be found under http://www.x3dom.org).
Hints and more information about creating a static 3d model can be found here: (hJ5ts67)Static 3D model creation
CREATION OF A 3D-PREVIEW
Once you have created the 3D-model of your print product, you only have to make it available as a 3D-preview in printQ. Upload the x3dom- as well as the html-file including all textures to the following folder on the server:
/datacenter/public/personalization/3d_models
Check in the browser, whether the model is working. You can do this by opening the following link (with your shop domain at the beginning):
YourShopDomain/datacenter/personalization/3d_models/3dmodel.html
At the end of the <body> insert the following script – before closing the <body> with the command </body>:
<script type=“text/javascript“>
  var OnMessage = function(e){
      if (e.data.length)
      {
        var _data = jQuery.parseJSON(e.data);
        for (var j in _data.texture) {
        $(‚#‘+_data.texture[j][0]).attr(‚url‘,_data.image[_data.texture[j][1] - 1]);
      }
      //_handleMessage(_data.act,_data.option);
      }
  }
  if (window.addEventListener) {  // all browsers except IE before version 9
    window.addEventListener („message“, OnMessage, false);
  } else {
    if (window.attachEvent) {   // IE before version 9
    window.attachEvent(„onmessage“, OnMessage);
    }
} </script>
In the <header> insert the following jquery-script:
<script src=“//ajax.googleapis.com/ajax/libs/jquery/1.11.1/jquery.min.js“></script>
Check again, whether the print product is displayed as desired. Then, look for the texture in the x3dom-file, which you wish to replace.
<ImageTexture url=“texture.png“>
Add an ID (x3dom-file):
<ImageTexture id=”texture1” url=“texture.png“>
The texture-ID in printQ is a combination of the texture-ID of the x3dom-file and the “nameSpaceName“ from the html-file, separated by two consecutive underscores, without spaces in between. So, if the following is true: nameSpaceName=”tt”, and texture-ID is “texture1”, the page mapping ID, which you have to enter in the backend, has to be named as follows:
“tt__texture1”
Finally, copy the crossdomain.xml
Regarding 3D files in Babylon format: Upload all files to
/datacenter/public/personalization/3d_models
Open the HTML file and add following Code in footer:
<script type=”text/javascript”>
  var OnMessage = function(e){
    if (e.data.length)
    {
      var _data = jQuery.parseJSON(e.data);
      for (var j in _data.texture)
      {
        if (_data.texture[j][0].indexOf(‘.’) >= 0)
        {
            var _tmpIndex = _data.texture[j][0].split(‘.’);
            window.scene.meshes[_tmpIndex[0]].material.subMaterials[_tmpIndex[1]].diffuseTexture = new BABYLON.Texture(_data.image[_data.texture[j][1] - 1], window.scene);
        }
        else
        {
            window.scene.meshes[_data.texture[j][0]].material.diffuseTexture =  new BABYLON.Texture(_data.image[_data.texture[j][1] - 1],window.scene);
            window.scene.meshes[_data.texture[j][0]].material.emissiveTexture =  new BABYLON.Texture(_data.image[_data.texture[j][1] - 1],window.scene);
        }
      }
    }
  }
if (window.addEventListener) {  // all browsers except IE before version 9
  window.addEventListener(“message”, OnMessage, false);
} else {
  if (window.attachEvent) {   // IE before version 9
    window.attachEvent(“onmessage”, OnMessage);
  }
}
</script>
Add following code in Header:
<script src=”https://ajax.googleapis.com/ajax/libs/jquery/2.2.0/jquery.min.js”></script>
Open JS file and add:
window.scene = scene;
after the line:
BABYLON.SceneLoader.Load(“assets/”, “airtube.babylon”, this.engine, function(scene) { (assets and airtube differ from model to model)
Open HTML in Browser (Chrome) and switch to Console; type in:
window.scene.meshes
Count the r‘s and start typing from the last one:
window.scene.meshes[NUMBER]
To hide or delete a Texture type:
window.scene.meshes[NUMBER].visibility = 0
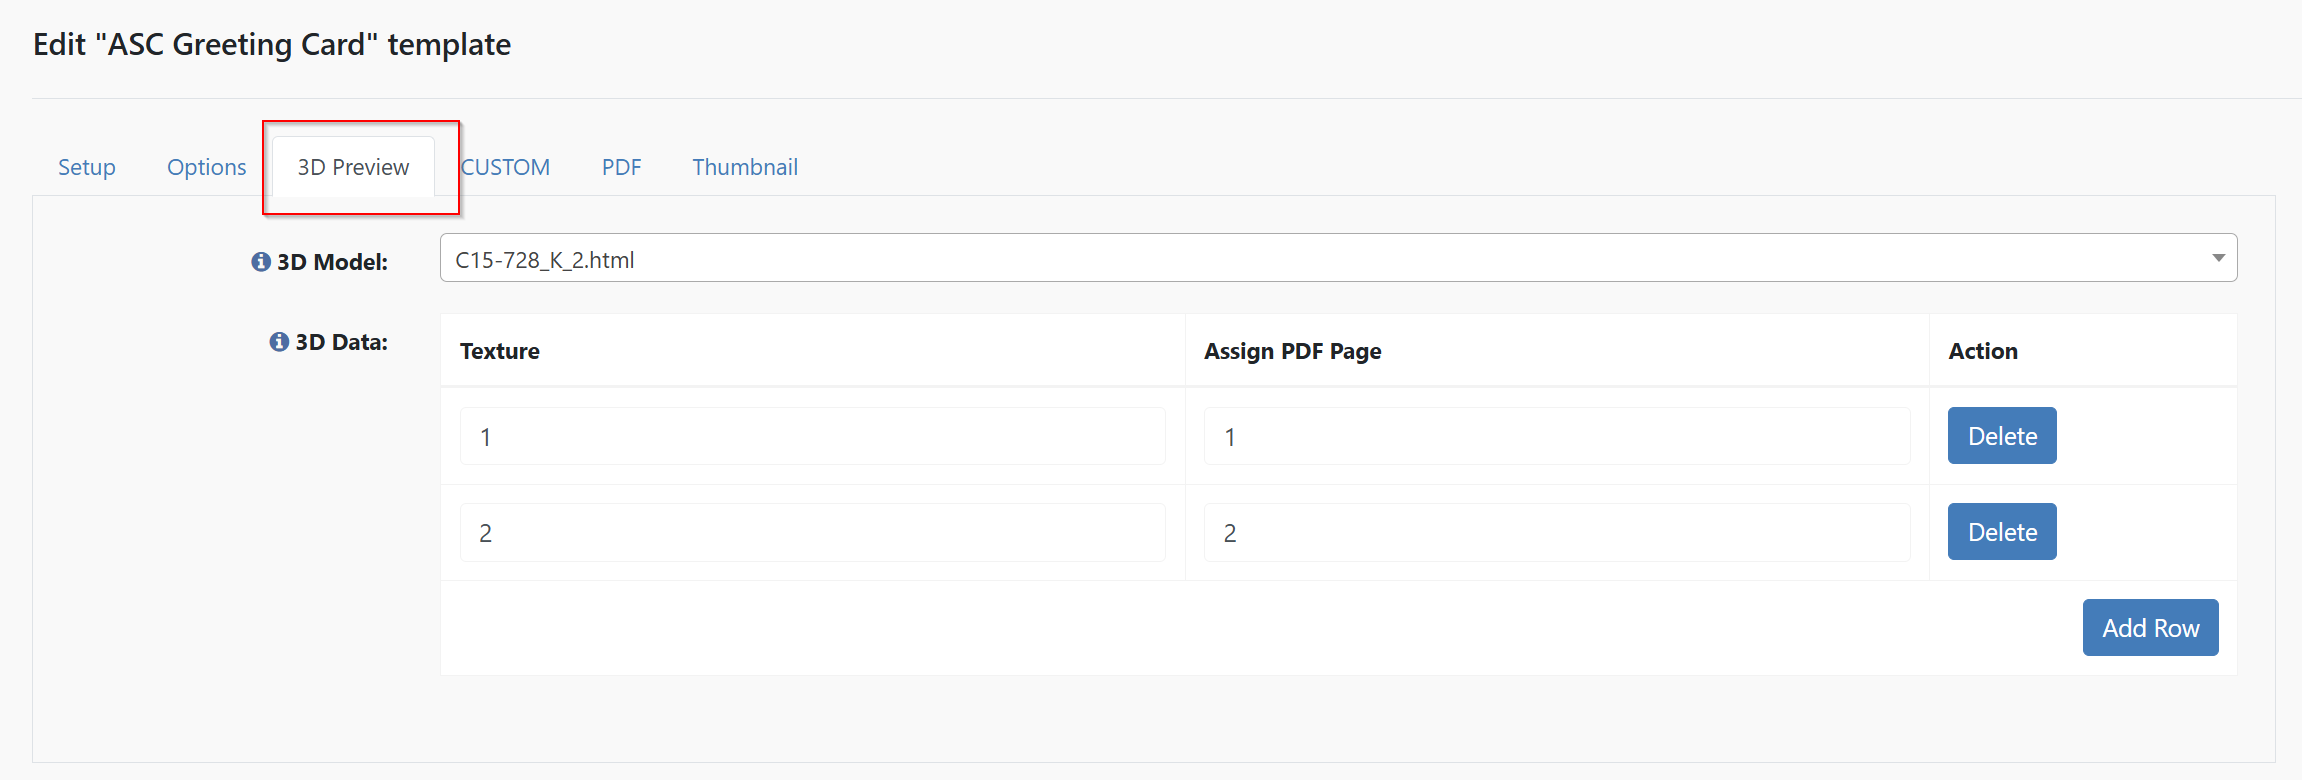
In the Magento backend switch to CloudLab > Data center > Personalization > Templates > All Templates, select the personalization template you want to edit and click Add Value under 3D Preview. In Texture enter the number of the texture and assign it to the PDF page.
When this is not working, it could be that your Texture is using SubMaterials. In this case, go to Console and type in:
window.scene.meshes[NUMBER].material.subMaterials
Count the r‘s and start typing from the last one:
window.scene.meshes[NUMBER].material.subMaterials[NUMBER].alpha=0
In Backend add the SubMaterial in Texture, seperated with a dot behind the Texture:
TEXTURE.SUBMATERIAL, z. B.: 1.2
The approach in the Designer is slightly different.
Upload all files to
/datacenter/public/personalization/3d_models
Open the HTML file and add following code in footer:
<script type=”text/javascript”>
 var OnMessage = function(e){
   if (e.data.length)
   {
    var _data = jQuery.parseJSON(e.data);
    for (var j in _data.texture)
    {
        $.image = new Image();
        $.image.src = _data.image[_data.texture[j][1] - 1];
        $.image.onload = function(){
        var _rand = Math.random();
        var _time = Date.now();

        if (_data.texture[j][0].indexOf(‘.’) >= 0)
        {
            var _tmpIndex = _data.texture[j][0].
            split(‘.’);
            var x  = new BABYLON.
            Texture(‘data:image_’+_rand+’_’+_time+’jpeg’, window.scene, undefined, undefined, undefined,function(){
              window.scene.meshes[_tmpIndex[0]].material.subMaterials[_tmpIndex[1]].
              diffuseTexture = x;
            },undefined, _data.image[_data.texture[j][1] - 1]);
        }
        else
        {
          var x  = new BABYLON.
          Texture(‘data:image_’+_rand+’_’+_time+’jpeg’, window.scene, undefined, undefined, undefined,function(){
            window.scene.meshes[2].material.diffuseTexture = x;
          },undefined, _data.image[_data.texture[j][1] - 1]);
        }
      }
    }
  }
}
if (window.addEventListener) {  // all browsers except IE before version 9
  window.addEventListener (“message”, OnMessage, false);
} else {
  if (window.attachEvent) {   // IE before version 9
    window.attachEvent(“onmessage”, OnMessage);
  }
}
</script>
Add following code in header:
<script src=”https://ajax.googleapis.com/ajax/libs/jquery/2.2.0/jquery.min.js”</script>>
Open the JS-file and add:
BABYLON.SceneLoader.Load(“assets/”, “airtube.babylon”, this.engine, function(scene) {window.scene = scene; } );
Open the HTML file in a browser, go to console and enter:
window.scene.meshes
Count the r‘s and start typing from the last one:
window.scene.meshes[NUMBER]
To hide or delete a Texture type:
window.scene.meshes[NUMBER].visibility = 0
In the Magento backend switch to CloudLab > Data center > Personalization > Templates > All Templates, select the personalization template you want to edit and click Add Value under 3D Preview. In Texture enter the number of the texture and assign it to the PDF page.
In case this doesn‘t work, your Texture might be using SubMaterials. Go to Console and type in:
window.scene.meshes[NUMBER].material.subMaterials
Count the r‘s and start typing from the last one:
window.scene.meshes[NUMBER].material.subMaterials[NUMBER].alpha=0
In backend add the SubMaterial in Texture, seperated with a dot behind the Texture:
TEXTURE.SUBMATERIAL, z. B.: 1.2
Automatic 3D Preview
With our automatic 3D preview we allow to generate 3D models for flat products like business cards, flyer, banner, poster, etc. This preview can be compleatly setup in the personalization template by following these steps:
Select “Designer” as engine. The automatic 3D Preview is only supported for designer at the moment.
Select “Automatic 3D Preview” in the preview section
Select the 3D Model Type:
Flatsheet ← best for products like business cards or posters
Flatsheet Path ← if you e.g. want to sell stickers and the 3D Preview should be a star, heart, circle, etc
Folded ← best for products like flyers that will have a folding
Custom ← Custom 3D Model
If you would like to use foldings the you have to add the start and end point of each folding into the table. Important is that we only support points for the folding marks. If you created your template by using mm these values have to be converted by using this formula: value in mm * 3.779527559 * 0.75
Select the 3D Model
Folded (If folding animations should be used)
Leave empty for models without foldings
Select the shape type of your model
Rectangle ← Used for business cards, flyer, banner, etc
Path ← Used for custom path like star, heart, circle, etc.
If the 3D model should be a special path you have to add the path in 3D Shape Path. For rectangle 3D Models this setting can stay empty.
We offer a list of predefined folding animations. Select the one you would like to use. For non folding 3D models the list will be ignored. Note: Foldings cannot be added from backend. If you wish to have more folding animations please contact your project manager.
We also offer a list of materials that can be simulated for the 3D preview and be selected under 3D Material. Note: Materials cannot be added from backend. If you wish to have more materials for the 3D preview please contact your project manager.
Navigate to 3D Preview. Here you have to add a mapping between the page of the pds and the texture of the 3D model. The values can be simply 1 - 1 (if only one page is printed) and 2 - 2 if you print on both pages
Save your template and generate a preview. You should be able to see the live 3D preview in the designer including your personalization.
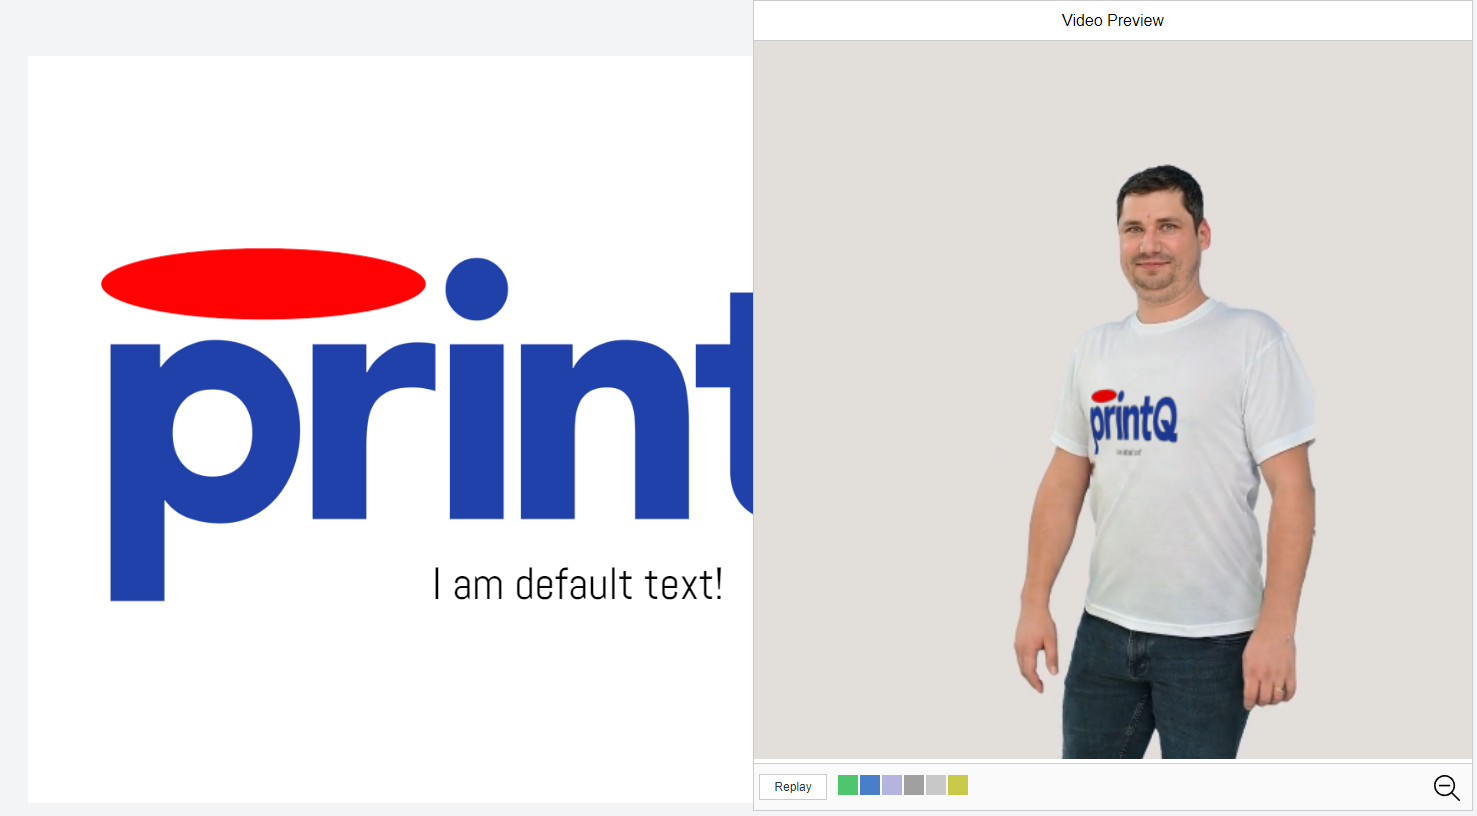
Video Preview
The video preview makes it possible to load the personalization of the customer directly into a video. Thus, for example, a personalization for a T-shirt can be shown directly on the basis of a video in which a person is moving or else.
If you are interested in using the video preview, please contact your project manager or our support. Here you will get all further information about the usage and the requirements.