X2 Collective invoice function (X2 EN)
Collective Invoice
You configure the collective invoice function under CloudLab > Settings > General > Configuration > Collective Invoice Configuration on store level (dropdown menu top left: Current configuration area) for each of your stores.
Once this feature is enabled, the Collective Invoice item will appear in the Sales menu. At the end of each month, a collective invoice is created for each store, listing all the invoices for that month and making them available for download as a PDF file. You design the PDF at the server level in the file
/html/templates/collective_invoice.phtml
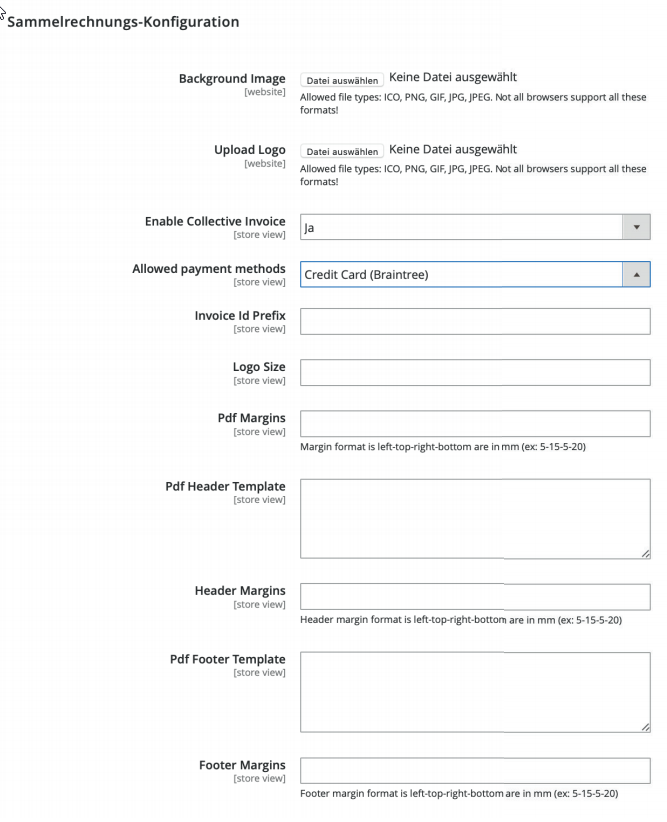
Alternatively, you can edit parts of the PDF template using the menu of the "Collective Invoice Configuration" tab. The menu provides the following options:
Background Image
Upload an image for the background of the PDF invoice here.
Upload Logo
Optionally upload a logo to be placed on the invoice.
Allowed payment methods
Here you specify the payment method for the collective invoices in the selected store (credit card, bank transfer, etc.).
Invoice Id Prefix
Specifies with which prefix the invoice numbering should start.
Logo Size
Specifies the size of the logo printed on the invoice, which can be uploaded at the top along with the background image.
Pdf Margins
Here you can set the distance to the edge of the invoice sheet in millimeters (mm). This is also optional for the header and footer margins.
Pdf Header Template
Here you can edit the header of the PDF invoice, which is formatted in HTML text.
Pdf Footer Template
Edit the HTML text formatted footer area of the PDF invoice here.
The invoice function can also be assigned to individual customers. To do this, select a customer under the Customers tab and click Account Information on the left. Then set the menu next to Enable Collective Invoice to "Yes" and click Save Customers in the upper right corner.

