Web2print settings
In Web2print settings, a CloudLab-specific sub-item when creating new articles under Catalog - Products, the most important settings for an article are made. The following sections describe how the basic options of this menu item work.
General Settings
Product type
Before changing any other settings, you will have to define the product type here. The following options are available for this:
Stock A simple stock product that can not be customized
Stock + Default PDF A simple stock product, whose specifications are listed in a PDF document that is created by default.
Personalization A product which can be personalized using the OTP Editor or Designer.
Upload This product requires for se file (PDF) to be uploaded.
Upload + Configuration This product type requires for a base file (PDF) to be uploaded. Subsequently, the product can be configured with product part options.
Personalization + Configuration A combination of personalization and configuration product.
Upload + Personalization + Configuration A combination of uploaded base file, personalization and configuration product.
Upload + Personalization + Configuration + Packaging A combination of uploaded base file and a personalization and configuration product where the parameters of a folding box are dynamic.
Upload + Full Page Configuration A combination of uploaded base file and configuration options for product pages as a whole.
Personalization + Full Page Configuration A combination of personalization product and configuration options for product pages as a whole.
Upload + Personalization + Full Page Configuration A combination of uploaded base file, personalization product and configuration options for product pages as a whole.
LFP editor (Large Format Printing) A special editor mainly used for exceptionally large and/or multi-component products.
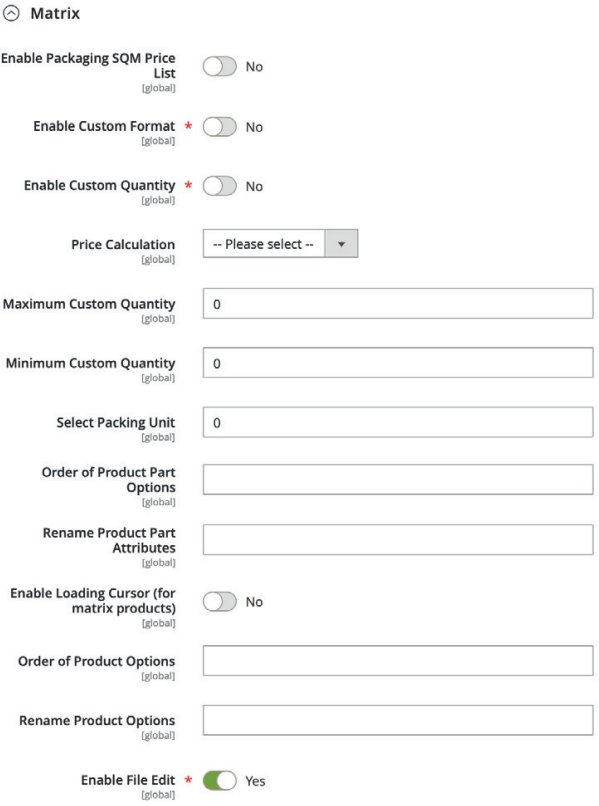
Matrix

Enable Custom Format
This is where you decide whether the customer may change the format of his product or not. If you choose “yes”, an entry field will be displayed in the shop under “Format“, in which the customer can enter the desired height and width.
Enable Custom Quantity
Here you define whether the customer can freely choose a print run or a fixed scale shall be used.
Price Calculation Select
how prices for specific customer settings are to be calculated here. In addition to the standard prices (Normal) you can use your own fixed prices (Fixed), prices calculated based on specific templates (Calculation) or fixed prices with additional costs for further services (Combined).
Maximum/minimum Custom Quantity
If above you allowed customers to freely choose their production run, these two fields are used to define a minimum and maximum allowed product run.
Select Packing Unit
The minimum value is 1.
Order of Product Part Options
If you use product part options, this is where you set the order in which you want them to be displayed. Simply use the ID numbers in the desired order and separate them by commas.
Rename Product Part Attributes
If you wish to rename product part options, enter the names according to the following scheme: „alterName: neuerName“
When renaming more than one option, separate the word pairs by commas. Below, this and the previous function are also available for Product Parts.
Enable Loading Cursor for matrix products
The mouse pointer turns into a loading animation for matrix products, when paper, color, number of pages, etc is selected. As loading times are optimized, this function is hardly ever needed, for example in systems with very complex price and deny list structures.
Personalization
Enable Confirm Checkbox
This checkbox is displayed under Personalization Products in the preview screen. The customer can not place a product in the shopping basket without ticking this box first.
Enable customer personalization data save
If the storage function for customer data is enabled, the form editor can be filled in with previously deposited customer data. Hence it is possible for a business card in frontend to automatically contain matching user data in the respective fields.

Personalization Pages
This setting applies to the form editor. Personalized pages in a multi-page document will be framed in red in order to ensure a good overview and traceability. Enter the page numbers separated by comma.
Project Personalization Default Title
If Save and continue is enabled in the system settings, projects are saved automatically. The default title is the name under which a project is saved. Allow Personalization Save/Load This function is used to save, load or open personalization projects in the customer account.
Allow/Disallow Download Pdf
“Yes” allows for the PDF file to be downloaded from the editor.
Open OTP/Designer in new page
Here you can determine whether you want the editor to open in the same browser window or a new one.
Project Personalization Default Id
The default ID is assigned by clicking Save and continue.
Project Personalization Default Description
This is the description used with Save and continue.
Project Personalization Subtitle Note
If you enter subtitle notes separated by semicolons here, they will appear in a drop-down menu, together with the name and description under Save Project in the form editor.
Watermark
Watermark
Indicate, whether you want to protect your print products with a watermark in the front view.
Show Watermark In Preview
Here you activate the watermark for the preview.
Watermark Size
The value you enter here defines the font size of the watermark text in “points”.

Watermark Text
Here you can enter for example your company name or any other desired text for the watermark.
Watermark Color
RGB-White: 255 255 255 is the maximum value, corresponding to the entry 1 1 1 (Red = 1 0 0, Blue = 0 0 1, Magenta = 1 0 1). For other colors divide the color value of each RGB channel by 255 and separate the decimals with a dot. Hence, our corporate color (R33 G64 B170) is generated through the input “0.13 0.25 0.67”.
Watermark Opacity
Assign values from 1 (=10%) to 9 (=90%) here.
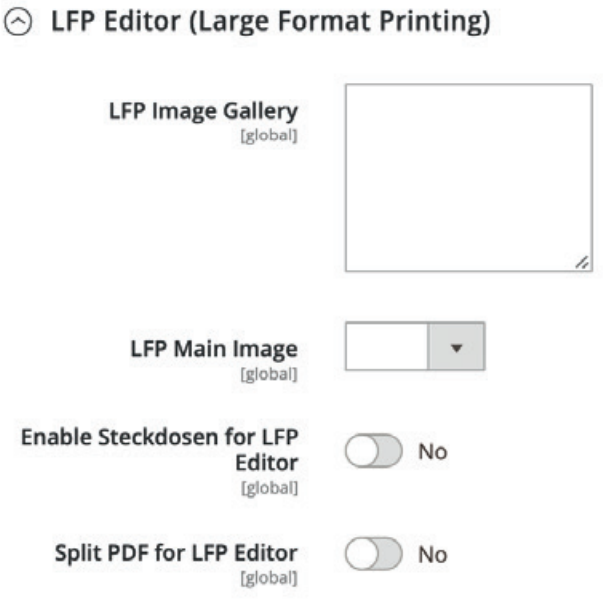
LFP editor
Enable Sockets for LFP Editor
This option and the following options will only be active if you choose “Image Editor“ further up under “Product Type”. Then you can choose here whether it should contain placeholders for power sockets (in different sizes). This is useful if you want to allow your customers to configure for example back walls of kitchen units or the like with the Image Editor.
Split PDF for LFP Editor
If the product designed with the Image Editor is very large, you can select “yes” here and the PDF print file can be split up into several parts.

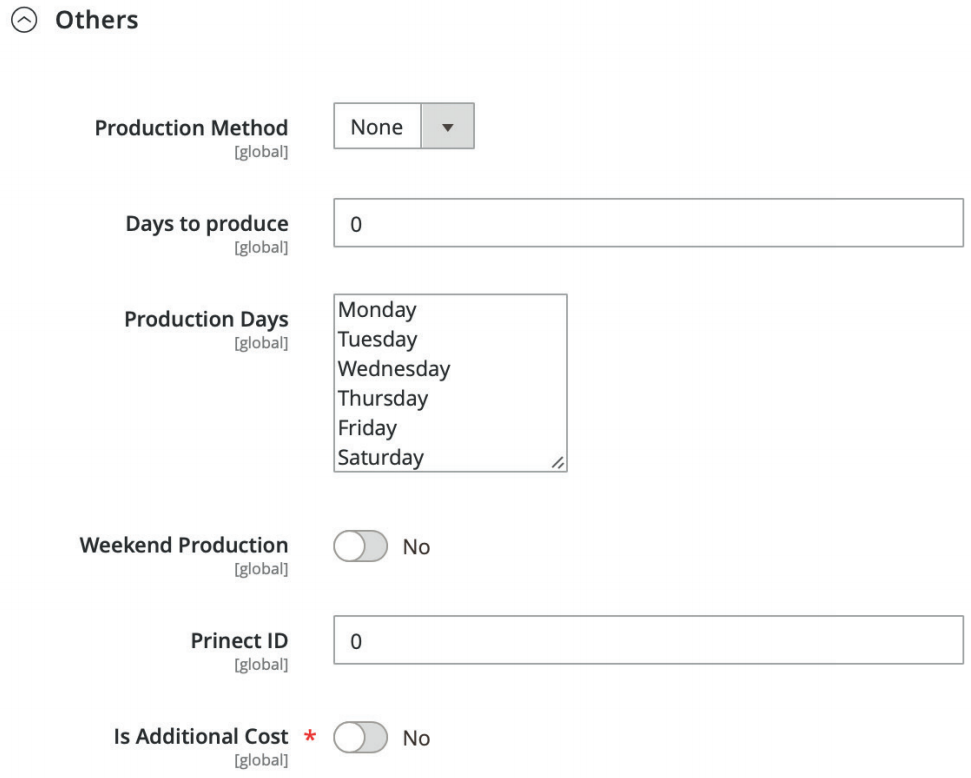
Others
Production Method
All production methods created under printQ Products are enumerated in a list. Each product can be assigned a different method.
Days To Produce
You can set separate production times for each product part.
Production Days
Depending on the print product and the machines used, production days may vary. If, for example, you produce on Mondays and Tuesdays, choose those two days here (while holding CTRL-/CMD-key). If production usually takes three days, include these in the calculation which is displayed to the customer. Example: A customer places an order on Thursday, the item goes into production on Monday and is ready by Thursday; thus, production takes seven days altogether. If the customer ordered on a Monday and the product went into production on Tuesday, it would be ready by Friday – production time would only be four days.
Weekend Production
If you do produce on weekends as well, you can specify this here.

