The External Editor
Our external editor allows customers to use all the functions of our product editor without CloudLab‘s full Magento shop system.
In fact, the external editor doesn‘t really differ from the editor implemented in Magento: It is equipped with the two editor options Designer and OTP Editor (SVG or PDF based; see page 5.2 et seq.) and responsively adjusts to any kind of device (desktop, tablet, smartphone). In the following we will quickly explain how to create and configure templates for the editor.
General Settings
Firstly, log in to the admin area of the external editor using your login data. In the left hand column you will find a list of the different functions of the editor. The first active menu item, CloudLab Configuration, contains general setting options.
Here you can enter the social credential options for the development links (Facebook, Instagram), so users can upload images straight to their editor.
Please do not make any changes to the data in the section Personalization Rest Server below. It is best not to change the JWT security key for data and links either – or, if desired, at least only change it once at the beginning of the setup of the external editor, because otherwise you may encounter problems with products and their linking later on
General Configuration Options
You can select from four basic options via the next four menu items:
Fonts
Under this menu item you can add fonts in TTF format by uploading them. Please get in touch with CloudLab Support quickly after each upload, so we can activate the respective font for you.
Colors
Here you can define colors for use in the editor. Assign a title to each color and enter the color code. You can use the formats RYB, CMYK, SPOT or SPOT_TINT. However, one RYB value is always mandatory.
Backgrounds
Upload your backgrounds here. Later during product creation, you can place them straight on the product.
Shapes
Here you can upload SVG vector shapes (ideally in version 1.1). If the use of shapes is activated for a template later on, these will be available in the editor as editing options.
Creating Products in the External Editor
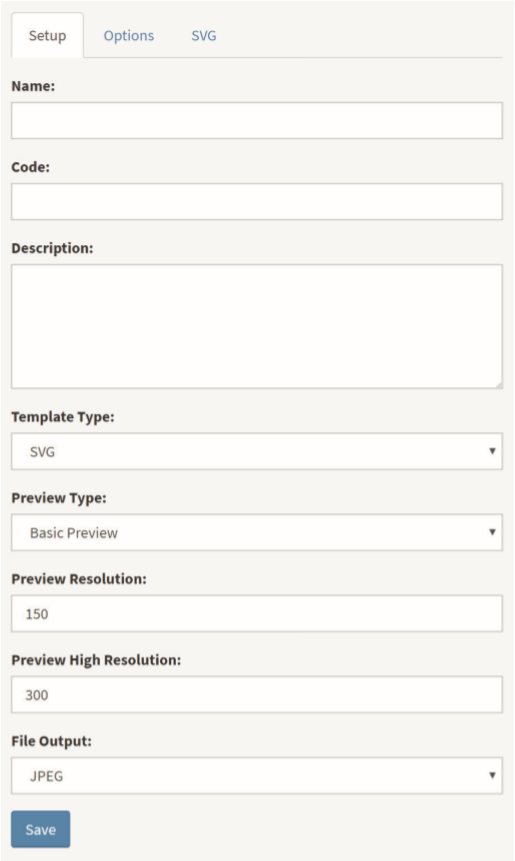
In addition to these basic settings for the editor function, of course you can also create products in the external editor. This is done using product templates. In order to generate a new template, click Templates in the left hand column. In the new window click Add New to generate a new template. Its basic data is then laid down under the menu item Setup:

Name
Enter the name of the template here. (This field is mandatory)
Code
This is where you define an identification code for the template. (This field is mandatory)
Description
Enter a template description here. (This field is mandatory)
Template Type
Here you need to choose the template type (e.g. SVG).
Preview Type
Choose between 2D and 3D preview here.
If the 3D view is activated, a new menu item will appear at the top of the page. A link to the model must be deposited there and the text mapping needs to be defined. Click Save and the view will become available. For more detailed information on the 3D preview and the programming requirements, please consult CloudLab Support.
Preview Resolution
Here you define the low resolution for the template preview.
Preview High Resolution
Here you define the high resolution for the template preview.
You should also select the file type for the final data output (JPEG, PNG, etc.).
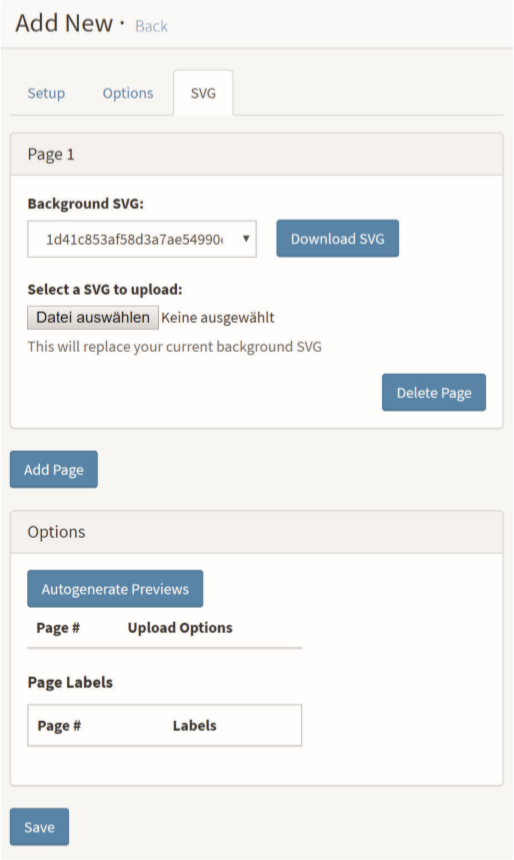
Provided that you selected the option SVG under Template Type, in the next step you can define the template properties via the menu item SVG.
Configuring SVG templates
Under Background SVG you can first select one of the previously uploaded SVG backgrounds as a background for your template.

Click Select a SVG to upload in order to select an (editable) product template. Next, click Autogenerate Preview and finally Save to upload and activate it.
Afterwards, under the menu item Options, you can determine what exactly the customer may and may not do in the editor – specifically for each template. Just like in the printQ shop, many details can be defined here during the creation of products (formatting options, zoom features, etc.), ensuring you‘ll be able to present your product in the best possible way and provide the customer with the optimum possibilities for personal editing.
In order to finally add the template in frontend you will have to create a JWT token for it. Please refer to page 9.7 of the API documentation for this.
Special Features of the External Editors
Helper
Helpers to display information which doesn‘t belong to the product itself can be created in the external editor as well.
Save/Load Project
It is also possible to enable customers to product-specifically save and later reload projects in the external editor via an ID – for example after logging in to your system. For further information on this, please contact CloudLab Support.
